REVERSIBLE WRAP SKIRT PATTERN

Cut for a gracious A-line sweep, this
pretty printed lined skirt reverses to a solid colour for double the
dressing options. Great for travel or everyday wear, this easy wrap
style design, similar to this one from Charlotte Russe, is a simple drafting project with a very forgiving fit.
You will need:- Fashion fabric A *
- Fashion fabric B *
- Fusible interfacing
- Coordinating thread
- 4 buttons, 7/8” [21.5 mm] dia., line 34
- Kraft paper
Design Tip: Select
a printed fashion fabric and choose the dominant or background colour
in the surface pattern as the solid colour match for the contrast
fashion fabric.
MEASUREMENTSWaist – measure around narrower part of torso just above the navel.
Hip – measure around fullest part of the seat, about 9” [23cm] below waistline.
Finished Hem Length – measure vertically from waistline to desired length (see chart below)
PATTERN DRAFT
 Draw a T shape with the vertical base equal to the Finished Hem Length (FHL) and the centered horizontal top equal to ¼ of the Waist measurement (W).
Measure vertically from the top of the T shape 9” [23cm] and square across. Plot ¼ of the Hip measurement (H) and center it on this line.
Draw a tangent line by joining A and B and extend it to the hemline at C on both sides of center, as illustrated.
On the tangent line, measure the Finished Hem Length from A to D. Place the set-square at D and square a line from this point, blending smoothly into the hem. Repeat on opposite side.

For the waistband, trace top portion on skirt panel, matching sides at A and B, 5 times onto additional paper. Smooth the chevrons into a gentle curve. Draw a parallel line 1 ½” [4 cm] above the tracing. At each end, square a line upward from the tracing.
Add ½” [12mm] seam allowance to skirt panel pattern and the waistband pattern. Grainline is the centerline.
CUTTING
 Cut 5 panels for each fabric. **
Cut 2 waistbands in contrast fabric.
Cut 2 interfacings for waistband.
** Note: Select fabrics in compatible weights and fiber content to allow for simple maintenance care.
ASSEMBLY
- Iron fusible interfacing to wrong side of waistband pieces following manufacturer’s directions.
- Turn under the bottom edge seam allowance on one of the waistband pieces and press flat.
- With right side facing together, align and match raw edges of the waistband and pin/baste together. Stitch up the two short ends and the top edge of the waistband. Trim corners and grade seam allowance. Turn waistband right side out and press flat. Set aside.
- Pin/baste 2 pair of panels matching at A, B, and D with right sides facing together. Sew and press seams open.
- Align and match each pair on sides of remaining panel at A, B, and D and sew together. Press seams open. Set aside.
- Repeat STEP 4 and 5 for contrasting skirt panels.
- With right side facing together, layer the set of skirt panels and align outer edges. Pin/baste and sew the perimeter edges, leaving the top un-sewn. Trim corners and press seams open. Grade seam allowances to reduce bulk.
- Turn skirt right side out and press flat. Topstitch perimeter of skirt, if desired.
- Baste upper open edge together and match raw edge of waistband to top edge of skirt. Pin/baste and sew together.
Turn all seam allowances to inside of waistband and align folded edge to machine-stitching on skirt waistline. Edge-stitch around perimeter of the waistband.
- Stitch a 1” [25 mm] buttonhole on each end of waistband. Position it ¾” [20mm] from the short end.
- Wrap the skirt around the waist to locate the placement of the buttons. At each location, sew a button on either side of the waistband (2 buttons anchored to one another) to make the skirt reversible.
- Measure the distance between the button locations to determine the location of the second set of buttonholes on the waistband. Stitch a 1″ [25mm] buttonhole.
MITERED PILLOWS
Clever use of the stripe from Foley & Cox HOME creates the illusion of mitered corners. With careful cutting and matching, a smart striped home décor fabric takes on a novel contemporary style when stitched into a mitered designer pillow. Select a favourite striped fabric and coordinate the colours with your home décor for this easy DIY project.You will need: (for each pillow)
- 54″ [137 cm]wide balanced stripe home decor fabric*
- 1 loose fiber-filled knife-edge pillow form
- matching all-purpose thread
- kraft paper
PATTERN
Measure the pillow form from seam to seam (length & width). Using a ruler and right-angled square, draw a SQUARE template following these dimensions. Divide the paper pattern into 4 equal sized triangles by drawing two straight lines from opposite corners, intersecting in the center. Cut paper into 4 pieces along lines. TRACE off onto additional paper, add a 1/2″ [12mm] seam allowance to all edges of each of the four triangles.CUTTING
The paper triangle patterns have two sides of equal length. Label the pattern with the letter X, at the center point, between these two equal sides. Label the corners on the unequal side with the letter O. With the points and corners of each triangle facing in the same direction, position the triangles on the striped fabric so each O-O line is parallel to and measures the same distance from a stripe. Mark and cut 8 identical triangles from fabric; four for pillow front and four for pillow back.
Design Note: To create the “cross” motif, align X facing in the same direction and position the triangles on the striped fabric so each O-O line is perpendicular to and centered on a stripe.ASSEMBLY
1. With right sides of fabric facing, and raw edges even, pin and stitch together one short edge of two triangles, matching stripes. Press seam open. Repeat for remaining 3 pair of triangles.2. With right sides facing, and raw edges even, pin and stitch together two triangle assemblies matching stripes and center seams. The Xs of the individual triangles will now be in the center and the Os will make up the corners of the pillow. Press seam open. Repeat for remaining pair creating a mitered pillow FRONT and mitered pillow BACK.3. With right sides of fabric facing, pin pillow front to pillow back along all edges. Sew front to back using ½” [12mm] seam allowance and leaving a wide opening at the center of one edge. Clip corners and press seams open. Turn mitered pillow cover to the right side through opening and press flat.
4. Insert pillow form into cover through opening. Pin opening closed around form and using a hand needle and thread, slip-stitch opening closed.Design Tip: Embellish the pillow edges with corded piping or a brushed fringe to change the pillow style from contemporary to traditional if desired.EYELET VEST
Featured: Chulette
Simple eyelet vest with a “peek-a-boo” attitude.
Try styling it similar to this one from Chulette; fully lined with tan colour cotton fabric to add some contrast.You will need:
- 1 ¼ yds. [1.15 m] leno-cut fabric, 45” [114 cm] wide such as eyelet.
- 1 ¼ yds. [1.15m] of matching lining, 45” [114 cm] wide such as broadcloth.
- Coordinating thread
- Kraft paper
MEASUREMENTS
Bust – measure around fullest part of chest, just under the armpit.
Waist – measure around narrowest part of torso, just above the navel.
Shoulder – measure shoulder length from ball socket to neckline.
Back width – measure across shoulder blades from armpit to armpit.
Backwaist length – measure vertically from nape of neck to waistline.
PATTERN
Cut a length of kraft paper equal to your bust measurement + 3” [75mm].
Fold the paper in half across its widest point.
Plot point A on the foldline at the top of the paper.
A-B = 2” [50mm]
B-C = backwaist length
C-D = ½ of B-C less 1” [25mm]
Square across all points at 90°
D-E = ½ of bust measurement
Square up and down from E to locate F and G.
H = midpoint of A-D.
Square across from H.
H-I = ½ of back width minus 1” [25mm].
A-J = 3 ½” [90mm].
K is located where lines squared from B and J intersect.
Draw a shallow arc at K to join B to J as shown.
L is half of D-E.
Square up and down from L to locate M and N.
F-O = 3 ½” [90mm].
E-P = 3” [75mm].
Q is located where lines squatted from O and P intersect.
Draw a deep arc at Q to join O and P as shown.
M-R = J-K + ½” [12 mm].
Draw a straight line from J and O to R.
J-S = 2/3 of shoulder measurement.
O-T = 2/3 of shoulder measurement.
Join S-I-L with a smooth curve as shown.
Trace this curve on the front portion between L and T.
G-U = 3 ½” [90mm].
G-V = 3 ½” [90 mm].
Draw a smooth arc at G connect U and V as shown.
C-W = 1” [25mm].
Square a line across from W.
N-X = ½” [12 mm].
X-Y = 1” [25 mm].
X-Z = 1” [25 mm].
Join points W-Y and V-Z with a smooth line.
Join points Y and Z to L with a straight line.
Add seam allowances to perimeter of pattern pieces except armhole.
Cut out pattern with paper on the fold.
Grainlines are parallel to CB and CF of pattern.
CUTTING
Cut 2 bias strips 2 ½” wide [65mm] in lining fabric.
Cut front 2X self
Cut back 1X self
Cut front lining 2X lining
Cut back lining 1X lining.
ASSEMBLY
- With right sides together (RST), match up vest fronts to vest back and pin/baste side seams and shoulder seams. Stitch seams and press open.
- Repeat Step 1 for vest lining.
- With RST, align and match vest to lining around outer edges. Pin/baste in place. Stitch around the perimeter of the garment. Trim and grade seam allowance close to stitching. Turn vest right side out through armhole.
- Press seam flat around outer edge of vest. (Use a press cloth as not to mar fabric).
- Align and match up armhole opening. Baste both layers of fabric together.
- Bind each armhole with bias strip. To do this, fold the bias strip in half lengthwise (wrong sides together) and press foldline (use an up & down motion). Place the raw edges of the bias strip along the armhole on the face side of the vest. Stitch around the armhole using a 3/8” [1 cm] seam allowance. Turn under the short ends to neaten and complete.
- Fold the bias binding over the seam allowance in the armholes and align the folded edge to the machine-stitching. Slipstitch binding to lining.
FATHER & SON TIES
Featured: Silk ties by Terrence Dobbs
Make Dad your own specially-designed tie for Father’s Day.Fresh from the Hamptons, Terrence Dobbs will inspire you with his ‘Father & Son’ ties.You will need:
- 1 square yard [meter] of fashion fabric (try something silky)
- coordinating thread
- kraft paper
This tie is drafted by height.The four major parts of the necktie draft equation are the length of the tie from the big tip to the knot, the knot itself, the tie around the neck, and finally the tail end of the tie that is hidden behind the front of the tie. The length should be reasonable so that when one tip is touching the belt buckle, the other tip can be securely held in place in the carrier on the back side.Height = measure vertically from top of head to heels.
Neck measurement = measure around base of neck.
Tie Width = 3.5 – 4 inches [9-10 cm] (it can vary on current fashion)
Tie Knot = 5 inch allowance [12.5 cm] (Half-Windsor type)
Take a length of kraft paper and fold it lengthwise. (You may glue 2 pieces together if needed).
Along the fold, plot the following:
A-B = 0.30 of the height
B-C = neck measurement + ½” [12mm]
C-D = knot allowance
D-E = 0.30 of the height – 3” [75mm]
Square 90° across from foldline at all points.
F-C = 0.75 of tie width
G-C = C-F
Join F and G with a straight line.
H is mid-point of F-G.
I-C = C-D
J-I = C-F
K-A = tie width; square up.
L-K = K-A
M-L = K-A
Join M to J with a straight line.
Join L to H with a straight line.
Using a set square placed on line L-H, square a line from A to locate N on line M-J.
Join L-A and L-N with a straight line.
O-E = 0.50 of the tie width
O-P = E-O
P-Q = E-O
Join Q and F with a straight line.
Join P and H with a straight line.
Using a set square placed on line P-H, square a line from E to locate R on line Q-F.
Join P-E and P-R with a straight line.
Join F to J with a straight line.
At B and D, draw a 1” x 1” square [25mm X 25mm] with one of its sides positioned on the foldline.
Add 3/8” [1cm] seam allowance around the perimeter of the tie pattern.
Cut out the tie pattern and open the folded paper.
Extend line F-G across the pattern piece. Cut through line F-G.
Draw a grainline through opposite corners of the square box at B and D.
CUTTING
Cut 1X self for upper portion of tie.
Cut 1X self for under portion of tie.
Cut 1X self for carrier – 6” X 2 ½” [150 mm X 65mm]
Tip: A rotary cutter is ideal for cutting fabric on bias grain.
ASSEMBLY
1. Make a carrier loop 6 inches by 1 ½ inches [150mm X 40mm].2. With right sides facing, align and match upper and under portions of tie together at center seam. Pin/baste and stitch seam using a ¼” [5mm] seam allowance. Press seam open.3. With right sides facing, align and match each tie end along raw edges. Pin/baste and sew each tie point using a 3/8” [1cm] seam allowance. Press seam open. Grade and trim points. Turn tie right side out.Tip: A wooden chopstick lets you get into tight corners when pressing a seam open.4. Fold the tie fabric with wrong sides together; align and match raw edges along length of tie. Baste both layers together.This tie is self-lined. Select which side of the tie will be the face side.5. Fold the tie carrier in half to form a loop and secure it 10” [25.5cm] from the front tip on the face side of the tie. Sew it to the seam allowance.6. With the tie face down, fold the basted raw edge 3/8” [1cm] over the center of the tie along its length. Herringbone stitch along the raw edge catching only the top layers of fabric.Tip: Use waxed thread and a new needle whenever doing hand-stitching.7. Place the folded edge over the basted raw edges and align to center (careful not to stretch fabric). Slipstitch along folded edge, catching only the top layer of fabric to complete the tie.8. Without touching the fabric, gently steam the tie shape. Let fabric cool before handling. (Do not press the tie.)PET BED
Posted by Don under do-it-yourself | Tags: creativity, DIY, patterndrafting, pet, sewing |
[6] CommentsFeatured: Imperial Dog Palace from Victoria Trading Co.
Creature comforts for the one who leaves no doubt who rules the roost.
You will need:
- Approx. 1 yd. [0.9 m] of upholstery fabric, 54”[138 cm] wide
- Approx. 1 yd [0.9 m] of ticking, 54” [138 cm] wide
- 1 closed-end zipper, 26”[66cm] long
- Coordinating thread
- 1 ½ yds. [1.2m] to 2 yds. [1.8 m] upholstery felt (kapok), 24” [61cm] wide
- Kraft paper
PATTERN
Seam allowance is includedCUTTING
Cut 1X in upholstery fabric and ticking.
ASSEMBLY
Note: Construction of the pet bed is the same for both the exterior cover and the padded cushion with the exception that the ticking will receive the kapok stuffing and the upholstery fabric with have an inserted zipper.- On both short ends between X and O, turn under ½” [12mm] and press flat.
For the exterior cover, center the zipper between X and O and align the foldline along the zipper teeth. Pin/baste zipper in place and topstitch fabric to zipper tape.
- Fold fabric with right sides together (RST), and repeat to other side of zipper. Note: If the zipper is shorter than folded edge, center zipper placement and stitch up seam at both ends of zipper.
- For kapok cushion, fold ticking with right sides together (RST). Stitch 1 ½” [40 mm] seam at X and repeat at O. Topstitch folded edges between X and O.
- With ticking RST, align and match side seams. Pin/baste and sew side seams using ½” [12mm] seam allowances. Press seam open.
-
Fold each notched corner and align and match the raw edges to form a miter. Pin/baste and sew seam at each corner.
- Turn the ticking right side out.
- Layer the upholstery felt in a high loft slightly larger in dimension to the ticking. Stuff the layers inside the cushion and slipstitch the opening closed.
- Repeat Steps 5 to 7 for the exterior cover. (Remember to open the zipper so you can turn the cover right side out.)
- Insert the kapok cushion into the exterior cover.
THE CHEMISE SUNDRESS
Featured: Simplicity
The button-front “chemise” sundress— the quintessential of summer attire – is easy to wear, unrestrictive and yet not without that “sophisticated look”. This summer, you’ll find the sundresses will be both elegant and appealing. And I am sure that because of its easy patterndraft, this lovely addition to your summer wardrobe will inspire you with your favourite fashion fabric.You will need:- 1 ½ yds. [1.5 m] of Fashion fabric, 60” [150 cm]wide
- 1 ¼ yds. [1.2 m] of Fusible interfacing 24” [60 cm] wide
- 12 buttons, 7/8” [22 mm] dia., line 34
- Coordinating thread
- Kraft paper
MEASUREMENTSBust – measure around fullest part of chest, just under the arms.Hips – measure around fullest part of seat, about 8” [20 cm] below waistline.Back waist length – measure distance from nape of neck to waistlinePATTERN
A-B = back waist lengthB-C = 2 times back waist length (or desired finished length**)B-D = 4” [10cm]Square across all points.D-E = 1/2 of hip or bust measurement (whichever is the greater)Square up and down from E to locate G, H.I = half distance of A to B.Square across to locate J.I-K = 2” [5cm]; square across to locate L.J-M = 3” [7.5 cm]N = half distance of I to J.Square down from N to locate O, P, and R.N-Q = 1” [2.5 cm]; I-S = 1” [2.5 cm]; join M to Q.T = half distance of B to P.Square up and down from T to locate U and V.L-W = 3” [7.5 cm]H-X = 3” [7.5 cm]Join W and X with a straight line.Measure 1” [2.5 cm] on either side of P. Shape sideseam by joining Q and R with a smooth curve passing through the points on either side of P.Measure ½” [12 mm] either side of T. Make a shaping dart by joining U and V with a smooth curve passing through the points on either side of T. (optional)PINTUCKSTrace out A-G-K-L.Add ½” [12mm] at K and L. Join new points with a straight line.Divide rectangle horizontally with 1 ½” [4 cm] intervals (3 in total) to create the pintucks.Each pintuck is ½” [12 mm] wide with 1” [25 mm] spacing. (see diagram)Trace out on fold S-Q-R-O-C for the dress back.Trace out J-N-O-R-Q-M for the dress front.Trace out L-W-X-N for the front placket.Trace out on fold K-L-J-I for the dress facing.Add ½” [12 mm] seam allowances to all pattern pieces.Add 1 ¼” [ 32 mm] hem allowance to dress back and fronts.**Design Note: This patterndraft can be shorten to waistline for a smart summer camisole.
CUTTINGCut BACK 1X self on fold
Cut FRONTS 2X selfCut FACING 1X self on fold; 1X interfacing on foldCut PLACKET 2X self; 2X interfacing.Cut PINTUCKS 1X self on foldCut 2 SHOULDER STRAPS = 16” long X 1” wide[40 cm x 2.5 cm]ASSEMBLY- Make 2 shoulder straps ¼” [6mm] wide.
- Iron fusible interfacing to wrong side of dress facing and both placket pieces, following manufacturer’s directions.
- Make the pintuck border. Beginning at the top edge, turn under 1 ½” [4cm] and press. Stitch ½” [12 mm] parallel to folded edge. From stitching, turn under 1” [25mm] and press. Stitch ½” [12mm] parallel to pressed edge. From stitching, turn under 1” [25 mm] and press. Set aside.
- Stitch the suppression darts on the back piece. (optional)
- Stitch fronts to back along side seams. Press seam open.
- Align and match bottom edge of pintuck border to top edge of dress. Pin/baste with right sides facing together. Machine stitch. Grade seam allowance and press upward.
- From face side, baste along seamline (while tucking in the seam allowance) to complete last pintuck. From last pressed fold, stitch ½” [12 mm] parallel to seamline.
- Press all pintucks downward on the face side of the dress.
- Set shoulder straps in place on front and back. Baste to top edge of border.
- Align and match dress facing to top edge of dress ensuring the straps are caught in the seam. Pin/baste in place. Machine stitch the seam. Grade seam allowance and press to one side. Understitch facing. Finish bottom of facing by turning under ¼” [6 mm] then topstitching. Turn facing to inside of dress.
- With right side of placket to wrong side of dress fronts, pin/baste placket to each front (allowing for seam allowance at top and hem). Stitch seam and press to one side.
- On opposite side of placket, turn under seam allowance and press flat. Fold the short ends of the placket back on itself and stitch across top and bottom. Trim corners, then turn plackets right side out. Align the pressed edge to the row of machine stitching and topstitch closed.
- On the right front placket, divide the length equally for 12 1-inch [2.5 cm] vertical buttonholes spaced 3 inches [7.5 cm] apart from the top. Position the first buttonhole 1″ [2.5cm] from the top of the dress front opening.
- On the left front placket, sew on the buttons.
CLOCHE HAT
Featured: Cloche hat from Banana Republic
A buckled cloche for Spring. Easy-peasy and pretty!
You will need:
- Graph paper
- approx. 1 yd. of fusible interfacing, 45″ wide
- approx. 1 yd. of bottom-weight or upholstery fashion fabric, 54″-60″ wide
- approx. 1/2 yd. of lining fabric, 45″ wide
- approx. 3/4 yd. of grosgrain ribbon, 2″ wide
- 1 belt buckle, 1 ½” wide
- coordinating thread


This hat draft is a medium size for a head circumference of approximately 23” [58.5cm].
PATTERN

Grid: 1 square = 1 inch [25 mm]
Add ½ inch seam allowances to all pattern pieces.
Trace out and cut pattern shapes on fold of graph paper.
CUTTING
Cut the crown side 2X; lining 2X ; interfacing 2X
Cut the crown top 1X; lining 1X; interfacing 1X
Cut the brim 2X; interfacing 1X
Cut the belt strap 2X; interfacing 1X
Cut the sweatband (grosgrain ribbon) 24” long X 2″ wide.
ASSEMBLY
1. Iron fusible
interfacing to wrong side of each crown piece and to one of each of the
brim and strap pairs, following manufacturer’s directions.
2. On each brim piece, pin and baste CB seam with right side together. Stitch seam using a ½” seam allowance and press open.
3. Layer the 2 brim pieces with right sides facing together and align the CB seams. Pin/baste outer edges together. Sew around the perimeter of the brim.
4. Grade and trim the seam allowance and turn brim right side out. Press outer edge flat.
TIP: Due to fabric thickness, it is important to grade the seam allowances as you sew. The bulk will reduce the headfitting measurement. You may also take less of the seam allowance to account for the bulk.
5. Topstitch outer edge of brim. (I use the width of the presser foot as a spacer.) The more stitching you put, the stiffer the brim. Set aside.
6. Layer the belt strap pieces with right sides facing together. Align and match up raw edges and pin/baste together. Machine-stitch across one short end and along the 2 long edges. Grade and trim seam allowances and turn strap right side out. Press outer edges flat. Topstitch around perimeter of the strap. Set aside.
7. Pin/baste the side pieces to the top section, with right sides facing together. Ease the straight edges into the curved ones. Machine-stitch the 2 side seams of the crown portion. Press the seam open. (You may need to clip the seam allowance to get it to lie flat.) Turn the crown right side out.
8. Repeat the same method for the hat lining. Insert the lining into the hat crown with wrong sides facing together. Baste lining to crown around the circumference of the crown.
9. Align the CF and CB and the Xs of the crown and the brim. Match up these points, pin and basting with right sides together. Machine stitch the crown section to the brim, using a ½” seam allowance.
10. Sew in grosgrain ribbon as a “sweatband”. This should equal the head fitting measurement. Lay the ribbon on top of the seam allowance along the top of the brim and edge stitch along the ribbon edge. Overlap at CB. Grade and trim the seam allowance . Turn the ribbon up into the crown to conceal the raw edge of the seam allowance and tack to CB of hat with hand stitching.
11. On the left side of the hat exterior above the seamline of the brim, handstitch the open end of the belt strap to the center of the crown side piece using a narrow seam allowance. (Do this with the belt strap pointing to the front of the hat.) Fold the strap back onto itself and slip on the buckle. Wrap the strap around the hat’s crown and slip loose end into the buckle. (Add punched eyelets if you are using a pronged belt buckle).
 This pattern is drafted by height.
 Dress Back – cut 1X self on fold


 Fuse
fleece interfacing to back of fashion fabric using transfer web before
cutting out bag front & back and bag tab. Follow manufacturer’s
direction for application.
Fuse
fleece interfacing to back of fashion fabric using transfer web before
cutting out bag front & back and bag tab. Follow manufacturer’s
direction for application.
This pattern is drafted by height. The body proportion is made up of 8 heads.
Your height divided by 8.

BODY:
Make a perfect square equal to ½ of the shoulder width measurement.
 Use a set-square to draw a 90 degree angle on the Kraft paper.
Set up a grid using the square as shown: A,B,C
Point O is 4″ from top right corner on square C.
Point Z is midpoint of right side on square C.
Join points O and Z with a curved line as shown in draft.
Point ■ is midpoint of upper square B.
Point X is located at left top corner of square C.
Points ■ (red) are located 2″ [5cm] from point X.
Fold new sheet of kraft paper into quarters.
Place left bottom corner of square A on folded corner of paper.
Trace out solid line outline of squares A-B-C.
This is the back and sleeve portion of the capelet.
Fold a second sheet of kraft paper in half width-wise.
Place bottom of square C on fold of paper.
Trace out solid line outline of square C.
This is the front piece of the capelet.
NOTE: Add seam allowance around perimeter of pattern pieces. (thick solid line)
Cut out pattern pieces while paper is still folded.
COLLAR:
Use a set-square to draw a 90 degree angle on the Kraft paper.
Set up a grid using the square as shown:
1st row: A,B,C,D
2nd row: E,F,G,H
Find the vertical midpoint of squares D and H. Join with a straight line.
Point + is midpoint of upper square C and lower square G
Add seam allowance to perimeter and cut out pattern piece. This is the collar.
Draw a rectangle 24″ x 2″ [61cm x 5cm]. This is the neck band.
Draw a rectangle 15″ x 5″ [38cm x 12.5cm]. Divide into 3 equal parts. These are carriers.
Add seam allowance to perimeter of neckband and carriers. Cut out pattern pieces.
CUTTING
Capelet Back and Sleeves – cut 1X self
Capelet Fronts – cut 2X self
Capelet Neckband – cut 2X self
Capelet Collar – cut 1X self
Carriers – cut 3X self
 Back and Sleeve Insulation – cut 1X batting
Front Insulation – cut 2X batting
Neckband Insulation – cut 1X batting
Collar Insulation - cut 1X batting
ASSEMBLY
A beauty in this double-breasted shawl-collared waistcoat from Moloh.
You will need:
Bust – measure under arms over fullest part of chest.
Waist – measure around narrowest part of torso at the navel.
High hip – measure around pelvis approx. 4″ [10 cm] below natural waist.
Back waist length – measure from nape of neck to natural waist.
Armhole depth – measure drop from shoulder to armpit level.
Shoulder – measure length of shoulder.
Back width – measure across shoulder blades from armhole to armhole.
Neck size - measure around base of neck.
Dart Width Opening – 2 ¾” [7cm].
PATTERN
 Square down from 0; square halfway across the paper.
0-1 = 5/8″ [1.5 cm].
1-2 = armhole depth + 3/16″ [0.5 cm]; square across.
2-3 = half of bust + 2″ [5 cm].
Square up and down; label this line centerfront [CF].
3-4 = 0-2
Square across from 4.
1-5 = back waist length; square across to 6.
5-7 = 4″ [10 cm], square across to centerfront line. Label point 8. (this gives ½ the high hip measurement plus 1″ [2.5 cm] ease).
Back
0-9 = 1/5 of neck minus 1/16″ [0.2 cm]; draw in back neck curve 1-9.
1-10 = 1/5 armhole depth minus ¼” [0.7 cm]; square halfway across the paper.
9-11 = shoulder length minus 1″ [2.5 cm]; draw back shoulder line to touch the line from 10.
12 is center of the shoulder line.
12-13 Draw a dart 2″ [5cm] long and 3/8″ [1 cm] wide perpendicular to shoulder line.
2-14 = ½ back width + 3/16″ [0.5 cm] ease; square up to 15.
14-16 = half the measurement of 14-15.
17 is midway between 2 and 14; square down with a dotted line to point 18 on waistline and point 19 on hemline.
Front
4-20 = 1/5 neck minus ¼” [0.7 cm].
4-21 = 1/5 neck minus 1/16″ [0.2 cm].
3-22 = 1/2 of back width measurement minus 3/4″ [2 cm] + half width of dart opening; square up.
3-23 = ½ of distance 3-22; square down with a dotted line to point 24 on waistline and point 25 on hemline.
26 is the bust point approx. 1″ [2.5 cm] down from 23; draw a line joining 20-26.
20-27 = dart opening; draw a line joining 26-27.
11-28 = 5/8″ [1.5 cm]; square out approx. 4″ [10 cm] to 29.
27-30 Draw a line from 27, equal to the back shoulder to touch on line from 28 to 29.
22-31 = 1/3 the measurement 3-21.
32 is midway between 14 and 22; square down with a dotted line to point 33 on the waistline and point 34 on the hemline.
Draw armhole as shown passing through points 11, 16, 32, 31, and 30.
When shoulder seams are joined it is essential that the armhole is a smooth curve.
3-35 = 3-23; square up to locate point 36 on line from 21 and square down to locate point 37 on line from 8. This is the double-breasted closure.
37-38 = ½” [1.25cm].
38-39 = ½” [1.25 cm].
Join 35 and 39 with a straight line.
The waistcoat requires a front drop from 7 to 39; join with a gentle curved line to complete the hemline.
Take a tracing of the back neck curve 1-9 and flip the shape over.
Place point 9 of back neck curve on point 20 on front neck.
 20-40 = 1-9.
40-41 = 3 ½” [9 cm]; this is the CB of the collar.
Complete the roll collar by drawing a parallel line to the neckline of the collar from 41 and gently curving into point 36 as shown.
Shaping the waist of the waistcoat requires half the waist measurement plus 1-3/16″ [3 cm] ease. This means 4 ¾” [12 cm] shaping. Shape waist suppression on the dotted lines; 1-3/8″ [3.5 cm] at back dart, 1-5/8″ [4 cm] at side seam, and 1 ¾” [4.5 cm] at front dart.
 Close the bust dart by slashing the dotted line up to point 26 and match point 27 to 20.
Mark 9 button placements evenly on either side of centerfront line for a double-breasted closure.
Front Facing
Trace off the vest draft. To make the front facing piece, separate the collar and front edge of the vest through points 25-26-20-40-41-36-35-39. The remaining pattern pieces will be used for the lining pattern.
NOTE: Add seam allowance to all pattern pieces.
CUTTING
Vest Front – cut 2X self
Vest Back – cut 1X self on fold
Vest Collar & Facing – cut 2X self
Vest Front Lining – cut 2X lining
Vest Back Lining – cut 1X lining on fold
Vest Interfacing – cut 2X fusible
ASSEMBLY
A unique and eye-catching haberdashery “vest-style” belt to make.
You will need:

1 square = 1 inch [2.5 cm]
Note: Add seam allowance.
Lengthen/shorten the waistline of the belt at CB fold.
CUTTING
 Belt – cut 2X on fold
Belt Interfacing – cut 1X on fold
Welt – cut 1X
Welt Facing – cut 1X
ASSEMBLY
 Dimensions are given in inches (imperial). **
NOTE: Length and width measurements may be adjusted by slashing through the RED lines and increasing or decreasing the amount needed in proportion.
** Add seam allowances to all pattern pieces.
CUTTING
 Cut each pattern piece 2X in fashion fabric.
Cut each pattern piece 1X in fusible interfacing.
(flip pattern)
Cut each pocket piece 2X in pocketing.
Cut interfacing 1″ X 11″ [2.5cm X 28 cm] for each zipper opening.
Cut 1 Velcro hook side – 7″ [18 cm] long.
Cut 3 Velcro loop side – 3″ [7.5 cm] long.
ASSEMBLY

Bust – measure under the arms around the fullest part of chest.
Back waist length - measure from nape of neck to waistline.
Shoulder width – measure across back from shoulder to shoulder.
PATTERN
 Yoke:
Yoke:
Fold kraft paper into quarters, aligning the foldline.
From the folded corner, measure ½ of shoulder width plus ½” [1.25 cm] across the paper.
From the folded corner, measure ½ of shoulder width minus 1″ [2.5cm] down the paper.
From the folded corner, draw a 45° line between the 2 foldlines.
Plot a point on the line equaling ½ of shoulder width. Label point, X.
Join these 3 points with a smooth curve.
Draw a second line 4″ [10 cm] parallel to the curved line within the curve to complete the yoke.
Add ½” [1.25 cm] seam allowances to neckline and yokeline.
Cut the shape from the folded paper.
Body:
Square 2 lines across and down the paper.
The length of the body equals the back waist length plus 1″ [2.5 cm] hem.
Label the length, CENTER FOLD.
The width of the body equals ½ of the bust measurement.
Square from these points to complete the body pattern.
On the side seam, measure 5″ [13 cm] from the hem. Label this point, O.
Point X is located at the top of the sideseam.
Add ½”[1.25 cm] seam allowance to top edge and side seam.
Sleeve:
Fold kraft paper in half and square a line from the foldline.
Plot a point on the line equal to the distance from X to O on the body section.
Label this point, X and label the foldline, O on the sleeve section.
Square a line from X.
Plot a point on this line from X and along the foldline from O equal to ½ the bust measurement.
Join the 2 points with a straight line. Add a 1-inch [2.5 cm] hem to complete the sleeve.
Add ½” [1.25 cm] seam allowances to top edge and side seam.
Cut the sleeve shape from the folded paper.
CUTTING
 Yoke – Cut 2X self.
Yoke Interfacing – Cut 1X fusible.
Body – Cut 2X self on fold.
Sleeve – Cut 2X self.
ASSEMBLY
Bias-cut one-shouldered tunic is fashioned with a single batwing sleeve and angled hemline .
You will need:
MEASUREMENT
This pattern is drafted by height. The body proportion is made up of 8 heads.
Your height divided by 8.
eg. for a person 5 foot 4 inches: 64″/8 = 8 or 163/8 = 20.4
1 head amount = 8 inches or 20.4 cm.
PATTERN
 Make a perfect square equal to 1 head amount.
Use a set-square to draw a 90 degree angle on the Kraft paper.
Set up a grid using the square as shown:
1st row : A,B,C
2nd row: D, E
3rd row: F, G
4th row: – , H
Point 1 is left midpoint on square D.
Point 2 is bottom left corner of square F.
Point 3 is top midpoint on square B.
Point 4 is top right corner of square C.
Join points 1 and 3 and join points 2 and 4, with a straight line.
Point 5 is bottom right corner of square H.
Point 6 is right midpoint of square C.
Join points 5 and 6 with a straight line.
Point 7 is intersection point of lines.
Draw a ½-inch [1.25 cm] facing parallel to lines 1-3, 4-6, and 5-7.
Line 2-4 is the grainline.
NOTE: Add seam allowance around perimeter of pattern piece. (thick solid line)
CUTTING
Cut 2X self. Note: Flip pattern to cut back section.
ASSEMBLY
 Fold kraft paper in half lengthwise and open it flat.
DESIGNER EASE

 Classic
five pocket cool, with an always-in-style timeless wash denim and the
most comfortable fit ever. It’s no wonder you reach for your
made-to-measure jeans again and again.
MEASUREMENTS
Classic
five pocket cool, with an always-in-style timeless wash denim and the
most comfortable fit ever. It’s no wonder you reach for your
made-to-measure jeans again and again.
MEASUREMENTS
Waist – measure narrowest part of torso at navel level.
Seat – measure around fullest part of hips approximately 8″[20 cm] below the waist.
Body Rise - measure drop from waistline to crotch level.
Outseam – measure distance from waistline to floor.
Bottom width – desired width of jean leg bottoms (minimum amount must allow for measurement of foot around the heel).

 To Complete Jean Front
6. Layer the belt strap pieces with right sides facing together. Align and match up raw edges and pin/baste together. Machine-stitch across one short end and along the 2 long edges. Grade and trim seam allowances and turn strap right side out. Press outer edges flat. Topstitch around perimeter of the strap. Set aside.
7. Pin/baste the side pieces to the top section, with right sides facing together. Ease the straight edges into the curved ones. Machine-stitch the 2 side seams of the crown portion. Press the seam open. (You may need to clip the seam allowance to get it to lie flat.) Turn the crown right side out.
8. Repeat the same method for the hat lining. Insert the lining into the hat crown with wrong sides facing together. Baste lining to crown around the circumference of the crown.
9. Align the CF and CB and the Xs of the crown and the brim. Match up these points, pin and basting with right sides together. Machine stitch the crown section to the brim, using a ½” seam allowance.
10. Sew in grosgrain ribbon as a “sweatband”. This should equal the head fitting measurement. Lay the ribbon on top of the seam allowance along the top of the brim and edge stitch along the ribbon edge. Overlap at CB. Grade and trim the seam allowance . Turn the ribbon up into the crown to conceal the raw edge of the seam allowance and tack to CB of hat with hand stitching.
11. On the left side of the hat exterior above the seamline of the brim, handstitch the open end of the belt strap to the center of the crown side piece using a narrow seam allowance. (Do this with the belt strap pointing to the front of the hat.) Fold the strap back onto itself and slip on the buckle. Wrap the strap around the hat’s crown and slip loose end into the buckle. (Add punched eyelets if you are using a pronged belt buckle).
ISLAND FLOUNCER
 Courtesy: Vogue
A flirty flouncer has that button-to-hem flippancy and shows lots of sun-kissed shoulder.
A very easy sundress draft to get you in that tantalizing “island-in-the-sun” attitude.
You will need:
- Approx. 2 – 2 ¼ yds [1.8 - 2m] of fashion fabric, 45″ [114 cm] wide
- 2.5 yds. [2.3 m] of pre-cut interfacing, 1″ [2.5 cm] wide
- 1 pkg. of single fold bias tape, ½” [12.5 mm] wide
- 1 yd of elastic, 3/8″ [10 mm] wide
- 8 buttons, line 20; ½” [12.5 mm] diameter
- Coordinating thread
- Kraft paper
MEASUREMENTS
Bust = measure around the fullest part of chest just under the arms.
Hip = measure around the fullest part of the seat about 9″ [23 cm] below the natural waist.
Back waist length = distance from nape of neck to natural waistline.
PATTERN
This pattern is drafted by height.
Make a SQUARE template with length and width equal to your Back Waist Length.
On the kraft paper, square lines from X at 90 degrees.
The line squared down from X is the length. It equals the centerline. (dress length)
Along the length line of the paper, set up A-B-C as shown.
Across the width line of the paper, set up C-D-E-F as shown.
1. On square A, divide the length into 3 equal parts.
Add 1 inch [25 mm] at the first division by marking a parallel line above the division line.
Subtract the difference between your hips and bust measurements on this new line, opposite the centerline.
Join this point to the bottom corner of square B with a straight line.
Cut pattern piece A-B out.*
This is the pattern piece for the front and back of the dress.
2. Save remaining piece of square A for O.*
This is the pattern piece for the shoulder straps.
3. Parallel to the centerline, draft K piece from X and make it 2 inches [50 mm] wide.
Cut pattern piece K out.*
This is the pattern piece for the front button placket.
4. Along the top edge of C-D-E-F, add 1 inch [25 mm] by marking a parallel line above the squares.
Along the bottom edge of C-D-E-F, add ½ inch [12.5 mm] by marking a parallel line below the squares.
Label centerline on square C.
Cut out pattern piece C-D-E-F.*
This is the pattern piece for the flounce of the dress.
* Note: Add seam allowances to pattern pieces.
Grainline is parallel to centerline.
CUTTING
Dress Back – cut 1X self on fold
Dress Fronts – cut 1X self on fold
Button Placket – cut 2X self
Shoulder Straps – cut 2X self
Flounce – cut 2X self
Interfacing – cut 2 strips equal to dress length
ASSEMBLY
- For the shoulder straps, fold each O piece lengthwise with right sides together (RST).
- Stitch along the long edge. Press seam open.
- Stitch across one short end. Grade and clip corners. Turn strap right side out. Press flat.
- Make 2 shoulder straps. Set aside.
- For flounce, cut one of the two fabric pieces in half. Align and match each short piece to either side of the long piece with RST at the short ends. Pin/baste and sew the seams. Press seams open. Finish the raw seam edge (I used pinking shears).
- Hem the bottom edge of the flounce by turning under ¼” [0.7 mm] and then ¼” [0.7mm] again. Press turnings. Machine stitch in place.
- Then, turn upper edge down 1 inch [25 mm] to make a heading for the flounce, and baste. Gather fabric along the basting. Set aside.
- For the dress fronts, cut one folded fabric piece in half. Align and match each front piece to either side of the back piece with RST at the side seams. Pin/baste and sew the seams. Press seams open. Finish the raw seam edge (I used pinking shears).
Turn upper edge of dress down 1 inch to make a gathered ruffle, and baste. Apply the bias fold tape on top of the raw edge of the turned dress edge. At this time, place one shoulder strap under the top edge of the bias fold tape and locate it in the middle of the front pieces. Make a casing for the elastic by stitching on both sides of the tape’s edge, ensuring you catch the raw end of the shoulder straps.
On the bottom of the dress, apply the flounce to the bottom edge. Gather along the lower edge of the heading and distribute the gathers evenly. Pin/baste flounce in place. Stitch on top of the first stitching to secure the gathers to the dress.
- Wrap elastic over the bosom and stretch to a comfortable fit. Cut elastic to that length. Thread elastic through casing to shirr the top and secure at each end with stitching.
- Fold each button placket piece (K) in half lengthwise with wrong side together. Press fold. Open each placket piece and baste the interfacing strips to one half by aligning with foldline.
- Pin/baste each placket piece to the front edge of the dress from the top edge down to the hem of the flounce with right sides of the placket facing the wrong side of the dress. (Note: Remember to allow for seam allowances at top and bottom edges). Stitch plackets to dress.
- On opposite side of placket, turn under seam allowances and press. Then turn under the seam allowances on the short ends. Press. Align and match the turned edges of the placket to the stitched seam of the front edge to encase the raw edges and topstitch the plackets to the dress.
- Divide the right hand side placket into 8 equally spaced vertical buttonholes. Make buttonholes.
- On the left hand side placket, hand-sew 8 buttons to align with buttonholes.
- Try dress on and drape dress straps over shoulder and pin to fit. Hand stitch ends of straps securely to inside of dress on bias tape.
BE MY VALENTINE
Step out with your Valentine with this heart-shaped disco bag.
You will need:- fashion fabric, 45″ wide
- lining, 45″ wide
- polyester fleece interfacing
- Transfer web
- cable cord, ½” dia.
- coordinating thread
- 1 dome snap set or Velcro tab, ½” dia
- 1 tasseled decorative cord for bag strap
- kraft paper
Make a circle. Measure the diameter (D).
Make a square with sides equal to D + ½”.
Cut circle in half.
Fold square in half matching opposite corners. Open fold.
Join semi circles to square matching Xs and Os to form heart shape.
Draw a 1″ dart between the semi circles 4″ long.
Bag Tab for closure – make a rectangle 3″ wide and 1/2 the diameter of the circle. (1/2 D)
Add ½” seam allowances to all pattern pieces.
CUTTING
Fuse
fleece interfacing to back of fashion fabric using transfer web before
cutting out bag front & back and bag tab. Follow manufacturer’s
direction for application.
Bag Shell – cut 2X self
Bag Lining – cut 2X lining
Tab – ½ D long x 3″ wide, self
Bias Strips for piping – 1″ wide (enough to go around perimeter of heart shape)
Cable Cording – perimeter of heart + 2″
ASSEMBLY
Make Piping
Make up corded bias piping. Join enough
bias strips for the required length and wide enough to cover the cable
cord plus the seam allowance. Lay the  cord in the centre, on the wrong side of the bias strip.
cord in the centre, on the wrong side of the bias strip.
Fold the bias strip over the cord
matching the raw edges. Stitch the 2 sides of the bias strip together
along the length. Use a zipper foot or cording foot on the sewing
machine to ensure that the stitches are close to the cord.
Trim Bag Front
Place the corded piping around the outer
edge of the interfaced heart piece, right sides together (RST) and
matching the raw edges. Align the seams on the piping, allowing 1″ extra
and begin at the dart; continue around the perimeter of the bag so that
the piping gently curves around the heart shape (clip piping seam allowance if necessary). Finish at the dart and allow 1″ extra again. Carefully clip and remove the filler (cord only)
from ends of the piping and crisscross the ends to neaten. Baste in
place, 1/2″ in from the raw edges. Sew piping in place using a zipper
foot.
Carefully cut through center of dart.
Place ends of piping flat in center of dart. Fold heart in half and sew
up dart to encase piping ends.
At bottom of dart (●), attach bottom portion of dome snap set, according to manufacturer’s instructions. Set aside.
Front Bag Lining
Make a square patch pocket and place it
in the center of one lining piece beneath the dart. Topstitch in place,
leaving the top edge open. Sew up the dart.
With wrong sides together (WST), align
and match the heart shape of the lining to the piped fashion fabric and
baste together around the top part of the heart shape between the “O”s.
Stitch around the top edge using ½” seam
allowance. Grade and trim seam allowance if necessary. Clip seam
allowances at point O. Turn front bag section right side out and press
edge flat. Topstitch along edge if desired. Baste the open edge of
lining to the wrong side of the front piece from the Os to the point of
the heart shape.
Bag Back Section and Lining
Sew up the dart on the bag back portion and on back lining piece.
With WST, align and match the heart shape and baste together around the top part of the heart shape between the “O”s.
Stitch around the top edge using ½” seam
allowance. Grade and trim seam allowance if necessary. Clip seam
allowances at point O. Turn back section right side out and press edge
flat. Topstitch along edge if desired.
Apply the top portion of the dome snap set to the bag tab, according to manufacturer’s directions.
Attach tab closure to face of back section, securing it at the bottom of the dart.
Joining Bag Front to Back
With WST, align and match the front and back sections following the heart point shape.
(Do not include the back lining.) Pin
/baste together and sew along the piping using a zipper foot. Grade
seam allowance and trim point.
Turn under seam allowance of back lining
and align folded edge with the machine-stitching. Slipstitch the opening
edge of the lining closed.
Turn bag right side out.
Finishing Bag
Hand-stitch ends of tasseled cord securely at points O.
GET PUFFED
 Featured: Rouge Passion Capelet by Giambattista Valli for Moncler.
The famed puffy ski coats from Italy’s Moncler has teamed up with Giambattista Valli for the Moncler Gamme Rouge Collection. The beautifully sculpted pieces flaunt huge collars with twisted closures. Why not hit the ski slopes wearing a capelet puffer?
You will need:
- Approx. 60″ [152cm] of Marilite® waterproof nylon, 60″ [153cm] wide
- Approx. 24″ [61cm] of hi-loft terylene batting, 60″ [153cm] wide
- Coordinating polyester thread
- 4 sets of covered dome snaps, ½” [12 mm] dia.
- Kraft paper
- Tissue paper
This pattern is drafted by height. The body proportion is made up of 8 heads.
Your height divided by 8.
Shoulder width = distance from shoulder point to shoulder point across the back.
PATTERNBODY:
Make a perfect square equal to ½ of the shoulder width measurement.
Use a set-square to draw a 90 degree angle on the Kraft paper.Set up a grid using the square as shown: A,B,C
Point O is 4″ from top right corner on square C.
Point Z is midpoint of right side on square C.
Join points O and Z with a curved line as shown in draft.
Point ■ is midpoint of upper square B.
Point X is located at left top corner of square C.
Points ■ (red) are located 2″ [5cm] from point X.
Fold new sheet of kraft paper into quarters.
Place left bottom corner of square A on folded corner of paper.
Trace out solid line outline of squares A-B-C.
This is the back and sleeve portion of the capelet.
Fold a second sheet of kraft paper in half width-wise.
Place bottom of square C on fold of paper.
Trace out solid line outline of square C.
This is the front piece of the capelet.
NOTE: Add seam allowance around perimeter of pattern pieces. (thick solid line)
Cut out pattern pieces while paper is still folded.
COLLAR:
Use a set-square to draw a 90 degree angle on the Kraft paper.
Set up a grid using the square as shown:
1st row: A,B,C,D
2nd row: E,F,G,H
Find the vertical midpoint of squares D and H. Join with a straight line.
Point + is midpoint of upper square C and lower square G
Add seam allowance to perimeter and cut out pattern piece. This is the collar.
Draw a rectangle 24″ x 2″ [61cm x 5cm]. This is the neck band.
Draw a rectangle 15″ x 5″ [38cm x 12.5cm]. Divide into 3 equal parts. These are carriers.
Add seam allowance to perimeter of neckband and carriers. Cut out pattern pieces.
CUTTING
Capelet Back and Sleeves – cut 1X self
Capelet Fronts – cut 2X self
Capelet Neckband – cut 2X self
Capelet Collar – cut 1X self
Carriers – cut 3X self
Back and Sleeve Insulation – cut 1X battingFront Insulation – cut 2X batting
Neckband Insulation – cut 1X batting
Collar Insulation - cut 1X batting
ASSEMBLY
- For each carrier piece, fold in half lengthwise with right sides together (RST).
- Pin/baste long raw edges. Stitch seam and press open. Turn right side out and press flat.
- For each front piece, place one carrier at point Z face up. Fold fronts in half width-wise with RST.
- Pin/baste front edge and side seam. Sew seams, ensuring the carrier is caught in the seam, and press seams open.
- For back and sleeve portion, fold in half width-wise with RST.
- Pin upper edge and pin/baste under-sleeve arm edge on both ends. Sew seams and press seams open.
- Attach one front armhole to armhole on back portion with RST. Pin/baste armhole seam in a “U” shape. Sew armhole seam. Clip seam allowance if necessary.
- On back portion, fold self fabric at point X with RST, and pin/baste from X to red point. Sew seam and press open. Repeat on opposite end.
- Insert batting into each body piece. Baste insulation to seam allowance of armholes on the front portions and upper edges of all self pieces. Topstitch through all layers on back portion vertically at CB and vertical sides of square B to contain the insulation. (see tip below)
- Align one piece of the neckband to the upper edge of the body at the CB and at the CF with RST. Match the upper edge of the front piece and shoulder with the neckband and allow for seam allowance at the front edges. Pleat out any excess on the sleeve portion. Gather the upper back edge evenly into the neckband. Pin/baste into place. Layer the second neckband piece on the inside of the body to sandwich the 3 layers together. Pin/baste in place. Machine-stitch the neckband to the body. Sew up short ends of the neckband. Press seams and trim if necessary. Turn right side out.
- Insert batting into neckband and baste upper edge closed.
- For collar piece, staystitch at pint +. Fold collar lengthwise in half and pin/baste from point + to end of collar and across short end. Sew seam; press and grade seam.
- On opposite short end, gather edge to remaining carrier. Fold carrier to form a loop and attach midway in seam. Gather collar onto it. Fold collar lengthwise with RST. Sew gathered end. Grade and trim seam allowance if necessary. Turn right side out.
- Insert batting into collar and baste to seam allowance. Pin/baste collar to neckband between the + . Sew collar seam. Turn seam allowance into the collar and slipstitch the open side to the neckband.
- To complete the capelet, handstitch 4 sets of dome snaps evenly-shaped to front edge closure and attach short end of carrier under the armhole by turning under the open end and sewing to the back of the capelet to create a sleeve.
DOUBLE-BREASTED WAISTCOAT
 Featured: Vest by Moloh
A beauty in this double-breasted shawl-collared waistcoat from Moloh.
You will need:
- 1 yd. [0.9 m] of fashion fabric, 54″ [150 cm] wide
- 1 yd. [0.9 m] of bemberg® satin lining, 45″ [115 cm] wide
- 1 yd. [0.9 m] of fusible interfacing, 24″ [60 cm] wide
- coordinating thread
- 18 half-ball shank buttons, 13mm diameter [line 20]
- kraft paper
Bust – measure under arms over fullest part of chest.
Waist – measure around narrowest part of torso at the navel.
High hip – measure around pelvis approx. 4″ [10 cm] below natural waist.
Back waist length – measure from nape of neck to natural waist.
Armhole depth – measure drop from shoulder to armpit level.
Shoulder – measure length of shoulder.
Back width – measure across shoulder blades from armhole to armhole.
Neck size - measure around base of neck.
Dart Width Opening – 2 ¾” [7cm].
PATTERN
 Square down from 0; square halfway across the paper.
0-1 = 5/8″ [1.5 cm].
1-2 = armhole depth + 3/16″ [0.5 cm]; square across.
2-3 = half of bust + 2″ [5 cm].
Square up and down; label this line centerfront [CF].
3-4 = 0-2
Square across from 4.
1-5 = back waist length; square across to 6.
5-7 = 4″ [10 cm], square across to centerfront line. Label point 8. (this gives ½ the high hip measurement plus 1″ [2.5 cm] ease).
Back
0-9 = 1/5 of neck minus 1/16″ [0.2 cm]; draw in back neck curve 1-9.
1-10 = 1/5 armhole depth minus ¼” [0.7 cm]; square halfway across the paper.
9-11 = shoulder length minus 1″ [2.5 cm]; draw back shoulder line to touch the line from 10.
12 is center of the shoulder line.
12-13 Draw a dart 2″ [5cm] long and 3/8″ [1 cm] wide perpendicular to shoulder line.
2-14 = ½ back width + 3/16″ [0.5 cm] ease; square up to 15.
14-16 = half the measurement of 14-15.
17 is midway between 2 and 14; square down with a dotted line to point 18 on waistline and point 19 on hemline.
Front
4-20 = 1/5 neck minus ¼” [0.7 cm].
4-21 = 1/5 neck minus 1/16″ [0.2 cm].
3-22 = 1/2 of back width measurement minus 3/4″ [2 cm] + half width of dart opening; square up.
3-23 = ½ of distance 3-22; square down with a dotted line to point 24 on waistline and point 25 on hemline.
26 is the bust point approx. 1″ [2.5 cm] down from 23; draw a line joining 20-26.
20-27 = dart opening; draw a line joining 26-27.
11-28 = 5/8″ [1.5 cm]; square out approx. 4″ [10 cm] to 29.
27-30 Draw a line from 27, equal to the back shoulder to touch on line from 28 to 29.
22-31 = 1/3 the measurement 3-21.
32 is midway between 14 and 22; square down with a dotted line to point 33 on the waistline and point 34 on the hemline.
Draw armhole as shown passing through points 11, 16, 32, 31, and 30.
When shoulder seams are joined it is essential that the armhole is a smooth curve.
3-35 = 3-23; square up to locate point 36 on line from 21 and square down to locate point 37 on line from 8. This is the double-breasted closure.
37-38 = ½” [1.25cm].
38-39 = ½” [1.25 cm].
Join 35 and 39 with a straight line.
The waistcoat requires a front drop from 7 to 39; join with a gentle curved line to complete the hemline.
Take a tracing of the back neck curve 1-9 and flip the shape over.
Place point 9 of back neck curve on point 20 on front neck.
 20-40 = 1-9.
40-41 = 3 ½” [9 cm]; this is the CB of the collar.
Complete the roll collar by drawing a parallel line to the neckline of the collar from 41 and gently curving into point 36 as shown.
Shaping the waist of the waistcoat requires half the waist measurement plus 1-3/16″ [3 cm] ease. This means 4 ¾” [12 cm] shaping. Shape waist suppression on the dotted lines; 1-3/8″ [3.5 cm] at back dart, 1-5/8″ [4 cm] at side seam, and 1 ¾” [4.5 cm] at front dart.
 Close the bust dart by slashing the dotted line up to point 26 and match point 27 to 20.
Mark 9 button placements evenly on either side of centerfront line for a double-breasted closure.
Front Facing
Trace off the vest draft. To make the front facing piece, separate the collar and front edge of the vest through points 25-26-20-40-41-36-35-39. The remaining pattern pieces will be used for the lining pattern.
NOTE: Add seam allowance to all pattern pieces.
CUTTING
Vest Front – cut 2X self
Vest Back – cut 1X self on fold
Vest Collar & Facing – cut 2X self
Vest Front Lining – cut 2X lining
Vest Back Lining – cut 1X lining on fold
Vest Interfacing – cut 2X fusible
ASSEMBLY
- Iron fusible interfacing onto back of collar & facing pieces, following manufacturer’s directions.
- With right sides together (RST), pin/baste front facing to front lining. Sew seam and press seam allowance towards lining. Topstitch the lining along the seam.
Stay-stitch shoulder/neck point (#20) on collar facing to reinforce corner. Clip seam allowance to the stitching at a 45° angle.
- Pin/baste waist suppression darts on back lining. Sew darts and press towards the sideseam.
- With RST, pin/baste lining fronts to lining back at sideseams and shoulders. Sew seams and press open.
- With RST, pin /baste CB seam of top collar together. Sew seam and press open. Then pin/baste the collar neckline to the back lining and sew between the two clips. Press seam towards lining. Topstitch lining along neckline seam. Set aside.
- Stay-stitch shoulder/neck point (#20) on waistcoat fronts to reinforce corner. Clip seam allowance to the stitching at a 45° angle.
- Pin/baste waist suppression darts on back and front waistcoat sections. Sew darts and press towards the center.
- With RST, pin/baste fronts to back at sideseams and shoulders. Sew seams and press open.
- With RST, pin /baste CB seam of under-collar together. Sew seam and press open.
- With RST, pin /baste neck edge of collar to back neckline of waistcoat. Sew neck seam between the two clips. Press seam open.
- Place the lined portion with the outer portion of the waistcoat with right sides together, aligning them up along the outer edges. Pin/baste the two halves of the waistcoat together.
- Stitch the waistcoat along the front edge and collar. Grade seams and clip seam allowance along curved edge of collar. Press seam open.
- Pin/baste along the lower edge of the waistcoat from the front edge to the sideseam matching up the waist darting. Sew lower edge of front and press open. Trim corners and grade seam allowance on front facing.
- Turn the waistcoat right side out. Use a point turner to gently push out the edges of the garment and make sure it is fully right side out.
- Entering from the bottom, match up the seam allowances of the armholes and sew lining around the armholes. Do a parallel row of stitching 1/8″ [0.25 cm] on armholes and trim seam allowances away. Then, match up the seam allowances of the back neckline and collar and baste together.
- Turn the bottom edge of the waistcoat so that the back hemline is even with the rest of the front. Press the folded hem. Turn the bottom edge of the lining and lay on top of the hem just shy of the fold. Baste the two layers together. Slipstitch the lining to the back.
- Under-stitch along the armholes, 1/4 inch [0.5 cm] from the edge.
- Press the outer edges of the waistcoat. Under-stitch the front closure and under-collar 1/4 inch [0.5 cm] from the edge.
- On the right hand side front, thread-mark 9 buttonholes (5/8″ diameter [15 mm]). Sew buttonholes.
- Hand-stitch 9 shank buttons to the left front of the waistcoat following button placement on draft.
- To create the double-breasted “look”, on the right front sew 9 more buttons (mirror-imaged on CF line) in a slight V-formation, as shown.

HABERDASHERY BELT
 Featured: Forever 21 belt from Twelve By Twelve
A unique and eye-catching haberdashery “vest-style” belt to make.
You will need:
- ½ yd. [0.5 m] of fashion fabric, 45″ [115 cm] wide
- ¼ yd. [0.25 m] of fusible interfacing, 45″ [115 cm] wide
- Covered button kit, 10 mm diameter/line 16
- Coordinating thread

1 square = 1 inch [2.5 cm]
Note: Add seam allowance.
Lengthen/shorten the waistline of the belt at CB fold.
CUTTING
 Belt – cut 2X on fold
Belt Interfacing – cut 1X on fold
Welt – cut 1X
Welt Facing – cut 1X
ASSEMBLY
- Iron fusible interfacing to wrong side of OUTER belt section, following manufacturer’s direction.
- Make 4 – 3/8″ (10 mm) covered buttons [line 16] following manufacturer’s directions.
- For a single welt on the belt, you will need a welt piece and a facing piece. The welt strip should be 2 ½ ” (6 cm) deep [ 3/4" (2 cm) finished] and 1 ¼” (3 cm) longer than welt placement line. The facing piece should be twice as wide as the welt and 1 ¼ ” (3 cm) longer than placement line. Interface the facing piece. Transfer all placement markings to the welt, the facing, and the OUTER belt section.
- With wrong sides together, fold the welt piece in half lengthwise. Baste the raw edges together. On the right side of the garment, position the welt with the raw edges aligned with the centre of the placement line and the folded edge extending beyond the bottom of the placement line. Pin and baste in place along placement line of welt on the surface of the left hand side of the belt section.
- Place facing piece, right side face down over area above placement line. Stitch along marked placement line being careful not to touch top and side edges of welt in seam. Cut along centre of the placement line, ending ¼ ” (7 mm) from ends, being careful not to cut through welt strip. Turn raw edges to inside with welt strip centre in opening.
Fold back the belt to expose the seam allowance at the upper edge of the opening. Matching raw edges and with right sides together, centre facing piece over the seam allowance. Sew in place. From right side of belt piece, fold back welt opening to expose small triangular pieces and welt of pocket. Stitch along welt side seamlines, catching small triangles in seam. Stitch across bottom of welt opening catching the facing portion to close the opening. Trim seam allowance and clean-finish edges.
- With wrong sides together, layer the two belt sections together and match up raw edges. Pin/baste the perimeter. Machine stitch around the belt, leaving a 5″ (13 cm) opening to turnout. Grade seam allowances and trim corners. Turn belt right side out. Press edges flat.
- On right hand side of belt face, thread-mark 4 – 1/2″ (1.25 cm) buttonholes. Stitch buttonholes. Hand-stitch the covered buttons to the left front of the belt.

COMMUTER BANDOLIER
 SHOULDER VEST

The Commuter Bandolier
is a comfortable easy-to-wear shoulder vest and can totally tote your
possessions in its pouches as you go about your daily routine.
Cheerfully strap it on, head out into the world, and start a
culture-wide fashion trend.
You will need:- 1 yd. [0.90 m] of fashion fabric, 45″[114 cm] wide
- 1/3 yd. [0.30 m] of pocketing, 45″ [114 cm] wide
- 2/3 yd. [0.60 m] of fusible interfacing, 45″ [144cm] wide
- Coordinating thread
- 2 nylon pocket zippers, 10″ [25 cm] long
- ¼ yd. [23 cm] of Velcro® fastener, ½” [1.25 cm] wide
- kraft paper
 Dimensions are given in inches (imperial). **
NOTE: Length and width measurements may be adjusted by slashing through the RED lines and increasing or decreasing the amount needed in proportion.
** Add seam allowances to all pattern pieces.
CUTTING
 Cut each pattern piece 2X in fashion fabric.
Cut each pattern piece 1X in fusible interfacing.
(flip pattern)
Cut each pocket piece 2X in pocketing.
Cut interfacing 1″ X 11″ [2.5cm X 28 cm] for each zipper opening.
Cut 1 Velcro hook side – 7″ [18 cm] long.
Cut 3 Velcro loop side – 3″ [7.5 cm] long.
ASSEMBLY
- Iron fusible interfacing to the wrong side of the INNER FACING pieces of the vest, following the manufacturer’s directions.
- On the OUTER pieces of the shoulder harness and right front piece, center and fuse interfacing to the wrong side of the fabric at the zipper placement.
- With right sides together (RST), match the upper pocket piece to the zipper placement on the shoulder harness. Baste in place. Stitch the outline of the pocket opening 10″ [25 cm] long X ½” [1.25 cm] wide, pivoting at the corners.
- Slash through center of outlined stitching and cut diagonally into the corners. Pull pocket lining through opening to wrong side of shoulder harness. This opening should form a perfect rectangle. Roll edges of opening between your fingers until each seam is at the edge of the opening. Press so that none of the lining shows on the outside.
- Center the zipper with the slider pointing upward behind the opening and baste in place.
- Topstitch around the pocket opening to secure the zipper.
- Match the remaining pocket lining piece to the upper pocket lining and align raw edges. Pin/baste the perimeter and sew up the pocket bag.
- Baste vertical seams of pocket bag to shoulder harness.
- Repeat inset zipper application to pocket opening on right front piece, as described above.
- Match front and back of shoulder harness with RST. Pin/baste long edges together. Sew seams, catching the pocket bag in the stitching. Turn shoulder harness right side out and press seams flat. Topstitch along the long edges.
- Match the vertical seams of the OUTER pieces of the “belt” portion of the vest. Pin/baste each seam and machine-stitch. Press seams open.
- Repeat last procedure for the vertical seams of the interfaced INNER pieces of the “belt” portion of the vest.
- Position the Velcro® hook vertically 1″ [2.5cm] from raw edge along the right front edge on the INNER portion (allow for seam allowance) with the right side UP. Stitch in place.
- Baste shoulder harness to OUTER portion on front and back along top edge, matching up RED dots.
- Pin/baste INNER and OUTER “belt” sections with RST and match up seams. Beginning at the center of the bottom edge, sew around the perimeter and pivot at the corners, leaving a 6″ [15cm] opening to turn out. Be certain to catch pocket bag in the stitching. Grade seam allowances and trim corners.
- Turn vest right side out and press edges flat. Topstitch around the perimeter to close opening.
- On left front, position 3 Velcro® loops horizontally and equally spaced approximately ¼” [0.5 cm] from the front edge on the OUTER section with the right side UP. Stitch in place through all layers.
CHIC BOHEMIAN STYLE

In the fashion world, bohemian or boho,
refers to a a state of mind regarding fashion that is individual,
romantic, and free-spirited. This style is often called hippie-chic. Try
drafting and making a fully-gathered yoked boho blouse to wear with
your skinny jeans.
You will need:- Approx. 1.5 yds. [1.4 m] of fashion fabric, 60″ [150 cm] wide
- Approx. 0.5 yd. [0.5 m] of fusible interfacing, 24″ [60 cm] wide
- Coordinating thread
- Kraft paper
Bust – measure under the arms around the fullest part of chest.
Back waist length - measure from nape of neck to waistline.
Shoulder width – measure across back from shoulder to shoulder.
PATTERN
 Yoke:
Yoke:Fold kraft paper into quarters, aligning the foldline.
From the folded corner, measure ½ of shoulder width plus ½” [1.25 cm] across the paper.
From the folded corner, measure ½ of shoulder width minus 1″ [2.5cm] down the paper.
From the folded corner, draw a 45° line between the 2 foldlines.
Plot a point on the line equaling ½ of shoulder width. Label point, X.
Join these 3 points with a smooth curve.
Draw a second line 4″ [10 cm] parallel to the curved line within the curve to complete the yoke.
Add ½” [1.25 cm] seam allowances to neckline and yokeline.
Cut the shape from the folded paper.
Body:
Square 2 lines across and down the paper.
The length of the body equals the back waist length plus 1″ [2.5 cm] hem.
Label the length, CENTER FOLD.
The width of the body equals ½ of the bust measurement.
Square from these points to complete the body pattern.
On the side seam, measure 5″ [13 cm] from the hem. Label this point, O.
Point X is located at the top of the sideseam.
Add ½”[1.25 cm] seam allowance to top edge and side seam.
Sleeve:
Fold kraft paper in half and square a line from the foldline.
Plot a point on the line equal to the distance from X to O on the body section.
Label this point, X and label the foldline, O on the sleeve section.
Square a line from X.
Plot a point on this line from X and along the foldline from O equal to ½ the bust measurement.
Join the 2 points with a straight line. Add a 1-inch [2.5 cm] hem to complete the sleeve.
Add ½” [1.25 cm] seam allowances to top edge and side seam.
Cut the sleeve shape from the folded paper.
CUTTING
 Yoke – Cut 2X self.
Yoke Interfacing – Cut 1X fusible.
Body – Cut 2X self on fold.
Sleeve – Cut 2X self.
ASSEMBLY
- Iron fusible interfacing to wrong side of 1 yoke section following the manufacturer’s directions.
- With right sides together (RST), match up the front and back sections of the body. Pin/baste side seam between O and hem edge. Stitch side seams. Press open.
- Turn under a ½” [1.25 double rolled hem along the sleeve opening and topstitch down.
- With RST, pin/baste sleeve between the Xs on the body. Stitch seam and press open.
- Sew 2 rows of gathering stitches across the top edge of the front and back body from sleeve opening to sleeve opening. Draw up threads and gather fabric.
- With RST, pin/baste gather edges of body to yoke, matching centers and Xs. Butt sleeve opening edge together and pin/baste at shoulder point on yoke. Distribute gathers evenly.
- Machine stitch yokeline. Press seam allowance towards yoke. Turn garment right side out.
- Turn under seam allowance along outer edge on interfaced yoke piece. Press.
- Match neckline of interfaced yoke piece to neckline of garment. Pin/baste in place. Stitch neck seam. Clip and grade seam allowance. Pull interfaced yoke piece through neckline to inside. Understitch the neckline.
- Lap the folded edge of the interfaced yoke piece over the gathered yoke seam, matching the centers, shoulders, and Xs. Slipstitch yokeline to encase the raw edges of the gathers.
- Turn under the hem allowance of the garment and press. Stitch a ½" [1.25 cm] double rolled hem.
ASSYMETRICAL TUNIC
 Featured: Nordstrom Metallic Print Tunic
Bias-cut one-shouldered tunic is fashioned with a single batwing sleeve and angled hemline .
You will need:
- approx. 2 yds. [2m] of fashion fabric, 45″[115cm] wide. *
- coordinating thread
- Kraft paper
MEASUREMENT
This pattern is drafted by height. The body proportion is made up of 8 heads.
Your height divided by 8.
eg. for a person 5 foot 4 inches: 64″/8 = 8 or 163/8 = 20.4
1 head amount = 8 inches or 20.4 cm.
PATTERN
 Make a perfect square equal to 1 head amount.
Use a set-square to draw a 90 degree angle on the Kraft paper.
Set up a grid using the square as shown:
1st row : A,B,C
2nd row: D, E
3rd row: F, G
4th row: – , H
Point 1 is left midpoint on square D.
Point 2 is bottom left corner of square F.
Point 3 is top midpoint on square B.
Point 4 is top right corner of square C.
Join points 1 and 3 and join points 2 and 4, with a straight line.
Point 5 is bottom right corner of square H.
Point 6 is right midpoint of square C.
Join points 5 and 6 with a straight line.
Point 7 is intersection point of lines.
Draw a ½-inch [1.25 cm] facing parallel to lines 1-3, 4-6, and 5-7.
Line 2-4 is the grainline.
NOTE: Add seam allowance around perimeter of pattern piece. (thick solid line)
CUTTING
Cut 2X self. Note: Flip pattern to cut back section.
ASSEMBLY
- With RIGHT sides together, match raw edges of front and back pieces. Pin/baste between 1-2, 3-4, and 6-7. Stitch seams and press open.
- Turn under facing ½” [1.25 cm] at neck and on sleeve opening and hem.
- Turn under slit facings between 5 and 7 and stitch down. Then, hem bottom of tunic.
DRAPEY BLOUSON
 Featured: Ella Moss Red Label ‘Simone’ Top

Here’s an easy-to-draft casual fun style with a spirited “young in attitude” feel by Ella Moss.
A silky knit blouson top designed with a fitted under-layer, topped
with a second draped layer, featuring a single flutter sleeve offset by a
thin spaghetti strap.
You will need:
- Approx. 2 yds. of jersey knit, 54″ wide **
- Approx. 1 yd. of 2-way stretch spandex, 45″ wide
- Coordinating thread
- Approx. 1 yd. of cable cord, 1/8″ thickness
- Kraft paper
MEASUREMENTS
Bust – measure just under arms around fullest part of chest.
Back waist length – measure from nape of neck to waist.
Bust height – measure from top of shoulder to apex of breast.
Apex Distance – measure distance between apexes of breasts.
Armscye Depth – measure from top of shoulder to underarm level.
Elbow Length – measure arm from neck, along shoulder to elbow.
PATTERN
 Fold kraft paper in half lengthwise and open it flat.
Draw a straight line along the foldline of the paper.
Plot a point and label, 0.
0-1 = back waist length + 1″; square across
0-2 = bust height + 1″; square across
2-3 = ¼ of bust measurement
2-4 = ½ of apex distance + ½”; square down to locate 5 on line 1.
3-6 = 3-4; square across to locate 7 and 8.
Join 3 and 7 with a straight line.
3-9 = distance from 4 to 5 plus 4″; square across to locate 10.
11 is located midway between 1 and 2; square across.
10-12 = 9-10; square up to locate 13 at intersection of line from 11.
1-14 = 1-5
2-15 = 2-4; square up.
15-16 = armhole depth + 1″. Draw a tangent line from 0 through point 16.
17 is located at intersection of 8 and 15. Draw a tangent line from 0 through point 17.
18 is located midway between 0 and 16.
Join 15 to 18 with a straight line.
The fitted under-layer consists of 0-8-7-5-14-15-18-0. Trace.
0-19 = elbow length
0-20 = elbow length
Join 20 to 13 passing through 19 with a smooth curve.
The draped overlay consists of 0-8-6-9-12-13-20-0. Trace.
NOTE: Add ¼” seam allowances to perimeter of all pattern pieces.
** Please be
aware that all stretch fabrics have different elasticity and will
affect the design ease in the pattern draft based upon whatever you
chose.
CUTTING
Cut all pattern pieces with greatest amount of stretch across the width of each piece.
Overlay – cut 2X in jersey knit fabric.
Underlay – cut 2X in spandex tricot fabric.
An 18″ strip of jersey fabric ½” wide for spaghetti strap.
ASSEMBLY
- Find mid-point of cable cord and place it on fabric strip with right side face up.
- Stitch across mid-point to attach cording to strip end.
- Wrap fabric strip around the cording with right sides together (RST). Using a zipper foot, stitch long edge of fabric close to the cording. Trim the seam allowance.
- Pull the fabric tubing down over the uncovered end of the cable cord, easing gently as it slips over the cording. You will have 18″ of thin spaghetti strapping. Cut off excess cable cord.
- With RST, layer the underlay pieces and match up seams. Pin/baste the side seams from 4 to 5 and from 14 to 15. Stitch seams.
- Match up shoulder seam and pin/baste from 0 to 18. Stitch seam.
- Sew a narrow double-rolled edge to finish the armhole. Set aside.
- With RST, layer the overlay pieces and match up seams. Pin/ baste the shoulder and sleeve together. Stitch seam and press open.
- With RST, match up the side seams and pin/baste from 3 to 9 and 12 to 13. Stitch seams and press open.
- With RST, match neckline of underlay to overlay. Match up points 7, 8, and 0. Stitch neckline. Clip seam allowance at 8 to release stress.
- Attach one end of spaghetti strap at point 7 between the two layers on the front.
- Pin/baste 3 to 4 and 7 to 7. Stitch left armhole seam.
- At hemlines of each layer, divide into 4 equal portions. With RST, match up each point and pin together. On overlay, gather hem edge to the under-layer between the pins. Pin/baste layers together. Stitch seam while slightly stretching the fabric to ease. Turn right side out through right sleeve opening.
- Put on top by slipping it on over the head. Place spaghetti strap over shoulder and align end with point 7 on back. Tack in place neatly.
- Stitch a narrow double-rolled hem edge on opening of flutter sleeve.
It has
come to my attention that the ease is too little for the drape of this
garment. I am certain that you know that the pattern pieces are cut
twice with the greatest amount of stretch going in the direction of the
girth (ie. across the fabric rather than up & down with its length)
as the cutting direction have clearly been given.
Please
be aware that all stretch fabrics have different elasticity and will
affect the design ease in the pattern draft based upon whatever you
chose. It is very well possible that the elasticity of your fabric is
not the same as the sample given. Therefore I will try to explain the
concept of ease as it pertains to knits and stretch fabrics. I hope this
will help you to get a better fit to your pattern draft.
Very easy-fitting garments can be cut
from simple basic patterndraft when a designer wants to create styles
that are loosely fitted or even oversized. This can be done by adding
ease to create volume in the styling rather than grading up to the next
size. Note that when dealing with basic body measurements, substantial
extra ease must be added for movement and comfortable fit. The sizing
remains the same, since the neckline and wrists have not changed in
dimensions.
EASE CHART
Use this chart to determine the amount for additional ease for movement and styling.| Total Body Ease | Quarter Body Increase | Shoulder Increase | Underarm Increase |
| 1” | ¼” | ⅛” | ⅛” |
| 2” | ½” | ¼” | ¼” |
| 3” | ¾” | ⅜” | ⅜” |
| 4” | 1” | ½” | ½” |
| 5” | 1 ¼” | ⅝” | ⅝” |
| 6” | 1 ½” | ¾” | ¾” |
| 7” | 1 ¾” | ⅞” | ⅞” |
| 8” | 2” | 1” | 1” |
| 9” | 2 ¼” | 1 ⅛” | 1 ⅛” |
| 10” | 2 ½” | 1 ¼” | 1 ¼” |
| 11” | 2 ¾” | 1 ⅜” | 1 ⅜” |
| 12” | 3” | 1 ½” | 1 ½” |
| 13” | 3 ¼” | 1 ⅝” | 1 ⅝” |
| 14” | 3 ½” | 1 ¾” | 1 ¾” |
For styling purposes, a designer may
require garments to be loose-fitting, or much larger than regular styled
garments. Understand that your garments may be created as large as you
wish but the sizing does not change, because the styling is worn simply
larger, looser, and baggier. To create additional volume without
changing the fit, add designer ease instead of grading the pattern.
ADDING EASE INTO A PATTERNDRAFT (Blouson Top)
Use a straight waist (no dart
suppression) on your chosen pattern as it does not make sense to make a
loose-fitting “fitted” waistline on the garment.
- Draw a vertical line through the shoulder area to the hem and then the underarm area to the hem, dividing the quartered body ease equally.
- Next, draw a line horizontally through the armhole, the same amount that the shoulder is increased. Slash and spread the pattern to increase the fit. Blend the new lines together.
- Slash and spread the sleeve pattern to correspond to the body pattern. Only the widths of the body and sleeve have changed, not the garment size; the neckline and wrists remain the same.
Remember to keep the spread parallel with
the centerline and the waistline (90° angle) to stay on straight grain
with the grainline of your pattern.

Example of a pattern with 6 inches of additional ease.
CLASSIC JEANS
 Classic
five pocket cool, with an always-in-style timeless wash denim and the
most comfortable fit ever. It’s no wonder you reach for your
made-to-measure jeans again and again.
Classic
five pocket cool, with an always-in-style timeless wash denim and the
most comfortable fit ever. It’s no wonder you reach for your
made-to-measure jeans again and again.Waist – measure narrowest part of torso at navel level.
Seat – measure around fullest part of hips approximately 8″[20 cm] below the waist.
Body Rise - measure drop from waistline to crotch level.
Outseam – measure distance from waistline to floor.
Bottom width – desired width of jean leg bottoms (minimum amount must allow for measurement of foot around the heel).
PATTERN

Jean Template: Front
Square both ways from 0.
0-1 = body rise minus width of waistband: square across.
0-2 = waist to seat minus waistband width; square across.
0-3 = outseam measurement; square across.
1-4 = half the distance of 1-3 minus 2″[5cm]; square across.
1-5 = 1/12 of seat measurement + 3/8″[1cm]; square up to 6 and 7.
6-8 = ¼ of seat measurement.
5-9 = 1/16 of seat measurement.
7-10 = 5/8″[1.5cm].
Join 10-6 and 6-9 with a curve touching a point 1 ¼”- 1 ½” [3.25-3.75cm] from 5.
10-11 = ¼ waist + ½”[1.25cm]
3-12 = ½ of bottom width minus 1/8″[0.5cm].
4-13 = the measurement 3-12 + ¾”[2cm].
Draw side seam 11,8,13,12; curve 8-11 out 1/8″[0.5 cm].
3-14 = ½ bottom width minus 1/8″[0.5cm].
4-14 = the measurement 3-14 + ¾”[2cm].
Draw inside leg seam 9, 15, 14. Curve in 9-15 by 1/8″[0.5cm]
Jean Template: Back
5-16 = ¼ of distance 1-5; square up to 17 on hipline, 18 on the waistline.
16-19 = ½ of distance 16-18.
18-20 = ¾”[2cm].
20-21 = ¾”[2cm].
21-22 = ¼ of waist + 1″[2.5cm]. Join 21-22 to touch the line squared out from 0.
9-23 = ½ of distance 5-9 minus 1/8″[0.5cm].
23-24 = 1/8′[0.5cm].
Join 21-19 and 19-24 with a curve touching a point 1 ½”- 1 ¾”[4-4.5cm] from 16.
17-25 = ¼ seat + 1/8″[0.5cm].
12-26 = 3/8″[1cm]
13-27 = 3/8″[1cm]
Draw side seam 22, 25, 27, 26. Curve out slightly at 25.
14-28 = 3/8″[1cm]
15-29 = 3/8″[1cm]
Draw inside leg seam 24,29,28; curve 24-29 in 3/8″[1cm].
21-30 = ½ of 21-22; square down from line 21-22. Construct a dart on the line, 1/2′”[1.25cm] wide.
 To Complete Jean Front
Trace off front section from template draft. Mark point 6.
Draw in curved pocket line 31-32 and pocket bag.
Cut off side piece along the line 31-32; add 1-3/8″[3.5cm] from 31-32.
Draw in fly piece shape to point 33 3/8″[1cm] below 6.
Fly piece width = 1 ½ – 1 ¾”[3.7-4.5cm] wide.
Trace off fly piece.
Trace off pocket bag along line 31-32.
To Complete Jean Back
Trace off back section from template draft. Mark points 16, 17, 21, 22, 24 and 25.
Cut along hipline 17-25, open a wedge approx. 1 ½”[4cm] wide at 17.
(Note: for rounder behinds increase more if desired).
17-34 = 1/8″[0.5cm]; draw in new crotch seamfrom 21-24.
Draw in patch pocket design. (Note: opening must allow for width of hand).
21-35 = ¼ of distance 21-16.
22-36 = ¼ of distance 22-25.
Cut off yoke along line 35-36; close dart.
Curve the line 21-22 and 35-36.
Patch Pocket – trace off back pocket.
Waistband
The jean waistband is cut with ease (1 ¼”[3 cm] larger than waist measurement to fit lower waist position).
37-38 = 2 x waistband width; square across.
38-39 = waist measurement + 1 ¼”[3cm]; square up.
39-40 = fly width; square up.
39-41 = ½ of distance 38-39; square up, label CB and CF. Mark foldline down center.RUFFLED TOP
 Featured: Abaete Lauren Top

Ever the chic choice, a simple shell
blouse is the definitive feminine look. With cascading sleeves and a
universally flattering shift shape, this sweet style is a fabulous
day-to-evening option. Shown here, the Lauren top by Abaeté has flutter sleeves and a bateau neck, an easy fashion project to draft and make up in a lovely silky fashion fabric.
You will need:- approx. 2 yds. [2 m] of fashion fabric, 45″[115 cm] wide
- Coordinating thread
- 1 – hook and eye set
Bust – measure just under arm around fullest part of chest.
Waist – measure around narrowest part of torso
Armhole Depth - measure from top of shoulder to underarm level.
Back waist length - measure from nape of neck to waist level.
PATTERN

Blouse:
Square down from 0 and square across on the pattern paper.
0-1 = back waist length + 2″ [5cm]; square across.
0-2 = armhole depth measurement + ¾” [2 cm]; square across.
0-3 = 2″ [5 cm]; square across
Extend distance between 2-3 beyond centerback line by ½” [1.25 cm].
2-4 = half bust measurement + 2″ [5 cm]. Square up and down to locate 5, 6, and 7; mark this line the centerfront line.
4-8 = midway 2 and 4 plus 1″ [2.5 cm]; square up and down to locate 9 and 10.
2-11 = half of back width measurement + ¼” [0.7 cm] ease; square up to 13.
Shape back neckline with a shallow curve as shown.
8-12 = 8-11; square up to 14.
Shape front neckline with a shallow curve as shown.
9-15 = 1 ½” [3.75 cm]; connect 15 to 13 and 14 with a straight line.
16 from 13 and 17 from 14 = 1 ½” [3.75 cm].
11-18 = midway 11-13.
12-19 = midway 12-14.
At a 90° from 16 and 17, join 16 to 18 and 17 to 19 with a smooth curve.
4-20 = two-thirds the distance from 4 and 8. Square down.
20-21 = 2″ [5cm].
Find the difference between half the bust measurement and half the waist measurement. Add 2″ [5cm]. Make a waist suppression dart from point 21 with equal distribution of the difference at 22 and 23 on the hem line. (see draft)
NOTE: The waist suppression may be determined by fitting the garment on the body as well.
Grainlines are parallel to centerfront and centerback lines. Add hem allowance. Add seam allowances to centerback, side seams, shoulders, and armholes.
Armhole Ruffle:
Measure armholes from 11-18-16 and 12-19-17. Add amounts together and record this measurement.
Using the formula C = 6.28 x R, determine the radius (R) using the armhole sum for the circle circumference (C).
Using a compass, draw a circle based on this radius. (A-B)
B-C = 5″ [13 cm]
B-D = ¾” [2 cm]
Draw a tapered spiral curve from C to D, pivoting from A as shown.
Grainline is parallel to B-C.
Measure front and back necklines. Double this amount. Make a cutting guide for bias binding (2-3/8″ [6 cm] wide) based on neckline measurement + 5″ [13 cm].
CUTTING
Front – cut 1X self on fold
Back – cut 2X self
Ruffle – cut 4X self
Binding – cut 1X self on bias grain
ASSEMBLY
- Staystitch neckline on front and backs as well as corners of square armholes.
- Turn under raw edge of extension of back neck opening to create a rolled edge. Slipstitch or topstitch in place.
- With right sides together (RST), match up back shoulders to front shoulders. Pin/baste together and sew. Press seam open.
Fold bias strip in half lengthwise (wrong sides together) to create bias binding. Pin raw edge of binding to raw edge of neckline beginning and ending at CB opening. Turn under short ends of binding to neaten and align folded bias strip to right side of neckline. Pin/baste in place.
Sew binding around neckline using 3/8″ [1 cm] seam allowance. Wrap binding over neck edge to underside. Align folded edge of binding to overlap machine stitching. Sew binding to neckline face up by “stitching in the ditch” or slipstitching folded edge of binding.
- Pair up armhole ruffles. With RST, pin/baste short ends on each pair and sew. Press seam open.
- Measure the side seam of the blouse.
- Sew a double-rolled hem along the outer edge of each ruffle. Do the same for the inside edge equal to the sideseam measurement beginning from the tip of the spiral.
- Clip diagonally each corner of the square armhole up to the stay stitching. With RST, pin/baste unhemmed edge of ruffle to armhole from front corner to back corner. Gather excess on either side of shoulder seam and distribute evenly. Sew gathered ruffle to armhole. Repeat a second stitch 1/8″ [0.25 cm] along side the first stitching. Trim seam allowance.
- With RST, pin/baste backs to front at side seams. Sew and press seam open.
- Turn under seam allowance twice at underarm to create a double-rolled hem. Slipstitch or topstitch underarm.
- With RST, pair the back pieces at centerback and pin/baste along CB seam. Sew seam from bottom of extension to hemline. Press CB seam open.
- Create a waist suppression by making front waist dart under the bust on the front of the blouse. Pleat out the excess fabric and stitch up dart. Press dart fold towards sides.
- Hem bottom of blouse with a narrow double-rolled hem.
- Hand-stitch a hook & eye set at top of CB neck.


HOODED WRAP COAT

Featured: Hooded wrapcoat by Mara Hoffman
The appeal of the flat-felled seam is
that it makes the joint stronger by running two lines of stitches
through each piece of fabric, while simultaneously encapsulating the raw
edges and preventing them from unraveling. This is the special seam
that designers use to create your denim jeans. What’s more, it’s pretty
simple once you get the concept. You can make it even easier by running
an iron over the seam after you make each fold. Set it to a low heat so
that you don’t scorch your fabric and try making a hooded wrap coat like
this one from Mara Hoffman. Use a cozy double-sided winter coating and skip the lining.
You will need:- 3 1/4 yds. of fashion fabric, 54″ wide
- 2 yds. of stay tape. 5/8″ wide
- coordinating thread

Add a 3-1/2″ hem allowance to the body pattern pieces and appropriate seam allowances for desired size of flat-felled seams (I used 3/4″ for 3/8″ flat-felled). All other seaming can be 1/2″ seam allowance.
CUTTING

ASSEMBLY
- Layer the pocket placket (right side) to the patch pocket (wrong side) pin/baste and stitch seam. Press seam allowance upward and grade. Turn under 1/2″ seam allowance and press.
- Aligned pressed edge to machine stitching and topstitch the placket in place.
- Topstitch the top edge of the pocket.
- Press under seam allowance on patch pockets and edge stitch on fronts.
- Join fronts and back at shoulders with RST*.
- Secure a stay tape on shoulder seams. Double topstitch shoulder seams.
- Join sleeves to armholes with RST. Grade seam and secure with a stay tape. Double topstitch armscye seams.
- Fold body and sleeves with WST*. Pin/baste side seams and underarm seam. Stitch seams with a flat-felled seam.
- Make loop carrier. Cut into 3 equal lengths.
- Stitch belt loops to side seams 5″ below armholes.
- Fold the remaining loop at the CB neck and baste in place.
- Layer hood pieces together with WST. Pin/baste center seam. Stitch center seam with flat-felled seam.
- Pin/baste hood to neckline with WST. Pin/baste neck seam catching back neck loop. Trim. Sew neck seam with a flat-felled seam.
- Fold up hem 3″ and topstitch.
- Fold cuffs in half RST and sew up short ends. Press open.
- Pin/baste cuffs (RSU) to sleeves (WSU). Sew sleeve cuff opening. Grade seam and press seam allowance towards cuff.
- Turn under 1/2″ on cuff and align turn with machine-stitching. Topstitch the cuff seam. Topstitch cuff edges.
- Pin/baste front placket to front edges and hood with WST. Sew placket to coat using 1/2″ seam allowance. Grade seam and press towards placket.
- Turn up short ends of placket and turn under 1/2″ of placket. Press. Align pressed edge to machine-stitch and topstitch. Topstitch placket edge.
- Press under 1/2″ on short ends of sash. Fold sash in half (RST) lengthwise and stitch the long seam. Grade. Turn sash right side out and press flat. Topstitch around perimeter.
THE FLAT-FELLED SEAM
To begin, lay one piece of fabric on top
of the other. The bottom piece of fabric should extend beyond the upper
piece by the width of the seam (the seam-to-be, that is). Sew a line of
stitching in from the edge of the top piece by the width of the seam.

Flip the bottom piece out from underneath
so that both are lying flat on the table and the extra flap sticks up
in the air. Fold the longer flap down over the short one and then fold
both of them down flat, as shown. Sew a line of stitches to hold down
the flap. When you sew this second row of stitches, be sure to gently
pull the two pieces of fabric taut and press the overlap flat as you
feed it through the sewing machine. This will result in a cleaner and
stronger seam.

DIRNDL SKIRT
 Featured: Dirndl Skirt by Valentino

The Dirndl skirt (a full skirt with a
gathered waistband) has come a long way since its origins in traditional
German costume. Lots of prominent designers have included dirndl
skirts in their collections recently. The Dirndl featured above is from
the Valentino collection.
You can incorporate this adorable look
into your wardrobe. The Dirndl skirt looks great on everyone! In
contrast with the full skirt, the tight waistband highlights curves and
minimizes your waistline. The full skirt also makes legs appear
thinner.
Overall, the look is very figure flattering and feminine.
You will need:- 2 – 3 yds. of fashion fabric, 60″ wide
- 1 – 1 ½ yds. of fusible interfacing, 22″ wide
- 1 skirt zipper, 7″ long
- 2 hook & eye set, size 0
- Coordinating thread
- Heavy-duty thread
- Kraft paper
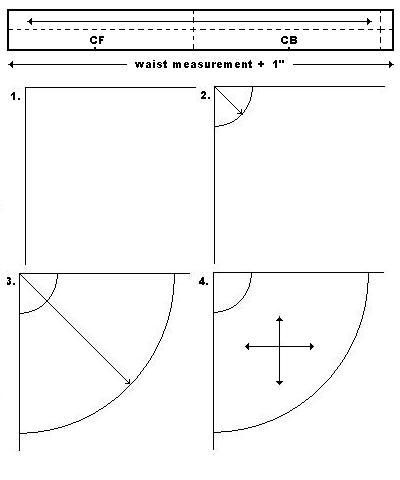 On kraft paper, draw a line equal to your waist measurement. Add a 1 inch extension.
Draw a parallel line 4 inches from first line. Connect the 2 lines by joining the ends together. Draw the grainline through the center of the pattern. Add ½” seam allowance to the perimeter. This is the waistband.
Draw a right angle on kraft paper. (1)
From the right angle, pivot an arc using a compass equal to your waist measurement. (choose radius from the chart). (2)
 From the right angle, swing an arc equal to the chosen radius measurement plus 22 inches or desired finished length. (3)
Draw grainlines parallel to the vertical and horizontal axis in the center of the pattern piece. Add ½” seam allowance to the waistline and ¾” seam allowances to the side seams. (4)
CUTTING
Cut waistband 1X self
Cut skirt 2X self
Cut waistband interfacing 1X fusible
ASSEMBLY
- Mark the center on each skirt piece.
- Staystitch the waist seam on each skirt piece. Do this from the side seam to the center.
- Do a seam finish on the side seams to neaten raw edges. (I used pinking shears).
- Layer the skirt pieces with right sides together and pin/baste the left side seam. Stitch the seam beginning 7 ½” from the top, using a ¾” seam allowance. Press seam open.
- Insert skirt zipper using a lapped zipper application.
- With right sides together, pin/baste the right side seam. Stitch seam using ¾” seam allowance. Press seam open.
Open zipper and place heavy-duty thread slightly above the waist staystitching. Zig-zag stitch over the thread. Do this along the whole waistline. (Use a wide, long zig-zag and loosen your machine tension slightly).
- Turn under the seam allowance on one long edge of the waistband and press.
- At one short end, clip seam allowance 1 ½” from end for the extension.
- Fold the waistband in half with right sides together, and stitch the short ends. Grade seam and trim corners. Turn right side out.
- Divide the waistband in quarters excluding the extension. Beginning from the back of the skirt, pin the unpressed edge of the waistband to the skirt matching quarters to the CF, CB and side seams.
- Gather up excess fabric by drawing up on heavy-duty thread and shirr the skirt waist evenly and in proportion. Sew seam slightly beneath the staystitching at the waist.
- Turn the raw seam up into the waistband and encase it. Align the pressed edge of the waistband to the machine stitching. Slip-stitch the waistband to the skirt and the opening on the extension tab.
- Stitch a pair of hook and eyes on the inside of the waistband and the extension tab.
- Hem the bottom of the skirt with a ¼” double-rolled hem.
HIP HOLSTER
 Travelling
through the urban jungle isn’t like dustin’ crops, buddy! For one
thing, you’ve got to make sure you’ve got all your gear with you. You’ve
got a cell-phone, iPod, headphones, keys, wallet, sunglasses… Before
you know it, your pockets are bulging, and you’ve got nowhere to hook
your thumbs and look cool.
Travelling
through the urban jungle isn’t like dustin’ crops, buddy! For one
thing, you’ve got to make sure you’ve got all your gear with you. You’ve
got a cell-phone, iPod, headphones, keys, wallet, sunglasses… Before
you know it, your pockets are bulging, and you’ve got nowhere to hook
your thumbs and look cool.
I’ve found this awesome holster that hold
lots of gadgets, and keeps them readily available. You never know when
you’ll need to grab your cellphone, iPod, wallet, keys, headphones, pen,
whatever… so make sure they were right at the ready to go. The pattern
is easy and the fabrication is simple.
You will need:
- 1 yd. of cotton poplin or duck, 60″ wide
- 5/8 yd. of fusible interfacing, 60″ wide
- 1 closed 8″ coil zipper
- 1 square ring, 2″ diameter
- 1 slider, 2″ diameter
- 1 dome snap set, 3/4″ diameter
- 30″ of cable cord, ¼” thickness
- Coordinating thread
PATTERN

CUTTING
Cut ring tab and wallet #5 2X and cut all remaining pieces 1X in fabric.
Cut all pieces 1X in fusible interfacing.
Cut 30″ of 1 ¼” wide bias binding for piping.
ASSEMBLY
- Make up piping trim with bias strip and cable cord using a zipper or cording foot.
- Iron the fusible interfacing to the wrong side of all fabric pieces except 1 wallet piece (#5), following the manufacturer’s directions.
- For the cell latch (1), fold right sides together and stitch long edge and one short end using ½” seam allowance. Grade and trim corner. Turn right side out. Press.
- Topstitch around the perimeter. Attach top part of dome snap as illustrated, following manufacturer’s directions.
- For cell pocket (2), sew each miter corner using ½” seam allowance. Trim.
- With right side together, fold pocket in half and align corners one on top each other.
- Sew along the raw edge, leaving an opening on one side for turning. Trim and grade seams.
- Turn right side out and press finished edge. Attach bottom part of dome snap as illustrated, following manufacturer’s directions.
- For ring tab (3), layer both pieces with right sides together. Sew along both shaped sides using ½” seam allowance. Trim and grade seams (the center should be 2″ wide). Turn right side out and press. Topstitch along finished seams.
- For wallet, turn under straight top edge of one piece of #5 and stitch down. Layer this piece with the second #5 piece to create a pocket. Baste outer edges together. Attach top (4) and bottom (5) together, then topstitch this seam. Apply corded piping to outer edge. (clip the piping in the corners to release the buckling).
- Attach zipper around top edge of the face of the wallet, next to the piping. Start midway up side, over the top, and down the opposite side.
- For the wallet side (6), fold strip in half with right side together and sew up short ends using ½” seam allowance. Press seam open.
- Fold “loop” in half with wrong sides together and match up raw edges. Baste together.
- Press the folded edge.
- Pin and baste raw edge of wallet side (6) to zipper and remaining wallet front (4-5) along the piped edge. Sew wallet side (6) close to zipper through all layers using a zipper foot and continue around the face of the wallet section.
- For the holster shoulder strap (7), fold the fabric with right sides together and pin/baste the long edge. Stitch across both short ends and the long edge leaving 5″ opening for turning using ½” seam allowance. Grade and trim corners.
- Turn right side out. Press. Topstitch around the perimeter.
- Wrap ring tab (3) around 2″ square ring.
- Position the holster strap face up with the folded edge of the strap to the left.
- Place the wallet on the wide end of the holster strap. Pin in place. Sandwich the ring tab (3) between the wallet and the strap midway between zipper and bottom of wallet. Baste the wallet in place. Edgestitch through all layers around pressed edge of wallet.
- From top of wallet, measure upward 6 inches. Center cell latch (1) on holster strap face down. Sew across unfinished short end. Trim.
- From top of wallet, measure upward 3 inches. Center cell pocket (2) on holster strap. Pin/baste and edgestitch around finished edge being certain to catch the turn opening in the seam stitching.
- Apply 2″ slider to narrow end of holster strap. Insert narrow end of strap through the square ring and back on itself to the slider. Tack ends in place.
FORTUNE COOKIE PURSE
 Confucius say: “Make this bag and good fortune will bestow upon you.”
You will need:
- ½ yd. of Fashion fabric, 45″ wide
- ½ yd. of Satin lining, 45″ wide
- ½ yd. of Fusible interfacing, 22″ wide
- 1 yd. of Cording
- Coordinating thread
- 1 Closed nylon zipper, 12″ long
- 1 shank button

CUTTING
Cut fashion fabric, lining, and interfacing each 1X.
Cut cording 16″ long 2X; button loop 4″ 1X
ASSEMBLY
Iron fusible interfacing to wrong side of fashion fabric following manufacturer’s directions.
- With right sides together, lay lining on top of fashion fabric. Baste together.
- On centerline, draw a narrow rectangle equal to the zipper length + 1/8″.
- Staystitch around this outline.
- Cut down center of rectangle and diagonally into the corners at each end using sharp pointed scissors. Remove basting.
- Flip fabrics right side out by inserting lining through slashed opening.
- Press seams of opening flat for a neat professional look.
- Place zipper face up in center of opening. Pin and baste into place.
- Topstitch around the zipper opening. Open zipper.
- Add 2 long cord loops, one on each end of bag. Double the cording to form a large strap loop. Attach cut ends side-by-side at end of zipper. Sew a button loop to on end and attach a shank button on the other (as shown in model). *
- With right sides together, fold the fashion fabric in half and match notches. Pin and baste together along curved edge. (Keep lining free).
- Stitch curved seam and catch cording in the seam using a ½” seam allowance. Clip and notch seam allowance along curve.
- Repeat procedure for lining, leaving a 5″ opening.
- Turn bag right side out through zipper opening and slip stitch lining seam closed.
- To form the fortune cookie shape, “fold” purse and latch button to the button loop.

VESTS MAKE THE MAN

Leather vests are an ideal fashion in
traditional or western design for all seasons. It makes a bold statement
when worn as outerwear when the weather is too warm and unforgiving for
a jacket. Vests with simple styling and function can replicate your
looks and will make you look simply outstanding. So get in this garb and
feel the punch in any season.
You will need:
- cowhide leather
- kasha lining
- fusible interfacing
- coordinating polyester thread
- double-sided leather tape, 1/4″ wide
- leather machine needle
- 4 dome snaps
- bone turner
Chest – measure just under the arms around the upper body.
Back waist length – measure from nape of neck to waistline.
Back width – measure from armhole to armhole across shoulder blades.
PATTERN
Draw a straight line and locate a point. Label X.
1 from X = back waist length + ½”
2 from 1 = midway between X and 1
3 from 1 = 3″
Square lines across the paper from these points.
4 is located midway between X and 2
5 from 1 = ½”
Join 4 and 5 with a straight line.
6 from 5 = ½”
7 from X = 3 ½”
8 from 7 = 1″
9 is located where line 4-5 intersect line 2
10 from 2 = ½ chest measurement + 3″
Square up and down from 10.
11 from 10 = 1/3 the distance from 2 to 10.
Square up and down from 11
12 is located at intersection of line 1.
13 is located at intersection of 1 and 10.
14 from 2 = ½ back width + ½”
Square up and down from 14.
15 from 14 = 1″
16 from 11 = 1″
17 is midway between 15 and 16.
Square down from 17 to locate 18 and 19.
20 and 21 are ½” on either side of 18.
Shape the side seam as shown.
22 is located at the intersection of X and 10.
23 from 22 = 3 ½”
24 from 10 = 1″
Join 23 and 24 with a straight line.
B from 16 = 6″
C from 11 = 6″
D is located midway between B and C.
Join 8 and D with a straight line.
25 from 8 = 4″
26 from 23 = 8 to 25
Shape armsyce with a deep curve in the front and a shallow curve in the back.
 27 is the intersection of 10 and 3.
28 from 27 = 2″
29 from 28 = 2″
At point 12, draw a welt pocket opening 6″ x 1″ as shown.
Shape the front hem as shown.
Trace off the front of the vest, from the shoulder
down to the front, and the bottom edge to the side seam. Make a front
facing pattern with at least 1 ½ inch width at shoulder and hem.
Trace off welt and double its width. Add seam allowance.
CUTTING
Vest Front – cut 2X
Vest Back – cut 2X
Vest Facing – cut 2X
Front Lining – cut 2X
Back lining – cut 2X
Front interfacing – cut 2X
Welt – cut 2X
ASSEMBLY
- Sew the welts onto the front sections of the vest.
- Place the vest backs right sides together. Leather tape the back seam. Sew the CB seam. Flatten the seam with a bone turner and clip seam allowance if necessary.
- Place the vest back and vest fronts right sides together. Leather tape the back and front together along the shoulders and sides.
- Stitch the vest back and fronts together along the shoulders and sides, using 1/2 inch seam allowance. Flatten the seams with a bone turner.
- Iron the fusible interfacing to the wrong side of the front facing using a low heat setting and presscloth.
- Sew the front lining to the front facings.
- Sew the lining fronts and back together the same way as the outer portion in step 3 and 4.
- Place the vest and the lining right sides together, lining them up along the edges, and use small paper clamps to keep them together. Stitch the vests along the front and neckline, and around the armholes. Stitch along the lower edge of the vest front, leaving the lower edge of the vest backs unstitched.
- Turn the vest right side out. Use the bone turner to gently push out the edges of the vest.
- Turn the un-sewn edges of the lower back to the inside of the vest, so that the folded edge is even with the rest of the back. Press the folded edges under, and leather tape them together.
- Top-stitch along the outside edges of the vest and the armholes. Make sure the lower edge of the back of the vest gets sewn closed in this seam.
- Apply the snap domes to the front of the vest following the manufacturer’s directions.
(Note: A man’s vest closure laps from left to right).
HALTER GOWN

Silk charmeuse is pure luxury. It is
soft, elegant, and surprisingly versatile. Charmeuse is a medium weight,
woven silk with a lustrous appearance, rather like the surface of a
pearl. And like the pearl which it resembles, it is an elegant classic!
Try it to create this alluring halter
gown… the perfect creation in a super flattering style. Very easy
pattern to make, the halter is not fitted, so slips over the head and
ties at the nape while a fabric rosette adds interest detail for a
romantic touch.
You will need:- 3 ½ yds. of charmeuse, 54″ wide
- 3 ½ yds. of sheer organza, 54″ wide
- 3 yds. of satin ribbon, 3″ wide
- Coordinating thread
CUTTING
 Fold fabric in half on crossgrain with selvedges aligned. Baste selvedges together with long stitches.
Place centerfront [CF] of pattern on fold. Weight down and cut out fabric 1X on fold.
For rosette, cut pattern 1X on true bias grain
ASSEMBLY
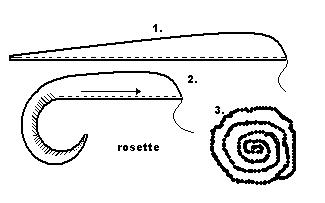 To make rosette, pink curved edge. Fold fabric lengthwise in half. Sew a running stitch
along the folded edge and gather tightly. Starting with the narrow end,
spiral the fabric onto itself and tack gathered edge as you form the
rosette.
To make rosette, pink curved edge. Fold fabric lengthwise in half. Sew a running stitch
along the folded edge and gather tightly. Starting with the narrow end,
spiral the fabric onto itself and tack gathered edge as you form the
rosette. Staystitch 1″ either side of notch [●] on centerback seam [CB] using ½” seam allowance. Clip seam allowance to stitching.
With wrong sides together, layer the charmeuse and organza. Pin and baste between ● to CF. Sew seam using ½” seam allowance. Clip a V-notch in seam allowance at CF. Press seam open.
Along curved edge, match edges and sew both layers together using a 1/2″ seam allowance. Trim seam allowance. Turn right side out through CB seam.
Press seams flat. Baste CB seam together. Topstitch along curved seam through both layers to finish the hem.
 Cut ribbon in 2 pieces for strap ties. On one end, fold the ribbon at a 45°angle with a ½” extension.
Align the L-shape to the CB with the garment face up and place the ribbon on top of the finished edge, stopping 3″ from CF. Repeat in reverse on the opposite side of the CF.
Topstitch ribbon ties through all layers of the garment on both edges of the ribbon.
With right sides together, pin and baste CB seam. Stitch back seam using ½” seam allowance. Press seam open.
 Crisscross strap ties at a 90° and sew through opposite corners of the layered ribbon. Fold back “point” at CF and tack down. Attach rosette at CF.
TIP: Check this link for working with charmeuse and organza fabrics.
SOHO SLOUCH TOTE
 Suede is a natural Aniline leather
that has been surface brushed or buffed on the grain side of the
leather creating a nap and leaving a texture similar to velvet (softest
of all leathers to the touch). Usually suede has a natural finish, but
may have a light protective coat and a transparent leather dye for
colour. This process increases the leathers surface exposure making it
extremely absorbent. Water drops will darken the leather but it returns
to its original colour after drying.
Suede is a natural Aniline leather
that has been surface brushed or buffed on the grain side of the
leather creating a nap and leaving a texture similar to velvet (softest
of all leathers to the touch). Usually suede has a natural finish, but
may have a light protective coat and a transparent leather dye for
colour. This process increases the leathers surface exposure making it
extremely absorbent. Water drops will darken the leather but it returns
to its original colour after drying.
Irresistible in butter-soft suede is this chic Italian bag from Sundance.
It deftly adapts to bulky or bitty loads with ease. Zen-like styling
(no zips, pockets or snaps) make this easy and versatile carryall for
virtually everything.
You will need:- 1 – 4 oz. [1/16" thick] Suede split hide, 16 square ft.
- 1 spool of cotton or nylon thread
- 1 leather machine needle
- Kraft paper
- 1 rotary cutter with pinking blade
- 1 roll of double-side mounting tape, 1/4″ wide
Transfer pattern onto graph paper. Each square equals 1/2 inch.
Copy onto a folded piece of kraft paper so you have the entire pattern for easy 1-ply cutting of the leather.
Dimensions: Approx. 11″H x 9-1/2″W.
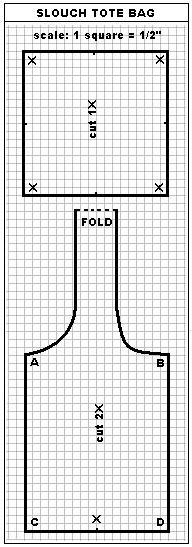
CUTTING
Check skin for any tears and blemishes on the face of the suede. Chalk around them to avoid them when cutting.
Chalk out pattern on skin and cut out
using pinking blade of a rotary cutter. Use a cutting mat to protect
cutting surface. Cut base 1X and sides 2X. (Raw edges will not fray).
ASSEMBLY
Tape one seam [AC] with mounting tape of each side section of the tote.
On one side section, with right sides together, remove the backing on the tape and align with opposite end of section [AC] to form a bag loop. Stitch ¼” seam allowance along AC.
With a bone turner, crease the seam open. Fold the seam allowance to
one side and edgestitch along seam on the face through all the layer. (I use a Teflon ® presser foot to reduce drag).
Repeat the above directions for the other section.
Join each side with right sides together from B to D with mounting tape. Stitch ¼” seam allowance. Now you will have 2 handles. 
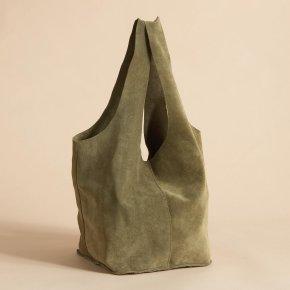
At each X mark on the side section, snip a ¼” slit.
Tape the perimeter of the base on the wrong side with mounting tape. Place the X notch of the side sections at each corner of the base. (The slit will create a square corner). Remove backing one strip at a time and join with wrong sides together. Machine-stitch from D around the bottom, pivoting at X and continue around the base of the tote.
COVERT SCARF
 Hit the town this fall with the unique style of the Covert Scarf. A warm cozy neck wrap like this one made by Arc’teryx™ is made with Polartec® Thermal Pro®
sweater knit fleece for supreme itch-free comfort and warmth on chilly
nights out. The Covert Scarf is nicely bound-finished with a zippered
stash pocket laminated on it to hold house-keys and ID when you don’t
want to pack a purse.
Hit the town this fall with the unique style of the Covert Scarf. A warm cozy neck wrap like this one made by Arc’teryx™ is made with Polartec® Thermal Pro®
sweater knit fleece for supreme itch-free comfort and warmth on chilly
nights out. The Covert Scarf is nicely bound-finished with a zippered
stash pocket laminated on it to hold house-keys and ID when you don’t
want to pack a purse.- ¼ yd. of Polartec® Thermal Pro® Fleece Knit, 60″ wide
- 1 yd. of water-proof cotton poplin or duck, 54″ wide
- Coordinating thread
- 1 closed zipper in matching colour, 6″ long
- small piece of fusible interfacing (7″ x 3″)
Draw a rectangle 60″ X 8″. At the center taper in 1″ on each side and blend lines gradually to reduce the bulk around your neck. At each end round the corners.

Cut out in thick pill-free polar fleece.
Draw a patch pocket 8″ X 7″ and round off the 2 bottom corners. Add ½”seam allowance all around. Cut out in poplin or cotton duck.
MAKING BIAS BINDING
Binding is a way of neatening a raw edge using a separate length of fabric, usually in a contrasting colour or fabric. The binding trim is cut on the bias as this makes it slightly easier to shape around curves. Cut out in poplin or cotton duck.
Instructions on Cutting Bias Strips
 To cut bias strips fold the fabric diagonally so that a straight edge is parallel to the selvedge at a 45°angle.
Press this fold and use this crease as a guide to mark parallel lines for bias strips. (fig.1)
To join bias strips place two lengths, right sides together, right angles to each other and stitch.
Open out, press seam open and trim off the overlapping edges. (fig. 2)
Instructions on Binding the Scarf Edge
Cut bias strips 4 times the finished width of the binding required (the model shown is ½” wide).
Fold both raw edges to the centre on the back, down the length of the bias strips and press. (fig.3)
Open up one side of the binding. Place this side of the binding onto the right side of the scarf with raw edges matching and baste. (fig. 4) Machine stitch on foldline of bias binding. Do not stretch bias strip and ease around curved corners.
Fold the binding over the raw edge to the wrong side of the scarf fabric.
Pin and slipstitch the fold of the binding to line of stitches on the wrong side to encase the edge. (fig. 5)
MAKING STASH POCKET
Cut out the patch pocket in poplin or cotton duck.
 Find
and mark the position where you would like the zippered opening to lie
on the patch pocket. This should be on the right side of the fabric. You
can put a strip of fusible interfacing on the “wrong” side of the fabric at that position, to make the opening a little sturdier.
Find
and mark the position where you would like the zippered opening to lie
on the patch pocket. This should be on the right side of the fabric. You
can put a strip of fusible interfacing on the “wrong” side of the fabric at that position, to make the opening a little sturdier.Next, place and pin a strip of fabric for the facing (3″ X 7″) so that its center covers the pocket opening position, with right sides together. Baste in place.
Chalk a narrow rectangle that’s just a little bit longer than your zipper. Sew around this outline. (fig. 6)
Carefully cut a line through both fabrics within the rectangle, as shown at left, with diagonal cuts towards the corners. The closer you can get to the stitching, the neater the pocket’s finished appearance will be. Use sharp pointed scissors. (fig. 7)
Turn the zipper facing towards the inside, through the opening. You may want to press at this stage, so that the opening is neat and professional looking.
Center the zipper into place and baste. Using a zipper foot, topstitch around the opening to secure the zipper. (fig. 8 )
Stitch along the bottom of the facing to secure to the patch pocket. (This stitching is visible on the right side.)
Turn under ½” seam allowance all around the perimeter of the stash pocket. Press. (fig. 9)
Center stash pocket on one end of scarf and edge stitch around the pocket.
BOXER SHORTS
 Jockey
shorts are a no-no but boxers are a capital YES. No longer relegated to
the underwear department, boxer shorts are everywhere. Teens wear them
with T-shirts, men and women wear them for sleep shorts and athletes
wear them for playing basketball. Boxers are easy to make, requiring
only one pattern piece, and no fitting. So ditch those tighty-whities
and embrace a new style of colourful drawers today!
Jockey
shorts are a no-no but boxers are a capital YES. No longer relegated to
the underwear department, boxer shorts are everywhere. Teens wear them
with T-shirts, men and women wear them for sleep shorts and athletes
wear them for playing basketball. Boxers are easy to make, requiring
only one pattern piece, and no fitting. So ditch those tighty-whities
and embrace a new style of colourful drawers today!- 1 yd. [1 ¼] of cotton fabric (45″wide) for waist 24″-36″ [37"-45"] *
- 1 ½” wide sew through sport elastic, buy waist measurement minus 3 inches.
- Coordinating cotton thread
- Kraft paper
* Buy 1/2 yd. more when sewing directional prints, matching a pattern repeat, or making legs longer than 3 ½”.
MEASUREMENTS
Waist – measure around the waistline at navel levelHip – measure around fullest part of hipline 9″ below waistline
Rise – while sitting measure side of body from waistline to top of seat.
PATTERN

Draw a straight line across top of kraft paper. Label point 1 as shown.
2 from 1 = half the hip measurement + 4″
3 is squared from 2 = rise measurement + ½”
4 is squared from 1 = rise measurement + ½”
5 from 1 = quarter of the hip measurement + 2″
6 is squares from 5 = rise measurement + 9″
7 from 3 = 2 ½”
8 is squared from 7 = 8 ½”
9 from 4 = 3 ½”
10 is squared from 9 = 8 ½”
Join points 8 - 6 – 10.
Point 11 is located midway between 9 and 10.
Using a set square, locate point 12 by drawing a 90° angle 1″ below line 8 – 10 joining points 6 and 11 as shown.
13 from 2 = 1 ½”
14 from 3 = 1½”
Join 13 and 14 to create the fly front on the centrefront (CF) line.
15 from 8 = distance of 11 – 12.
Join 4 – 11 with a smooth shallow curve as shown using a French curve.
Join 14 – 15 with a smooth deep curve as shown using a French curve.
Draw a grainline from point 5 to 6. Label the CF and the CB.
CUTTING INSTRUCTIONS: Cut 2X
ASSEMBLY
1. Once the fabric pieces are cut out, thread mark the center front line (dash line on diagram) on the left and right sides for reference in making the fly. Pin boxer fronts right sides together and baste.2. Sew lower part of front crotch curve, using a 1/2″ seam allowance from inner leg to 1/2″ above fly-front extension. Clip crotch curve right under fly extension, clipping seam allowance to within 1/4″ of crotch curve stitching.
3. Place shorts on the table with the right sides of the fabric facing you. Decide which side of the shorts you prefer the fly front to lap. (Men’s shorts lap left over right, but if you are making them for women then no fly is need. Trim away the fly extension). Mark lap over side with “O” and lap under side with “X” on some low-tack masking tape and place on each appropriate front piece.
4. On “X” side, fold under 1/4″ on fly extension. Fold again so that the first fold lines up with center-front marking. Sew 1/8″ from fold.
5. On “O” side, fold in fly extension to the wrong side along center-front line. Fold again so that raw edge is enclosed and lap-over side has three thicknesses and the folded edge lies along center-front line. Stitch lap-over side of the fly into place along inside edge of fly extension. This stitching will show on right side of shorts.
6. Position fly onto its placement line and press. Topstitch horizontally across the bottom edge of the fly and across top edge of fly 2″ away from the waistline edge.
7. With right sides together, sew backs to fronts at inner-leg seam. Finish seam with flat fell or overlocked seam. Turn one leg right side out. Insert this leg into the wrong side out leg. Pin remaining crotch curve together. Sew back crotch curve, continuing stitching from front crotch curve. Clip curves and finish seam.
8. Boxers are now ready for the elastic casing at waist. Press down raw edge 1/4″ along entire edge of waistline. To form casing, fold the width of the elastic plus 1/4″ to wrong side of boxers. Topstitch casing closed, leaving a 3″ opening at shorts back to insert elastic.
9. Start out by cutting the elastic your waist measurement minus 3″ or use a pair that you own as your guide to how tight to pull in the elastic. Insert elastic into casing. Try on shorts to determine how snug you would like them to fit. (If the boxers are for sleeping, elastic should be looser. Teenagers like to wear them a little lower than the waist so longer elastic is preferable).
10. To join elastic, butt ends of elastic over a piece of fabric cut twice the width of the elastic. Wrap elastic with fabric scrap. Zigzag-stitch the ends of elastic to fabric scrap. This method eliminates bulk in elastic and works to prevent frayed ends from protruding. Close opening in casing.
11. To hem shorts, press under raw edge of legs under 1/2″. Fold again so that raw edge of fabric is enclosed. Pin and baste. Topstitch hem into place.
WIDE-BRIMMED SUMMER HAT
 WIDE-BRIMMED SUMMER HAT
You will need:
- Kraft paper
- glue or scotch tape
- tape measure
- compass
- approx. 1 yd. of Pellon ® fleece interfacing, 45″ wide
- approx. 1 1/2 yds. of bottom-weight or upholstery fashion fabric, 54″-60″ wide
- approx. 1/2 yd. of lining fabric, 45″ wide
- approx. 3/4 yd. of grosgrain ribbon, 2″ wide
- coordinating thread
MEASUREMENTS
Begin by measuring the
circumference of your head. Wrap the tape measure around the back of the
head, over the ears, and high up on the forehead. For most people, this
will be approximately 22 ½ inches. Add 1” to your head measurement. This is the head fitting measurement (This
number may vary due to hairstyles as well. Most people will pull back
the hair or put it in an up-do to wear the hat properly.)
Next, you need to determine the radius (R) you will use to create a circle.
Use the formula, C = 2 п R, where п = 3.14
Eg. 23.5 = 2 x 3.14 x R
R = 23.5 divided by 6.28
R = 3.75
For a head fitting measurement of 23 ½”, you need a radius of 3 ¾”.
PATTERN
CROWN

Draw a rectangle equal to the head fitting measurement X the radius amount.
Divide the rectangle into 8 equal parts.
Slash each line from the top of the rectangle to almost the bottom edge.
Overlap each section left of center by ½” at the top to nil at the bottom and glue down.
Repeat for each section right of center.
Trace this new shape onto a new sheet of paper and blend the curved topline smooth.
Add ½” seam allowance around the perimeter. Label the 2 short ends, centerback (CB) and the centerline, centerfront (CF).
Draw a grainline 45 degrees to the center line. This is the side section of the crown.
Measure the new curved seam that you have created. Record this measurement.
Using the formula again, determine R for the top of the crown.
If you measure the circumference of the top section, it should equal the curved seam measurement of the side section.
(Adjustment Tip: Increasing or decreasing the circle by 1/8” all around will change the circumference by approximately ½”).
Use a compass and draw a circle using the amount for the radius (R).
Divide the circle into quarters. At the top and
bottom of the circle extend out ½”. At the sides of the circle, reduce
inwards by ½”. Join these points with a smooth arc blending into each
point to create an oval. Re-check the circumference of the oval. It
should still equal that of the new curved seam on the side section.
Add ½” seam allowance to the circumference and draw a straight grainline from CF to CB. This is the crown top.
BRIM

Fold a large piece of paper in half, then half again; open out flat.
Draw the 2 intersecting lines. Place a point in the center of the intersection.
Using a compass, draw a circle with a radius (r) based on the head fitting measurement plus 1”.
From the same point, draw a second circle with a radius (R) equal to 3 times r.
This is the brim width. (You may increase the width of the outer edge if you desire).
The inner circle must equal the head fitting
measurement. Starting at the top of the circle, measure half the head
measurement to the left of center and repeat on the right of center.
Mark a point at each interval. Square out from this point to the outer
edges. Label these edges, CB. This is the interfacing pattern.
Trace this brim shape onto a new sheet of paper.
Add ½” seam allowance all around the brim pattern. Draw a straight
grainline parallel to the centerline. This is the upper and lower brim patterns.
CUTTING
Cut the crown side 1X; lining 1X (on bias grain)
Cut the crown top 1X; lining 1X (on straight grain)
Cut the crown side interface 1X (on bias grain)
Cut the brim 2X (on straight grain)
Cut the brim interfacing 1X (on straight grain)
Cut 1 strip of self bias 2” wide; length to equal outer edge of brim + 2” (on bias grain)
ASSEMBLY
On each brim piece, pin and baste CB seam with right side together. Stitch seam using a ½” seam allowance and press open.
On the brim interface piece (Pellon ®), butt the two CB edges together and zigzag stitch it together.
Sandwich the interfacing between the two brim pieces with face sides up, lining up the CB seams. Baste together.
Do rows of topstitching parallel to the outer edge, ½” apart, starting from the inner edge. (I use the width of the presser foot as a spacer.) The more stitching you put, the stiffer the brim.
Bind the outer edge of the brim with the bias cut strip of self-fabric, beginning from the CB seam, folding in ½” to bind, and then turning under the end to encase the starting point. Press edge flat.
Baste the side interface to the wrong side of the side section.
With right sides together, pin and baste the CB seam. Stitch seam using a ½” seam allowance and press open. Grade seam allowances.
Divide top edge of crown side and the crown top
into quarters. Match up these points, pin and basting with right sides
together. Machine stitch the side section to the top of the crown, using
a ½” seam allowance. Trim and grade the upper seam allowance and interfacing only.
Repeat the same procedure for the hat lining.
With wrong sides together, place lining into crown, aligning with CB seam and baste seam allowances together. Turn right side out.
Now, insert crown into center hole of brim. Match up CB seams and pin and baste crown to brim. Machine stitch using a ½” seam allowance. (Clip seam allowance if there is any buckling).
Sew in grosgrain
ribbon as a “sweatband”. This should equal the head fitting measurement
less the inch. Lay the ribbon on top of the seam allowance and edge
stitch along the ribbon edge. Overlap at CB. Trim the seam allowance with pinking shears. Turn the ribbon up into the crown to conceal the raw edge of the seam allowance and tack to CB seam with hand stitching.
TIE ONE ON
 The Shape
The shape of the necktie is an
interesting item as it tends to fade in and out with current styles.
Designers prefer a shape known as the “half bottle”. This shape enables
a much more becoming knot with a small touch of refinement. However
the true half bottle shape which looks like the neck and shoulder of a
bottle typically doesn’t lend itself to some of the more narrower
styles. By narrow, I mean anything under 3.5 inches.
The four major parts of the necktie draft
equation are the length of the tie from the big tip to the knot, the
knot itself, the tie around the neck, and finally the tail end of the
tie that is hidden behind the front of the tie. The length should be
reasonable so that when one tip is touching the belt buckle, the other
tip can be securely held in place in the carrier on the back side.
You will need:
- sharp pair of scissors or rotary cutter
- silk pins
- ruler
- tailor’s chalk
- thread
- a new needle
- 1 square yard of silk fabric
- approximately 1 yard of wool tie fuse for your interlining.
THE NECKTIE DRAFT
A necktie is a symmetrical shape cut on the true bias grain (45 degrees).
You will need your height measurement and your neck measurement.
Tie Width = 3.5 – 3.75 inches (it can vary on current fashion)
Four in Hand Knot = 2 inch allowance
Pratt Knot = 4 inch allowance
Half Windsor Knot = 5 inch allowance
Full Windsor Knot = 6 inch allowance
Take a yard-length of kraft paper (36″)
and fold it lengthwise. Open the paper and draw a straight line on the
creased fold. Refold the paper.
FACE SECTION
 On the fold, mark a point, 1.
2 from 1 = (.30 x height) + neck measurement
Square across from 1 and 2.
3 from 2 = 3 x half the width measurement
4 from 1 = ½ distance of line 2-3
Join 3 to 4 with a straight line.
Divide line 2-3 and line 1-4 into thirds. Label points 5, 6 and 7, 8.
Connect 5 and 7 with a dotted line; connect 6 and 8 with a dotted line.
9 from 2 = line 2-3
Square across from 9. Label the intersection, point 10
Join point 9 to point 2.
11 from 1 = line 1-4
Square across from 11. Label the intersection, point 12.
Join point 1 to point 12.
13 from 2 = 7 inches
Square across from 13. Label the intersection, point 14.
Along the edge 14-10-2, make a parallel line ¼” and add a ½” seam allowance.
Trace all lines with a tracing wheel, then open paper and draw in lines using a ruler to retrace the lines.
To complete top portion, extend the line 1-12 with a tangent line across all lines.
Add ½” seam allowance parallel to tangent line.
Trace out the interface pattern and tip end as shown.
TAIL SECTION
 On the fold, mark a point, 1A.
2A from 1A = (.30 x height – 3) + knot measurement
Square across from 1A and 2A.
3A from 2A = 3 x quarter the width measurement
4A from 1A = ½ distance of line 2-3
Join 3A to 4A with a straight line.
Divide line 2A-3A and line 1A-4A into thirds. Label points 5A, 6A and 7A, 8A.
Connect 5A and 7A with a dotted tangent line; connect 6A and 8A with a dotted tangent line.
9A from 2A = line 2A-3A
Square across from 9A. Label the intersection of the tangent line, point 10A.
Join point 9A to point 2A.
11A from 1A = line 1A-4A
Square across from 11A. Label the intersection, point 12A.
Join point 1A to point 12A.
13A from 2A = 6 inches
Square across from 13A. Label the intersection, point 14A.
Along the edge 14A-10A-2A, make a parallel line ¼” and add a ½” seam allowance.
Trace all lines with a tracing wheel, then open paper and draw in lines using a ruler to retrace the lines.
To complete top portion, extend the line 1A-12A with a tangent line across all lines.
Add 1/2″ seam allowance parallel to tangent line.
Trace out the interface pattern and tip end as shown.
Make a carrier loop 6 inches by 1 ½ inches.
See this link to assemble and finish your necktie.
Check out this site to learn how to tie your necktie.
BABY DOLL SUMMER STYLE

A fun and fabulous
trend from the runway that works for all “non-model” body shapes!
Baby-doll dresses, with their forgiving fit and romantic feel, are the
smart choice for balmy summer weather. Flirty, flowy, and feminine, they
are a perfect staple for work, weekend, or travel. Wear with flat
sandals for day and transform for night with strappy stiletto heels or
wedges. For instant effortless style, choose one in a bold, solid color
or floral print, like this one from Nicole Miller at Bloomingdale’s.
And if you’re feeling extra daring, try a geometric pattern. Best of
all, these dresses work wonderfully well with this season’s essential
accessories. Try layering with leggings underneath for a not-so-hot day
or cinch high above the waist with a funky belt for an edgier look.
Baby-doll dresses have surfaced as one of the most prominent fashions in
the collections of designers everywhere. Given the emphasis on short
hemlines and loosely fitted clothes, it was perhaps inevitable. There’s
only one requirement: a great pair of legs.
THE PATTERNDRAFT
Let’s begin by folding the paper in half, lengthwise (for symmetry).
At the top of the paper, square a line across from the fold.
From this line, measure along the fold the finished length of the dress.
For example, the finish length of the model photo is 28″.
Square a line from this point across the paper from the fold.
Now along each of these draftlines, measure half the hip or bust measurement plus 6 inches (whichever is larger).
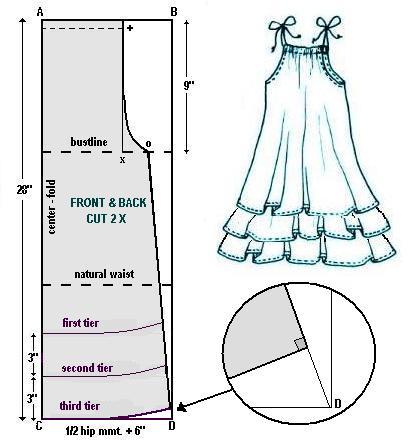
Join each point to create a rectangle. Label ABCD.
From line AB, make a parallel line 9 inches down the fold.
Divide this line into three equal sections and label the second third, point X. Square up from X.
Divide the distance from X to the edge in half. Label point O.
Join a straight line from O to D. (side seam)
Parallel to line AB, draft a line across from fold 1 inch. This will be the foldline for the drawcord casing.
Where it intersect line X, label +. Swing a shallow curve from + to O as shown.
Above point D, place a set-square on the sideseam line (OD) and draw in hemline with a smooth curve blending into the line CD from the 90 degree angle. [see bubble for detail].
For the three tiers, draw two parallel lines from line CD, each 3 inches apart.
Trace off each tier for each layer of the dress. [do this on folded pattern paper].
Add seam and hem allowances. Open the
folded paper for the complete pattern piece. Indicate the straight grain
parallel to the foldline with a grainline on each pattern piece.
Each pattern piece is cut 2 times and is used for both front and back portions.
- Stitch up sideseams and hem.
- Layer 2 tiers together and drop third tier inside by stitching together at armholes before turning right side out.
- Fold over top edge to create a casing and thread drawcord to create gathered neckline.
SASSY MINIS

This short and sassy
mini skirt duo are a whooping 6-8 inches above the knee – true ‘60s
style! Fun, flirty and flowing are the prominent themes with these
bias-cuts; fabricated here in cotton sateen and checked gingham with a pretty “net” underskirting.
To draft the skirt pattern you will need:
- Kraft paper (60” long x 30” wide)
- Tape measure
- Ruler
- Pencil
- Push pin
- String
1. Measure around your
waistline where you normally wear your skirt. (In the photo, this is a
hip-hugger style, approx. 2 inches below the natural waist). Record this measurement.
2. Fold along one end of the paper, 2 inches across its width. Open paper flat and draw in foldline with a pencil.

3. At a right angle (90
degrees), draw a second line perpendicular to the first line along the
length of the paper. Do this approx. 2 inches from the edge.
4. Where the two lines intersect, label this point X.
5. Use this formula for a circle to determine a compass point to draft your pattern.
4. Where the two lines intersect, label this point X.
5. Use this formula for a circle to determine a compass point to draft your pattern.
Radius #1 = Waist mmt. x 2 divided by 6.28
6. Tie the string to the pencil and measure the length of the string equal to the Radius. Using a push pin secure it at point X. This is a make-shift “compass” to create a circle.
7. Arc a curved line from A radiating from X . Be sure to hold the pencil upright and keep the string taut as you do so.
7. Arc a curved line from A radiating from X . Be sure to hold the pencil upright and keep the string taut as you do so.
This is the waistline of the skirt. (If you measure it with a tape measure, it should equal half your waist measurement).
8. Now, make the string 4 inches longer and repeat the last step from B radiating from X. This is the hip yoke portion of the skirt. Measure this line accurately with a tape measure. Record this measurement.
9. Now below this draft, fold the paper across its width. Open paper flat and draw in foldline with a pencil.
At a right angle (90 degrees), draw a second line perpendicular to the first line along the length of the paper. Do this approx. 2 inches from the edge.
Repeat steps 4 to 7 using this formula:At a right angle (90 degrees), draw a second line perpendicular to the first line along the length of the paper. Do this approx. 2 inches from the edge.
Radius #2 = yokeline mmt. x 2 divided by 6.28
10. Now, make the string 10 inches longer and repeat the last step. This is the flared skirt portion of the mini.
11. Use the same pattern piece but 2 inches longer for the net underskirt. Trace it off on paper.
12. In the center of each pattern piece, draw a line parallel to the foldline you began with. This is the grainline of the pattern. Indicate it with an arrowhead on each end of the line.
13. Add ½ inch seam allowances to all sides of your pattern pieces and label the following cutting directions:
- Yoke – cut 4 times
- Skirt Flare – cut 2 times
- Net Underskirt – cut 2 times
PATTERN DRAFTING BY HEIGHT
Posted by Don under apparel design | Tags: creativity, fashion design, pants, patterndrafting |[8] Comments
 This
pattern design method can be used to determine drafting measurements
from a given figure height combined with girth measurements for the
chest, waist and hips. Knowing the person’s height allows for
formulations of various lengths based on the Golden Mean and combined with established size parameters, a trouser or torso pattern can be drafted for an average human body.
This
pattern design method can be used to determine drafting measurements
from a given figure height combined with girth measurements for the
chest, waist and hips. Knowing the person’s height allows for
formulations of various lengths based on the Golden Mean and combined with established size parameters, a trouser or torso pattern can be drafted for an average human body.H = full length of body; also the span of laterally outstretched arms, measured from finger-tip to finger-tip, is equal to the height of the body.
1/2 H = upper part of body (torso) or lower part of body (legs)
1/4 H = length of leg from ankle to knee and length from chin to navel
1/6 H = length of foot and length of forearm (measured from elbow to wrist)
1/8 H = length of head from crown to bottom of chin
1/10 H = height of face; also length of hand
Drafting By Height: Trousers (based on 8 heads per figure)
The theory based upon the Golden Mean can be used to determine drafting measurements from a given figure height of an average or off-proportioned body. You need the following measurements to draft a trouser pattern: height, waist and hips. The scale is one head equals 1/8 of the total height.
Example:
for a person who is 5 feet 8 inches tall, one head length is 8 ½”
5′ 8″ = 68″ 68″/8 = 8.5″
Rise is 1 head plus 1″ ease plus width of the waistband
eg. rise = 1/8 height + ease + waistband width
Inseam is 4 heads minus Y (amount taken off for width of trouser cuffs)
eg. inseam = 1/2 height – Y
Outseam is inseam plus rise, or
5 heads plus ease minus Y plus waistband width
eg. outseam = 5/8 height + ease – Y + waistband width
Example:
Given a height of 5 feet, 8 inches, trouser cuff width of 18″ and a waistband 1-1/2″ wide, then:
rise = 68/8 + 1 + 1.5 = 11
inseam = 68/8 – 2.5 = 31.5
outseam = 5/8 x 68 + 1 – 2.5 + 1.5 = 42.5
Table for Leg Reduction (Y amount)
| for bottom width | take off Y amount * |
| 24″ | 1″ |
| 23″ | 1.25″ |
| 22″ | 1.5″ |
| 21″ | 1.75″ |
| 20″ | 2″ |
| 19″ | 2.25″ |
| 18″ | 2.5″ |
 Trouser draft:
square both ways at 0.
0-1 = body rise + 3/8″ [1cm]; square across
0-2 = waist to hip; square across. (approx. 8-9″ [20-23 cm]).
0-3 = outseam; square across
1-4 = midway between 1-3 minus 2″ [5 cm]; square across.
1-5 = 1/12 hip mmt. + 5/8″ [18 mm]; square up to locate points 6 and 7.
6-8 = ¼ hip mmt. + 3/8″ [10 mm]
5-9 = 1/16 hip mmt. + 3/8″ [10mm]
7-10 = 3/8″ [10mm] squared across and 3/8″ [10 mm] squared down
Join 10-6 with straight line and join 6-9 with a curve line as shown.
This is the centerfront crutch seam.
Square up and down from point 8.
10-11 = ¼ waist mmt. + 3/8″ [10mm] (note: point 11 will “sit” on line 7.)
12 is located at intersection of 3 and 8.
13 is located at intersection of 4 and 8.
Square down from 5 to locate 14 and 15
5-16 = 1/2 mmt of line 5-9
6-17 = ¼ mmt of line 5-9
7-18 = 3/8″ [10mm]; join 17-18 and extend as a tangent line
19-20 = ¼ waist mmt. + 3/8″ [10 mm], taken at a 90 degree angle from tangent line so that line 19-20 touches the line 7-11. (Note: point 19 will be located on the right angle and the constructed line may not touch at point 11 as shown.)
9-21 = ½ mmt. of 5-9
Join 17-21 with curved line as shown
3-22 = 1/4 trouser cuff width minus 1/4″ [6 mm]
23 is located on kneeline.
3-24 = ¼ trouser cuff width minus 1/4″ [6 mm]
4-25 = 4-23
Join 24-25 with a straight line and 25-9 with a curved line as shown.
24-26 = 3/4″ [20 mm]
25-27 = 3/4″ [20mm]
Join 26-27 with a straight line and 27-21 with a parallel curved line as shown.
5-28 = ¼ hip mmt. + 1/4″ [6 mm]
Join 22-23-28-8 and gently curve into 20 to draw outseam leg seam.
This is an easy fit type trouser pattern. Trace off front and back patterns. If you desire extra ease (seat angle) in crutch of trouser’s back portion, cut along back hipline and open a wedge about 1-1/2″ [40 mm] wide at CB to nil at side seam. Redraw centerback seam.
CONNECT-THE-DOTS
 How about an adult version of “connect-the-dots” to create some men’s wear? Sometimes known as
a tropical shirt, Hawaiian or aloha shirt, this casual type shirt is
loose fitting, short-sleeved and features a convertible collar with a
rever. Make it up in a border print or traditional floral print fabric.
How about an adult version of “connect-the-dots” to create some men’s wear? Sometimes known as
a tropical shirt, Hawaiian or aloha shirt, this casual type shirt is
loose fitting, short-sleeved and features a convertible collar with a
rever. Make it up in a border print or traditional floral print fabric.Take the following measurements of your man: chest, neck, arm length and finished length (usually hip level).
Note: 3/8″ seam allowance is included in draft
Working Scale = 1/3 chest measurement + 6″ (15.5 cm)
example: for a men’s medium size the scale = 42/3 + 6 = 20
PLOT EACH POINT & CONNECT-THE-DOTS
Mark point 0 and square both ways from it.
1 from 0 = ½ scale + 1″ (25 mm)
2 from 0 = ¼ scale
3 from 0 = 1/8 scale
4 from 0 = full length (30″/ 76 cm)
5 from 4 = 1 ½” (40 mm) for turn up.
Square all points across the paper.

6 from 0 = 1/6 scale + 3/8″ (1 cm); square up to 7.
7 from 6 = 1 ¼” (32 mm)
8 from 1 = 1/3 scale + 2 ½” (65mm); square up to locate 9 and 10.
11 from 10 = 1″ (25mm)
12 squared from 11 = 1″ (25 mm); join 7 to 12.
13 from 1 = 2/3 of half the chest measurement + 2″ (50mm)
14 from 1 = ½ of chest measurement + 2 ¾” (70 mm)
15 from 14 is midway between 13 and 14; square up to 16.
16 from 15 = ½ scale + 2 ¼” (58 mm); join 16 to 10.
17 is the distance between 7 and 12 – ¼” (6 mm) and is located on line 16-10.
Join 17 to 13; 18 from 17 = 1 ¼” (32 mm) and is located on line 17-13.
19 is midway 8 and 13; square down to locate 21 at hemline.
20 from 19 = 1 ¼” (32mm)

Shape armhole as shown with French curve ruler.
22 from 21 = 1″(25mm)
Join 20 to 22 for forepart side seam.
23 is located at intersection of hemline and centerfront (CF) line.
24 from 23 = ¾” (20 mm); shape front hem from 24 to 22 with 90° corners as shown.
25 is located at intersection of lines squared from 16 and 14.
26 from 16 = 1/12 scale + ¾” (20mm)
27 from 25 = 1/6 scale
Connect 26 and 27 and continue 1 ½” (40 mm) more to locate 28.
29 from 16 = ¾” (20 mm) for collar stand and creaseline of rever.
30 and 32 are each 1 ½” (40 mm) from CF line (overlap extension) as shown.
31 from 30 = 1″ (25 mm); join 31 to 29 to indicate roll-line of rever.
33 from 27 = ½” (13mm) for collar step.
Fold along line 28-32; trace out front shoulder, front neckline and front hem.
Shape self-facing as shown, making it 3″ 75 mm) wide at hem and blending uo to the shoulder for 1 ½” (40 mm). Note: The gray-shaded area should be interfaced.
Grainline is parallel to CB and CF lines. The CB may be cut on the fold.
Convertible Collar

Point 33 is the collar step for the collar and rever.
Trace out front neckline and rever, front shoulder, and roll line.
0 is located at intersection of roll line and shoulder
1 from 0 = back neck measurement (line 0-7 on body draft)
2 from 1 = 2″ (50mm)
3 from 0 = ½” (6 mm)
X is located where roll line crosses front neckline.
4 from X = 1 ½” (40 mm)
Shape 4 to 2 through point 3 with a French curve ruler.
5 from 3 = 1″ (25 mm)
Join 5 to 2 with a dash line and square on point 2 to locate 6 and 7.
6 from 2 = 2 ½” (65 mm)
7 from 2 = 1″ (25 mm)
Join 6 to 4 passing through point 3 with a French curve ruler.
To locate 8, swing an arc from 28 which is 2 1/8″ (55 mm) and another of equal size from 33.
Connect 8 to 33 and 8-7 with a slight curve. Then blend line 7-3-4. into point X.
Trace out as a separate piece for the top and under collar with the line 6-7 along a folded piece of paper.
Note: The under collar should be interfaced.
Grainline is parallel to line 6-7.
Short Sleeves*
* This may vary due to styling. Measure the circumference of the armhole from your draft.

Fold paper in half lengthwise.
Plot point 0 on folded edge.
1 from 0 = 1/6 armhole circumference + 1″ (25 mm)
2 from 0 = half of arm length.
3 from 2 = 2″ (50 mm)
4 from 0 = ½ armhole circumference (as it falls on line 1)
5 from 3 = 1/3 scale.
Divide 0-4 into 3 equal parts to locate 6 and 7.
8 from 7 = 3/8″ (10 mm)
9 from 7 = ¾” (20 mm)
10 from 6 = 5/8″ (17 mm)
Shape front sleeve cap 0-8-6-4 with a French curve ruler.
Shape back sleeve cap 0-9-10-4 with a French curve ruler.
Trace out the sleeve and the sleeve cap back portion.
Fold along line 3-5 and trace out bottom facing as shown.
Unfold paper for full short sleeve pattern piece
Note: grainline is located on line 0-2.
BERET & BELT (part 2)
 The lined beret is sized in small, medium and large with an inside grosgrain ribbon band. Measure
your head, placing the tape measure around your forehead and skull.
Choose your size by comparing your measurement to the hat measurements
below. The beret in the photograph is made up in lightweight woolen
fabric; I can suggest choosing a tweed, double knit, velvet, or
synthetic suede fabric as well to make it up.
The lined beret is sized in small, medium and large with an inside grosgrain ribbon band. Measure
your head, placing the tape measure around your forehead and skull.
Choose your size by comparing your measurement to the hat measurements
below. The beret in the photograph is made up in lightweight woolen
fabric; I can suggest choosing a tweed, double knit, velvet, or
synthetic suede fabric as well to make it up.SMALL BERET - 22" (56cm)
MEDIUM BERET - 23" (58.5)
LARGE BERET - 24" (61 cm)You will need:
½ yd. (.5 m) of fashion fabric
½ yd. (.5 m) of satin lining
7/8 yd (.8m) of 5/8″ (15 mm) grosgrain ribbon for headband
Matching colour thread
Pattern Pieces Key
1. Upper Section
2. Lower section

Enlarging The Pattern
Each square = 1″ (2.5 cm)
Includes 5/8″ (15 mm) seam allowance.
Enlarge your pattern on 1″ graph paper or a pattern tracing material such as Red Dot TM by HTC.
Pieces 1 and 2 are quarter pieces; for cutting ease, make each of these full pieces.
Cutting
Upper Section – 1 fabric, 1 lining
Lower section – 1 fabric, 1 lining
Ribbon – S – 23″ (58.5 cm)
M – 24″ (61 cm)
L – 25″ (63.5 cm)
Marking
Mark quarter points on the inner edges of lower section and lining.
Make A Beret in 6 Easy Steps

1. With right sides together, pin fabric upper section and lower section together; stitch. Press seams towards lower section, notching where necessary.

2. Topstitch lower section ¼” (6mm) from seam. Trim seam allowance.

3. Construct Lining upper and lower in same manner as Fabric. With wrong sides together and raw edges even, pin the Lining inside the fabric; baste.

4. Lap the ends of the ribbon headband, turning under ½” (13mm) seam allowance. Stitch in place. Using the seam as the center back, divide into quarters and mark.

5. Matching markings, pin the Headband to the Beret lower section, placing the edge along the seamline. Stitch close to the inner edge and again ¼” (6mm) away. Trim the Beret seam allowance close to the second stitching.

6. Turn the Headband to the inside along the seams; press. Tack the Lining at quarter points.
BERET & BELT (part 1)
 (Courtesy of Vogue/Butterick)
The wraparound obi style belt is sized in
small, medium and large. Choose your size by measuring your waist and
comparing your measurement to the chart below.
| S | M | L | |
| IN. | 24-25 | 26-28 | 30-32 |
| CM | 61-63.5 | 67-72 | 76-81 |
3/8 yds (.35 m) of synthetic suede or leather fabric.
Matching polyester thread.
SOBO TM Fabric glue.
Pattern Piece Key
1. Front
2. Sides
3. Tie Ends
4. Tassel

Enlarging the Pattern
Each Square = 1″ (2.5 cm)
Includes ¼” (6mm) seam allowances.
Enlarge your pattern on 1″ graph paper or a pattern tracing material such as Red Dot TM by HTC. Pieces 1 and 3 are given on a fold. For ease of cutting, makes theses full pieces.
Cutting
Front – cut 1
Sides – cut 2
Tie ends – cut 2
Tassels – cut 2
Marking
Use a water-soluble tracing paper and tracing wheel or marking pen. Mark the pleat lines on the wrong side of the belt. Mark the cutting lines for the tassel fringe on the wrong side of each tassel section. Cut along the lines.
Make A Belt In 6 Easy Steps


THE BOUFFANT SKIRT
Volume is one of the fashion directions for Autumn/Winter 2007. The
new volume is dramatic, often shocking in its surprise. But most
importantly is it does feel new, modern and forward looking however
revived or archive raided.

That ‘bubble’ hasn’t burst for the bubble skirt, according to Armani,
who made the shape the foundation of his new silhouette for fall. Extra
volume in clothing is everywhere. The general silhouette is showing a
growing acceptance of fullness in all areas and whatever your physique,
the trick to carrying off volume is to avoid choosing a garment that
makes the body look over burdened with masses of fabric.
Milan Fashion Week continued to play with the airy volumes that designers here seem set on carrying forward into Fall ‘07. Armani’s bubble silhouettes weren’t full jack-o’-lantern sized, but slimmer, prettier versions, softly draped
at the hem and worn with flats for a youthful look. If you wear the
bubble skirt make sure the top half has a closer fitting bodice, sleek
jacket or knit. If you have good waist but saddle bag thighs, cover the
thighs with a cinched waist fuller skirt with hemline interest. Many in
the collections featured hemline interest trimmed in velvets, fur, or
lace.
THE BOUFFANT SKIRT PATTERN

Drafting Method (overskirt):
1. Square the line A-B-C at right angles (90°) on kraft paper.
2. The waist measurement multiplied by 2 divided by 22 multiplied by 7 will equal the radius which is applied from point A to point D.
For example:
The waist measurement
= 66 cm (26”) x 2 = 132 cm (52”)
Divided by 22 = 6 cm (2 1/4”)
Multiplied by 7 = 42 cm (16 ½”)
Therefore D from A = 42 cm (16 ½”)
3. Swing an arc A through D to establish E. This is the waistline.
4. Swing an arc through B for the required skirt length plus 30 cm ( 12”) for blousing. Mark point C. This is the hemline.
5. The skirt is bias-cut with the centerfront grainline established at 45° angle at point A. This pattern is cut 2X. NOTE: Use a crisp textured fashion fabric for best results.
6. Reduce the hem via darts which must be evenly spaced as the diagram illustrates, to approximately half its circumference.
7. Prepare the underskirt to the appropriate length. (reduce skirt length by 10 cm (4”) to create the blousing.
8. Stitch seams along B-D and C-E. Gather overskirt at the hem and the waist to fit the underskirt. Set into a waistband.

August 22, 2007
3-in-1 skirt pattern
One pattern – 3 skirts styles…. A-line, flared, or full circle skirt fits a variety of body sizes and shapes. Easy peasy!

You’ll need:
 Drafting Method:
1. Square a line across the width of the paper and down its length with a ruler to create a 90 degree angle. Label the intersection, X.
2. Measure your waist.
3. Select the radius of the skirt style you wish to create based on your body measurements from the chart provided.
4. Tie a length of string to the pencil. Make the length of the string equal to the selected radius. (eg. for an A-line skirt to fit a 29″ waist, make the string 18-1/2″ long)
5. Pin the loose end of the string at point X using the thumbtack.
6. Extend the string taut with the pencil held steady and upright at 90 degrees and draw an arc from the horizontal line to the vertical line on the paper. This is the waistline.

7. Next, decide how long you wish to have the finished skirt length. Mini, knee length, mid-calf, maxi? Measure on your body from waist to the desired hem length.
8. Take a second length of string and attach it to the pencil. Make the string length equal to the radius amount plus the skirt length measurement. Pin the loose end of the string at the X and create a second arc on the paper. This is the hemline.
9. Lastly, create a waistband. Fold a piece of paper along its length. Measure along the foldline the full waist measurement plus 1 inch. Make the width 1 inch and mark a line parallel to the foldline and square the short ends.
10. Add seam allowances to all pattern pieces. Cut out skirt body. Cut out waistband piece on the fold and open flat.
11. Mark grainlines on pattern pieces. The waistband grainline is parallel along the foldline. The skirt grainline is parallel along either straight edge of the pattern.
12. For an A-line skirt – cut 1x; for a flared skirt – cut 2x; for a full circle skirt – cut 4x. Sew each panel along straight edges, leaving a opening for zipper. Cut the waistband 1x, and attach to waistline, allowing for a 1″ lapover extension. (Precautionary note: before stitching waistband to skirt body, try on skirt to determine if waistline needs to be adjusted). Hem with a narrow double-turned hem.
 Learn to make skirt patterns according to your
measurements; and they’re guaranteed to fit! To give you an
illustration of how easy it is to make a pattern, let’s make a 8-gore
skirt like the model is wearing. For the example, we’ll use a waist
measurement of 32 inches, hip 42 inches and skirt length of 24 inches.
Remember, when you make the skirt for yourself you simply use your waist, hip, and skirt length measurements instead of these sample ones.
Learn to make skirt patterns according to your
measurements; and they’re guaranteed to fit! To give you an
illustration of how easy it is to make a pattern, let’s make a 8-gore
skirt like the model is wearing. For the example, we’ll use a waist
measurement of 32 inches, hip 42 inches and skirt length of 24 inches.
Remember, when you make the skirt for yourself you simply use your waist, hip, and skirt length measurements instead of these sample ones.
Let’s establish your height parameters.

Square across the paper to make a “T” shape. This will be the waistline.
Then measure down 8″ [20 cm] and draw a parallel line squaring from the centerline. This is the hipline.
Measuring from the waistline, draw a second parallel line equal to your desired skirt length and square from the waistline. This will be the hemline.
Now that you have your grid set up, it is time to use your body measurements to set the girth parameters.
Start by deciding how many gores you wish to create. Even numbers (4,6, 8, 10, etc.) will make your skirt symmetrical, but I like to use the “rule of 3s”. Odd numbers (5, 7, 9, 11, etc.) makes for a more interesting look. Either way, the number of panels used will create a gore skirt that will fit.
For the waistline, take your waist measurement divided by the number of panels desired.
For example, to create a 8-gore skirt to fit a 32″ [81.5 cm] waistline.
32″ divided by 8 = 4″[10 cm]
The hipline is normally 8″ [20 cm] below the waist, so at that point you’ll make a horizontal like equal to hip divided by number of panels desired + ¼” [6 mm].
Our sample hip measurement is 42″ [107 cm], so the horizontal line is 5 ¼ ” [13.5 cm] plus ¼” [ 6mm] = 5 ½” [14 cm].
With a straight yardstick, draw in the outside lines of the skirt, connecting the waist to hip to the hemline and draw in the bottom line.
At the top of the”T”, measure down ¼” [6 mm] and make the slight waistline curve.
The outside edges of the bottom are measured up ¼” [6 mm] each and the slight hemline curve drawn.
Make your waistband to equal your waist measurement plus 1 ½” [40 mm], and the width is 2 ½” [65 mm] (your finished waistband will be 1 ¼” [32 mm] wide).
Remember you have not allowed for seams yet, so after making the skirt pattern, mark the 1/2″ seam allowance all around and add a 2″ hem. The seam allowance will be drawn around the skirt as well as the waistband.
Remember you will need to cut multiples of this pattern equal to the number of panels desired. Eg. cut 8 of the skirt pieces, since it is a 8-gore skirt.
The vertical center line of the pattern will be used as the “straight grain” line, when placing the pattern on the fabric.
 In the 1920s, the fur stole was the elegant secret of radiant
Hollywood divas, worn with delicate low-cut evening gowns – and even
worn provocatively with trouser suits by the “enfants terribles”
of the time. Today the fur wrap is once again the height of fashion –
made from faux fur with a bow tie. Now, as in the 1920s, it goes with
evening dresses, but also with business suits and simple knitted
dresses, and today it is still at its most seductive worn against bare
skin. Arrange this shapely fur around your shoulders and tie the opulent
double-sided satin ribbons into a large bow. Extraordinarily beautiful
and elegant, the colour – a rosé shade that is perfect for winter, looks
good with all dark colours, natural shades, and greys of the season.
In the 1920s, the fur stole was the elegant secret of radiant
Hollywood divas, worn with delicate low-cut evening gowns – and even
worn provocatively with trouser suits by the “enfants terribles”
of the time. Today the fur wrap is once again the height of fashion –
made from faux fur with a bow tie. Now, as in the 1920s, it goes with
evening dresses, but also with business suits and simple knitted
dresses, and today it is still at its most seductive worn against bare
skin. Arrange this shapely fur around your shoulders and tie the opulent
double-sided satin ribbons into a large bow. Extraordinarily beautiful
and elegant, the colour – a rosé shade that is perfect for winter, looks
good with all dark colours, natural shades, and greys of the season.
The soft, deep-pile woven fur is anti-static, soft and probably feels even better than real fur. It will keep its look for years, without losing hairs, and will never smell of mothballs. Measures approx. 40″ x 10″ (102 x 26cm).
You will need:
1/3 yd. (30 cm) of woven fake fur: 100% acrylic.
1/3 yd. (30 cm) of “Kasha” satin lining: 100% acetate
1/3 yd. (30 cm) of lamb’s wool interfacing: 100% wool
1 yd. (90 cm) of double-sided satin ribbon: 100% acetate
7 yds. (6.5 m) of ¾” wide twill tape: 100% polyester
 With
your piece of faux fur atop the work surface, place the wrong side up
and chalk an “arrow” pointing the direction of the fur pile. The hairs
of the fur will point “downward”. Chalk mark the center of the fabric,
and measure out 20″ [51 cm] on either side of the centerline. Square
from this point to create a rectangle, 40″ by 10″ [102 by 26 cm].
With
your piece of faux fur atop the work surface, place the wrong side up
and chalk an “arrow” pointing the direction of the fur pile. The hairs
of the fur will point “downward”. Chalk mark the center of the fabric,
and measure out 20″ [51 cm] on either side of the centerline. Square
from this point to create a rectangle, 40″ by 10″ [102 by 26 cm].
 Using
a large dinner plate, chalk mark curved pattern outlines on each corner
(see illustration). Cut out the backing with razor blade without
cutting fur. Hold the fabric backing slightly off the table and pull as
you slash. Do not cut out with scissors or you will cut the hairs.
Using
a large dinner plate, chalk mark curved pattern outlines on each corner
(see illustration). Cut out the backing with razor blade without
cutting fur. Hold the fabric backing slightly off the table and pull as
you slash. Do not cut out with scissors or you will cut the hairs.
For the lining, fold and pin the fabric right sides together, and measure 22″ [56 cm] from the foldline. Square a chalk line from this point to create a rectangle, 44″ by 12″ [112 by 30 cm] and repeat the arc pattern on each corner. Chalk a notch point on each end of the foldline. Cut out the lining on the fold and open flat.
 Sew a length of twill tape along the centerline of the fur piece with a hand herringbone (zigzag) stitch,
keeping edge of tape flat with back of the fur. These stitches can be
large as they will not show on the right side of the fur.
Sew a length of twill tape along the centerline of the fur piece with a hand herringbone (zigzag) stitch,
keeping edge of tape flat with back of the fur. These stitches can be
large as they will not show on the right side of the fur.
Sew twill tape on the outer edges to be sewn, with a hand herringbone (aka catch) stitch, keeping edge of tape flush with edge of fur backing and outline the perimeter with it. Since the “fur” has no seam allowance this will stabilize the edges from stretching and puckering.

Now, starting at the centerline, work with one fur side toward you and place the twill tape on top the fur edge to sandwich the fur edge between two layers of twill tape. Keep edges even and push hairs away from getting caught in tape. Join twill tape to edges with a close whip (overhand) stitch. Since the tape is necessary for reinforcement, be sure to catch both tapes as you do so. Sew around the perimeter of the fur piece. fig 1
Center the lamb’s wool interfacing on the back of the fur and baste along the center and to the edges. These stitches can be large ones as they will not be visible on the right side. Trim away any excess.
Turn the outer twill tape over the seam and pin to the inside edge on the back while wrapping over the interfacing. Baste twill tape to fur piece. fig 2
Cut the ribbon length in half and secure one end to each of the “X” points. (see illustration) to the fur piece. Cut the loose end on the diagonal.
 Turn in 1″ (25 mm) seam allowance on the satin lining and baste
along fold. Align notches at centerline. Pin lining to edges covering
the twill tape and interfacing. If lining edge puckers, clip shallowly
into seam allowance to release. Slipstitch along folded edge of lining to seam edge of fur. Remove basting thread.
Turn in 1″ (25 mm) seam allowance on the satin lining and baste
along fold. Align notches at centerline. Pin lining to edges covering
the twill tape and interfacing. If lining edge puckers, clip shallowly
into seam allowance to release. Slipstitch along folded edge of lining to seam edge of fur. Remove basting thread.
You’ll need:
- pencil
- ruler
- string
- thumbtack
- tape measure
- kraft paper (36″ long X 36″ wide)
1. Square a line across the width of the paper and down its length with a ruler to create a 90 degree angle. Label the intersection, X.
2. Measure your waist.
3. Select the radius of the skirt style you wish to create based on your body measurements from the chart provided.
4. Tie a length of string to the pencil. Make the length of the string equal to the selected radius. (eg. for an A-line skirt to fit a 29″ waist, make the string 18-1/2″ long)
5. Pin the loose end of the string at point X using the thumbtack.
6. Extend the string taut with the pencil held steady and upright at 90 degrees and draw an arc from the horizontal line to the vertical line on the paper. This is the waistline.
7. Next, decide how long you wish to have the finished skirt length. Mini, knee length, mid-calf, maxi? Measure on your body from waist to the desired hem length.
8. Take a second length of string and attach it to the pencil. Make the string length equal to the radius amount plus the skirt length measurement. Pin the loose end of the string at the X and create a second arc on the paper. This is the hemline.
9. Lastly, create a waistband. Fold a piece of paper along its length. Measure along the foldline the full waist measurement plus 1 inch. Make the width 1 inch and mark a line parallel to the foldline and square the short ends.
10. Add seam allowances to all pattern pieces. Cut out skirt body. Cut out waistband piece on the fold and open flat.
11. Mark grainlines on pattern pieces. The waistband grainline is parallel along the foldline. The skirt grainline is parallel along either straight edge of the pattern.
12. For an A-line skirt – cut 1x; for a flared skirt – cut 2x; for a full circle skirt – cut 4x. Sew each panel along straight edges, leaving a opening for zipper. Cut the waistband 1x, and attach to waistline, allowing for a 1″ lapover extension. (Precautionary note: before stitching waistband to skirt body, try on skirt to determine if waistline needs to be adjusted). Hem with a narrow double-turned hem.
GORED SKIRT
Learn to make skirt patterns according to your
measurements; and they’re guaranteed to fit! To give you an
illustration of how easy it is to make a pattern, let’s make a 8-gore
skirt like the model is wearing. For the example, we’ll use a waist
measurement of 32 inches, hip 42 inches and skirt length of 24 inches.
Remember, when you make the skirt for yourself you simply use your waist, hip, and skirt length measurements instead of these sample ones.Let’s establish your height parameters.
Square across the paper to make a “T” shape. This will be the waistline.
Then measure down 8″ [20 cm] and draw a parallel line squaring from the centerline. This is the hipline.
Measuring from the waistline, draw a second parallel line equal to your desired skirt length and square from the waistline. This will be the hemline.
Now that you have your grid set up, it is time to use your body measurements to set the girth parameters.
Start by deciding how many gores you wish to create. Even numbers (4,6, 8, 10, etc.) will make your skirt symmetrical, but I like to use the “rule of 3s”. Odd numbers (5, 7, 9, 11, etc.) makes for a more interesting look. Either way, the number of panels used will create a gore skirt that will fit.
For the waistline, take your waist measurement divided by the number of panels desired.
For example, to create a 8-gore skirt to fit a 32″ [81.5 cm] waistline.
32″ divided by 8 = 4″[10 cm]
The hipline is normally 8″ [20 cm] below the waist, so at that point you’ll make a horizontal like equal to hip divided by number of panels desired + ¼” [6 mm].
Our sample hip measurement is 42″ [107 cm], so the horizontal line is 5 ¼ ” [13.5 cm] plus ¼” [ 6mm] = 5 ½” [14 cm].
With a straight yardstick, draw in the outside lines of the skirt, connecting the waist to hip to the hemline and draw in the bottom line.
At the top of the”T”, measure down ¼” [6 mm] and make the slight waistline curve.
The outside edges of the bottom are measured up ¼” [6 mm] each and the slight hemline curve drawn.
Make your waistband to equal your waist measurement plus 1 ½” [40 mm], and the width is 2 ½” [65 mm] (your finished waistband will be 1 ¼” [32 mm] wide).
Remember you have not allowed for seams yet, so after making the skirt pattern, mark the 1/2″ seam allowance all around and add a 2″ hem. The seam allowance will be drawn around the skirt as well as the waistband.
Remember you will need to cut multiples of this pattern equal to the number of panels desired. Eg. cut 8 of the skirt pieces, since it is a 8-gore skirt.
The vertical center line of the pattern will be used as the “straight grain” line, when placing the pattern on the fabric.
FUR WRAP WITH AN ELEGANT SATIN BOW
The soft, deep-pile woven fur is anti-static, soft and probably feels even better than real fur. It will keep its look for years, without losing hairs, and will never smell of mothballs. Measures approx. 40″ x 10″ (102 x 26cm).
You will need:
1/3 yd. (30 cm) of woven fake fur: 100% acrylic.
1/3 yd. (30 cm) of “Kasha” satin lining: 100% acetate
1/3 yd. (30 cm) of lamb’s wool interfacing: 100% wool
1 yd. (90 cm) of double-sided satin ribbon: 100% acetate
7 yds. (6.5 m) of ¾” wide twill tape: 100% polyester
With
your piece of faux fur atop the work surface, place the wrong side up
and chalk an “arrow” pointing the direction of the fur pile. The hairs
of the fur will point “downward”. Chalk mark the center of the fabric,
and measure out 20″ [51 cm] on either side of the centerline. Square
from this point to create a rectangle, 40″ by 10″ [102 by 26 cm].Using
a large dinner plate, chalk mark curved pattern outlines on each corner
(see illustration). Cut out the backing with razor blade without
cutting fur. Hold the fabric backing slightly off the table and pull as
you slash. Do not cut out with scissors or you will cut the hairs.For the lining, fold and pin the fabric right sides together, and measure 22″ [56 cm] from the foldline. Square a chalk line from this point to create a rectangle, 44″ by 12″ [112 by 30 cm] and repeat the arc pattern on each corner. Chalk a notch point on each end of the foldline. Cut out the lining on the fold and open flat.
Sew a length of twill tape along the centerline of the fur piece with a hand herringbone (zigzag) stitch,
keeping edge of tape flat with back of the fur. These stitches can be
large as they will not show on the right side of the fur.Sew twill tape on the outer edges to be sewn, with a hand herringbone (aka catch) stitch, keeping edge of tape flush with edge of fur backing and outline the perimeter with it. Since the “fur” has no seam allowance this will stabilize the edges from stretching and puckering.
Now, starting at the centerline, work with one fur side toward you and place the twill tape on top the fur edge to sandwich the fur edge between two layers of twill tape. Keep edges even and push hairs away from getting caught in tape. Join twill tape to edges with a close whip (overhand) stitch. Since the tape is necessary for reinforcement, be sure to catch both tapes as you do so. Sew around the perimeter of the fur piece. fig 1
Center the lamb’s wool interfacing on the back of the fur and baste along the center and to the edges. These stitches can be large ones as they will not be visible on the right side. Trim away any excess.
Turn the outer twill tape over the seam and pin to the inside edge on the back while wrapping over the interfacing. Baste twill tape to fur piece. fig 2
Cut the ribbon length in half and secure one end to each of the “X” points. (see illustration) to the fur piece. Cut the loose end on the diagonal.
SMOCKED WRAP
 Smocked Wrap
You will need:
- approx. 5 yds. of 45-inch wide satin or iridescent fabric
- matching thread
To begin, straighten cut ends of fabric so that it is a right angle (90°) to the selvedge of the cloth. This can be achieved by drawing a crosswise thread or fraying the cut edge. Cut the crosswise edge straight.

Fold the cut edge to align with the selvedge edge from bottom to top. This with create the true bias line. Mark with chalk.
Repeat step 1 and 2 on opposite end of cloth, from top to bottom. The two triangles will be the front and back of the wrap.
With the remaining fabric, mark 9 bias strips (14.5 inches wide) parallel to one another, following the true bias (see diagram). This is the ruffle. Cut fabric along all chalk lines.
To assemble the ruffle, join each strip to one another at the short ends. Fold the long bias trim strip in half lengthwise, with wrong sides facing, and run a gathering stitch along the raw edges.
To assemble ruffled trim with body, begin by rounding the pointed ends of each triangle.(a saucer makes a perfect template). Then baste gathered ruffle to right side of the fabric, aligning all raw edges, along the perimeter of one of the triangles. Stitch gathered trim into place.
To complete the wrap, place the second triangle with right sides facing to the trimmed body piece (the trim will be sandwiched between each body piece) aligning all raw edges. Pin and baste together. Stitch around the perimeter, following the previous row of stitching, allowing a 4″ opening along one straight edge. Turn right side out and slipstitch opening closed.

To create the smocked effect, handstitch several running stitches in a circular shape throughout the body portion in a random pattern. (see diagram)
Draw up on each running stitch to gather up fabric and tie off. Hide loose ends of thread by sinking it into wrong side of fabric.
T-SHIRT WITH A TWIST

Turn a plain T-shirt into a high fashion wrap top, lickety-split.
Wrapping is a big component of this summer’s fashion look. If you have a plain cotton T-shirt, you can have a hot fashion item in no time.
STEP 1 Cut up center front to within 5cm (2 in.) of armhole.

STEP 2 Fold in half along center back and center front. Cut a diagonal line as shown in diagram. Cut removed section in half along center back fold line to create two ties.

STEP 3 With right sides together, stitch short edges of one tie diagonally across bottom of one point at bottom front of T-shirt . Repeat with second tie.

STEP 4 Zigzag-stitch all raw edges; turn under 1.5 cm (5/8 in.); topstitch.

To wear, cross ties at the front, wrap around to the back and secure in a snug knot.
EYE PILLOWS FOR RELAXATION

Eye Pillows provide soothing relief in two ways:
- Chill an eye pillow in a ziplock bag in refrigerator or use at room temperature to provide soothing relief for your eyes.
- Heat for up to 30 seconds in the microwave to use as a “mini” heat pad for other parts of your body. (Do not use heated product on your eyes.)
Eye Pillows are perfect for:
- Migraines and other headaches
- Sinusitis
- Rest for tired eyes
- Hand or foot warmers
Eye Pillows are made with 100% cotton covers (size 4″ by 9″) filled with natural grains such as millet or rice, or seeds like flaxseed or linseed, or an herb mix, such as lavender which is a favorite for calming nerves.
Combine Eye Pillows with soothing music and scented candles to maximize your relaxation experience.

To make an eye pillow, select 100% cotton percale or sateen for the inner bag. Cut a rectangle 5″ by 19″ [13 cm by 49 cm].
For the outer cover, select 100% cotton sateen or flannel. Preshrink fabric. Cut a rectangle 5″ by 22″ [13 cm by 56 cm].
To assemble outer cover, turn and stitch a
¼” double-roll hem on each short end of rectangle. Fold one end of
rectangle with right side together (RST) 2″ [5cm] to create a flap. Fold
opposite end of rectangle with RST to align ½” [1.25 cm] short of flap
fold. (see X location on diagram). Stitch through all layers along long edges. Turn right side out.
To assemble inner bag, fold rectangle in
half with RST and stitch along long edges. Turn right side out. Fill bag
with a ½ lb. [200 g] of grain/seed/herb mix. Turn under ½’ [1.25 cm] at
open end to inside and stitch opening closed. Insert inner bag into
cover.
MOBIUS SHAWL

 John Lennon sang on the White Album of the Beatles; “Your inside is out, when your outside is in”
to express the paradox of the oneness free from illusion of a
multidimensional world. The German mathematician and astronomer-
theoretician A. F. Möbius
discovered at the beginning of the nineteenth century, that something
with two sides can have one surface: the möbius ring. The inside is the
outside when one joins the two short ends together with a twist into a
ring – think of the cyclic of time; visualize by joining the frontside
to the backside. Isn’t it amazing?
John Lennon sang on the White Album of the Beatles; “Your inside is out, when your outside is in”
to express the paradox of the oneness free from illusion of a
multidimensional world. The German mathematician and astronomer-
theoretician A. F. Möbius
discovered at the beginning of the nineteenth century, that something
with two sides can have one surface: the möbius ring. The inside is the
outside when one joins the two short ends together with a twist into a
ring – think of the cyclic of time; visualize by joining the frontside
to the backside. Isn’t it amazing?
The möbius ring is a popular pattern used
by knitters to create scarves and wraps into wonderful fashion
accessories out of yarn. I thought the same idea could be achieved by
using double faced fabrics such as Yukon fleece. Both sides of the
fabric are identical and raw edges do not fray.
The shoulder shawl, similar like the one above designed by Judy Scott of Mountain Color Yarns http://www.mountaincolors.com, can be easily made from a rectangle of two-ply polar fleece. No pattern is needed.
- Start with a rectangle (ABCD) approx. 20″ long x 60″ wide.
- Give the rectangle a half twist.
- Align the short ends so that they overlap and A matches D and B matches C.
- Stitch through the overlapped layers and trim closely to the stitching.

ECO-FRIENDLY TOTES

You buy organic, ride public transit and recycle. It’s time to achieve the truly ultimate green lifestyle. Create your own reusable canvas shopping tote bag to replace your plastic and paper bags.
Eco-friendly and reusable, you can design a
wide-range of fashionable organic totebags — numerous styles, sizes, and
colours. These sustainable alternatives to your traditional shopping
bags are often made using hemp, bamboo or, most popular of all, organic cotton.
What you will need:
Self fabric – 1/2 yd. of 54″ width natural fibers
Contrast fabric – 3/4 yd. of 54″ width natural fibers
Matching thread
Card or Bristol board – 6″ x 18″
If you want to launder the tote, serge or zigzag the edges of the fabric, preshrink it in the washer and dryer, then cut the bag pieces to size. (note: allow extra yardage if preshrinking)
You should have a new sewing machine needle for this project and match the size to the weight of fabric being used.
All seam allowances are ½” unless stated otherwise. RST = right sides together.
INSTRUCTIONS
Step 1: No pattern is needed. From self fabric [A], cut two 25″ x 14″ panels.
From contrast fabric [B], cut one 25″ x 15″ rectangle for bottom section, two 19″ x 7″ rectangles for the base, and a strip 54″ x 5″ for the handles.
Step 2: Fold fabric B in half lengthwise. Cut out a 2.5″ square at the lower corners of each folded end.

Step 3: For bag straps,
fold strip in half lengthwise with WST and press. Open strip and fold
raw edges to centerfold. Refold strip on pressed fold. Edge-stitch along open edge, then edge-stitch along fold. Press. Cut in half for handles.
Step 4: Press under top edge of each panel section (fabric A)
1-1/4″ turn. Divide top edge into thirds and mark with a pin. Open
folded edge of front panel and place face up. Align strap ends to each
pin location and stitch ends in place along edge. Repeat on back panel.
Step 5: Stitch each panel section to bottom section along its width, with RST. Press seams to one side.
Step 6: Fold body of bag in
half with RST, aligning side seam at seam of contrasting fabric and at
top edge foldline. Stitch fabric pieces together on the sides and press
open.
Step 7: Matching the side and bottom seams of the fabric at point X, stitch across corners.
Step 8: Turn under ¼” along bag top and turn under foldline to create a 1″ facing at the top opening. Drop straps inside bag. Stitch facing at top edge catching the handles on the front and the back.
Step 9: Then, flip strap handles up, out of bag. Stitch 1/4″ topstitching at top edge catching handles once more to reinforce.
Step 10: On each base piece, press under seam allowance on one short end. With RST, match both pieces and stitch around edges leaving folded edge open. Grade corners. Turn right side out and slip in cardboard. Stitch open edge closed. Drop lined base into bottom of bag to reinforce.
EASY FIT YOGA PANTS

Use full width of 45″ fabric and select a fabric that can be cut in either direction. (eg. up or down its length). I prefer a lightweight fabric as it gathers easily with an elastic waist.
Straighten cut ends to a right angle [90 degree].
Fold the fabric, with right sides together (RST), in half lengthwise so that selvedges align. Chalk out 2 lengths for each pant leg.

The minimum outseam length is the measurement from your waistline, over the buttock and down the leg to your heel. Take this measurement while touching your toes. Add 2″ for a waist casing, 1″ for hem allowance and 1″ for seam allowance [total = 4"]. Square across fabric width. (see cutting diagram)

At bottom of rectangle, measure half the distance from foldline to selvedge to create the leg cuff . This measurement may be tapered if you desire a smaller opening at the ankle.
For the rise, measure down 13″ from the waist along the selvedge edge. Join this point with the leg cuff point with a straight line.
The remaining piece of fabric from the leg cut with be inverted and become the leg gusset. [2 pieces for each leg].
 Open each leg and sew a gusset piece to each inseam RST using a ½” seam allowance. Press seam open.
Fold each leg portion RST and align gusset seams. Sew using ½” seam allowance. Press seam open.
Turn one leg inside out. Insert right-side-out leg into inside-out leg with RST. Sew up crotch seam using ½” seam allowance. Turn legs right side out.
Turn under ½ ” seam allowance along waist edge. Press. Turn under 1-1/2″ once more to create casing. Sew along fold edges. Casing may be for elastic or a drawcord. Leave an opening to insert drawcord or elastic.
Turn up hem allowance ½” and press. Turn ½” again and sew double-turned hem.
Front and back of pants are the same, so if I use an elastic waist I sew a small button to inside CF. This “belly button” indicates the front of my pants.
CONVERTIBLE DRESSING
 Here’s
a clever little idea…convertible clothing. This dress works double duty
as a skirt. It’s ideal for weekend wear or travel wear. It’s functional
and versatile at the same time.
Here’s
a clever little idea…convertible clothing. This dress works double duty
as a skirt. It’s ideal for weekend wear or travel wear. It’s functional
and versatile at the same time.
Basically the concept is a wrap-around
garment so it is adaptable to many shapes and sizes. The body proportion
that needs to be considered is no more than a 7-8 inch
difference between bust and waist measurements. Other than that ratio,
it is quite flexible for most body shapes. The look is versatile as
well. Through different fabrications it can be anything from a casual
wrap by the pool to a sophisticated little black dress for a cocktail
reception.
No pattern is needed to construct it. It is a simple block layout. You need a solid colour woven fabric width of 54-60″ wide. (see cutting diagram). Small to medium sizes = 2 yds. in length and medium to large sizes = 2 ½ yds. in length. The grainline is crossgrain so this cut is not ideal for prints unless they are railroaded or abstract in direction.

- Cut 2 panels along each selvedge edge 15″ wide for wrap ties
- Remaining fabric panel is wrap skirt portion.

Assembly:
On the large skirt portion, fold in a ½” turn on each short edge to the wrong side of the fabric.
Then turn each folded edge in ½” again. Press. Topstitch to finish.
Along one of the long edges, create a
rolled hem by turning ½”, then 1″. Slipstitch or machine stitch in
place. Lightly steam the foldline of the hem.
Next, fold the skirt portion in half and
align and match the finished edges. Mark the fold on the long raw edge.
This is the center of the garment.
From the finished edges along the long raw edge, measure 6″ and mark this location point. Set aside.
Now, take the two tie portions and align them, right sides together, along one short edge. Pin and baste along seam using a ½” seam allowance.
Measure and chalk 1 ½” from each end of
the seam. Then measure and chalk 4″ from each of the chalk marks. This
will be an open slit when completed.
Machine stitch the seam, leaving the 4″ distances unsewn. Remove basting. Press seam open flat.
Divide the bust measurement by 4. (eg. for size 10 = 34″ divided by 4 is 8 ½”).

From the seam (wrong side face up),
measure and chalk ¼ the bust mmt. to the left of the seam and ¾ the bust
mmt. to the right of the seam.
Fold the tie portion, matching up the 2 chalk marks and mark the foldline. This is the center of the garment.
Now, with right sides together, align and
match the center marks of the tie and skirt portions. Pin together.
Align each 6″ chalk point of the skirt portion to the bust mmt. chalk
mark on each end of the tie portion. Pin together.
To control the excess fabric on the skirt portion, make 4 pleats
equally spaced on both sides of center and pin and baste to tie
portion. You will have 8 pleats in total. Ideally all pleats should fold
towards center.
Machine stitch seam using ½’ seam allowance. Remove basting. Press seam open then press all seam allowances upward to tie.
Fold tie portion, with right side
together, in half width-wise. Align and match raw edges on each tie end.
From finished front edges, pin and baste long ties and short ends.
Machine stitch using ½” seam allowances. Remove basting. Press seam
open. Grade corners.
Turn tie ends right side out and turn in
remaining raw edge by ½”. Place folded edge on top of pleating aligning
to machine stitching. Pin and baste to encase raw edges. Press a sharp
knife edge along the perimeter.
Edge-stitch by machine along the tie portion edge to finished. Align small 4″ opening and slipstitch together to complete garment.
To wear: Wrap garment
around bust or waist, slipping the tie end closest to body through the
4″ opening. Continue to wrap tie end around the body and tie together
with a bow to the other tie end.
BUFFALOPLAID

Featured: Vest from Chulo Pony
There’s something a bit redneck/hillbilly
and then there also a sort of British Hunting Party aura too. One
thing’s certain, buffalo plaid is going to take a front seat on all
sorts of garments this fall! Buffalo plaid flooded the Ralph Lauren New York runway and that of Vancouver’s Chulo Pony during Fashion Week. This is an easy-fit boxy vest that is easy to sew.
MEASUREMENTS
Bust – measure just under the arms around the fullest part of chest.Waist – measure around narrowest part of torso.
High Hip – measure 6 inches [15.5 cm] below waist around the hips.
Back-waist length – measure from nape of neck to waist level
Shoulder length – measure shoulder from ball socket to side of neck.
Armhole depth – measure from nape of neck to under arm level.
Back width – measure from armhole to armhole across shoulder blades.
Neck – measure around base of neck.
PATTERN DRAFT

Square down from 0; square halfway across the block.
0-1 = 5/8″ [1.5 cm]
1-2 = armhole depth plus 1″ [2.5 cm]; square across.
2-3 = half bust plus 3″ [7.5 cm]. Square up and down; mark this line the CF line.
3-4 = 0-2 (add 1/8″ [0.3 cm] for every size above size 14 [bust=36"])
Square across from 4.
1-5 = back waist length; square across to 6.
5-7 = waist to hem (6″ [15.5 cm] + 2″ [5 cm] hem allowance = 8″ [20.5 cm])
Vest Back
0-9 = 1/5 of neck size minus 1/8′ [0.3 cm]; draw in back neck curve 1-9.
1-10 = 1/5 of armhole depth minus 3/8″ [1 cm]; square halfway across draft.
9-11 = shoulder length plus 3/8″ [1 cm]. Draw back shoulder line to touch the line from 10.
2-12 = half of the back width plus 3/8″ [1 cm] ease; square up to 13.
12 – 14 = half the measurement of 12-13.
Vest Front
4-15 = 1/5 of neck size minus ¼” [0.7 cm].
4-16 = 1/5 of neck plus 5/8″ [1.5 cm]; draw in front neck curve 15-16.
17-16 = 2″ [5 cm]. Square down to locate 20. This is the front closure extension.
18-3 = half chest plus 5/8″ [1.5 cm]; square up.
19-18 = half the measurement 3-16 minus ¾” [2 cm].
21-11 = ¼” [0.75 cm]; square out 6″ [15 cm] to 22.
23-15 Draw a tangent line from 15, shoulder length plus ¼ ” [0.75 cm] to touch line from 21-22.
24-18 = midway between 12 and 18; square down to point 25 on waistline and point 26 on hemline.
At side seam, measure out ½ ” [1.25 cm] on either side of point 25 and shape with a smooth curve for waist suppression.
Draw armhole as shown on draft touching points 11, 14, 24, 19, and 23.
Vest Collar
27-15 = 0-9; square up from 27.
28-27 = 5/8″ [1.5 cm].
29-28 = 20″ [51 cm]. This is the collar depth.
30-15 = 28-29.
Draw the outer edge of collar parallel to line 15-28, passing through point 30 and gently tapering the curve to point 17.
Vest Collar Facing
Measure 2″ [5 cm] from 15 on shoulderline.
Measure from 8 the length of 8-20.
Join these 2 point as shown with dotted line.
Trace off the front edge, collar, shoulder, dotted line, hem and CF line to create the facing piece.
Grainlines are parallel to CB and CF lines.
A hem allowance is 2″ [5 cm] turn under. Seam allowances are 3/8″ [1 cm}.
Sash
A-B = 9" [23 cm].
A-C = 2 times waist measurement plus ¾” [2 cm].
 C-D = A-B.
B-D = A-C.
E = half of A-B
F = half of C-D
Join E and F to create foldline of sash.
CUTTING
Vest Front – cut 2X selfVest Back – cut 1X on fold; cut 1X lining on fold
Vest Collar Facing – cut 2X self; cut 2X interfacing
Sash – cut 1X self
Front Lining – cut 2X lining (NOTE: add ¾” [2 cm] to front edge of this piece for seam allowance.)
ASSEMBLY
- Fold sash piece with right sides together and stitch along the raw edges leaving a 5″ [13 cm] opening to turn out. Grade corners and turn right side out. Slipstitch opening closed and press edges. Topstitch around perimeter of sash.
- Iron fusible interfacing onto back of collar facing pieces, following manufacturer’s directions.
- With right sides together (RST), pin/baste collar facing to front lining. Sew seam and press seam allowance towards lining.
- Staystitch shoulder-neck point (#15) on collar facing to reinforce corner. Clip seam allowance to the stitching at a 45° angle.
- With RST, pin/baste lining fronts to lining back at sideseams and shoulders. Sew seams and press open.
- With RST, pin /baste CB seam of collar facing together. Sew seam and press open. Then pin/baste the collar to the back neckline and sew between the two clips. Press seam open.
- Staystitch shoulder-neck point (#15) on vest fronts to reinforce corner. Clip seam allowance to the stitching at a 45° angle.
- With RST, pin/baste vest fronts to vest back at sideseams and shoulders. Sew seams and press open.
- With RST, pin /baste CB seam of under-collar together. Sew seam and press open.
- With RST, pin /baste CB seam of collar together. Sew seam and press open. Then pin/baste the collar to the back neckline and sew between the two clips. Press seam open.
- Place the lined portion with the vest right sides together, aligning them up along the edges. Pin/baste the two halves of the vest together.
- Stitch the vests along the front and collar, and around the armholes. Do a parallel row of stitching 1/8″ [0.25 cm] on armholes and trim seam allowances away. Grade seams and trim corners.
- Stitch along the lower edge of the vest front facing only, 2″ [5cm] and trim away the excess material. Leave the lower edge of the lining unstitched.
- Turn the vest right side out. Use a bone turner to gently push out the edges of the vest and make sure it’s fully right side out. Entering from the bottom, match up the seam allowances of the back neckline and collar and baste together.
- Turn the bottom edge 2″ [5 cm] to the inside of the vest, so that the hemline is even with the rest of the facing. Press the folded edges. Turn the bottom edge of the lining and lay on top of the hem just shy of the fold. Baste the two layers together.
- Topstitch along the outside edges of the vest and the armholes, 1/4 inch [0.5 cm] from the edge. Make sure the lower edge of the back of the vest gets sewn closed in this seam.
- Add dome snaps or Velcro® tabs to front closure of the vest, if desired.
RUFFLED TOTEBAG
 Featured: Ruffle bag by Rianrae (India Rose Textiles)
A beautiful drawstring totebag made of soft cotton with a cascade of ruffles.
You will need:
- Fashion fabric, 45″ wide equal to 3.5 times your bag circumference measurement (W).
- Coordinating thread

This draft is an exercise in proportion. It is based on two measurements:
X = ruffle depth + 1″
W = circumference around the bag + 1″ (or 2 X finished width + ½”)
CUTTING
Ruffle strips – cut 6X self
Bag – cut 1X self
Drawstring casing – cut 1 ½”strip equal to W, cut 1X self
Draw cord – cut 1 ¼” strip equal to 2 x W, cut 1X self
ASSEMBLY
- Take 2 of the ruffle strips and with right sides together (RST), fold each strip in half lengthwise. Pin/baste and sew using ½” seam allowance.
- Turn each piece right side out and press flat. Edge stitch perimeter of each strap.
On remaining 4 ruffles strips, match up short ends together and join with a narrow French seam to create a “tube” on each strip. Hem top and bottom edges of each tube with a narrow double rolled hem. Then, sew a gathering stitch ½” below the top edge to gather the ruffle.
- On bag piece, hand-baste 4 rows of running stitches according to dimensions shown in illustration. Once completed, fold the bag piece in half lengthwise with RST and match up side seam. Pin/baste and sew seam using ½” seam allowance. Press seam open. Turn bag right side out.
- Beginning at the lowest running stitch, pin gathered ruffle to bag aligning the gathers on top of the running stitch line. Match ruffle seam with bag’s side seam. Distribute gathers evenly around the body of the bag. Turn bag wrong side out and machine stitch through the gathers on the ruffle. Remove running stitches.
- Repeat this step with each tier of ruffles on each subsequent row of running stitches. Each ruffle will overlap the last one.
- On wrong side of bag opening, centre each handle strap on half of the bag width without twisting the strap. Pin and baste upside down to top edge of bag.
- Take the drawcord casing strip and turn under the short ends ½” and press. Edgestitch along the short ends. Then, turn under ½” along one long edge. Press.
- Start at the midpoint between one of the handle loops, pin/baste raw edges together with right side of casing facing wrong side of bag opening. Butt the two short ends together. Sew around top of bag and encase strap ends using a ½” seam allowance. Grade seam.
- Turn bag right side out and fold over casing strip to the outside of the bag along the seam. Press casing flat. Baste casing strip along the face of the bag. Keeping bag straps free, topstitch along bottom and top edges of casing.
- Take drawcord strip and with wrong side together, fold in half lengthwise and press.
- Open fold and fold raw edges to center. Press again.
- Turning in short ends to the inside, refold strip and edgestitch around the perimeter to create a drawcord tie. Thread tie through casing.
To complete the bag, turn bag wrong side out and flatten from side seam. Match up bottom raw edges and pin/baste. (Do not catch ruffles in seam.) Stitch across bottom. Press seam open.
- At bottom corner, line up side seam on top of bottom seam to create a right angle with the fabric. Stitch across the point as shown. This seam will equal X (or 1/2X on either side of center seam). Repeat on opposite corner. Turn bag right side out.


THREE TIERED SKIRT

Featured: Layered 3-tier skirt by ASOS
You will need:
- 2 yds of Fashion fabric, 45″ wide
- 1/4 yds. of Fusible interfacing, 45″ wide
- 1 closed skirt zipper, 5″ long
- 2 sets of hook & eyes, size 0
- Coordinating thread
- Kraft paper
- String
- Push pin
- Tracing wheel
- Tape measure

Measure your waist and use R from chart to draw an arc from intersecting right angle. (90°)
For each tier, add 5 inch intervals to R. eg. R + 5″; R + 10″; R + 15″
To create the arc, use string and pencil as a compass and measure the string length equal to the tier lengths above. Attach string to push pin anchored at intersection (●). Holding string taut, draw arc from horizontal line to vertical line. Repeat with new lengths for each tier.
Trace off each layer separately on paper and add ½” hem and seam allowances.
For waistband, measure a line equal to your waist plus 1 ½”. Draw a parallel line 3″ next to it and join the ends of both lines. Add ½” seam allowance to perimeter.
Grainlines are parallel to horizontal lines of draft on all pieces.
CUTTING
Cut each tier 2x self in fashion fabric. *
Cut waistband 1X self in fashion fabric.
Cut waist interfacing 1X fusible in Pellon®
ASSEMBLY
- Iron fusible interfacing to wrong side of waistband piece, following manufacturer’s directions.
- Turn under ½” along one long edge and press.
- Stay-stitch waistline on each tier piece from side seam to center. Neaten raw edges of side seams with a seam finish.
- Layer tiers in pairs with right sides together. Pin/baste side seams, leaving 5 ½” open at waist on left-hand side. Sew seams and press open.
- On each tier, hem bottom with a ¼” double rolled hem. Press.
- Layer tiers one on top of one another (right sides out) and match up waistline and side seams. Baste together.
- Apply zipper on left-hand side, from waistline to bottom of top tier, using center slot application.
- With right side of waistband to wrong side of skirt, pin waistband piece to skirt’s waistline, extending waistband 1 ½” beyond zipper on back portion. Also allow for ½” seam allowance on each end of waistband piece. Baste waistband in place following stay-stitching. Sew waist seam.
- Press under seam allowances on each end of waistband and fold waistband in half, aligning pressed edge with machine stitching. Pin/baste. Edge-stitch around perimeter of waistband.
- Handstitch hook and eye sets to extension of waistband.
JAMMIN’ JAMMERS
 Jammin’ jammers for the budding beach bum.
You will need:
- 1-5/8 yds. of fashion fabric, 45″ wide
- 1-1/4 yds. of waistband elastic, 1 ½ ” wide
- 1-1/2 yds. of cable cord, 1″ thickness
- 1 VelcroTM tab
- Coordinating thread

Measure hip about 9″ below the natural waistline and around the fullest part of the seat. Finished length is approximately 22″ (knee length).
CUTTING
Cut 2X self on straight grain of fabric. Save crotch cut-out for pocket.
ASSEMBLY
- Take one piece of crotch cut-out and turn under top edge 2″. Press. Centre hook side of VelcroTM tab (just below the foldline) with pocket right side up. Stitch around the tab. Turn top edge 2″ again. Press. Topstitch facing of pocket below the tab.
- Turn under ½” seam allowance around perimeter of pocket rounding the “corners”. Press. (NOTE: The pocket opening should measure at least 5″ minimum for functional use.)
- Place pocket on placement line (black dots) on back of right-hand side piece. Align the loop side of the VelcroTM tab with the pocket tab. Stitch loop tab in place to pant. Match up hook to loop and fasten together. Pin/baste edges of pocket to pant. Topstitch pocket edges.
- Layer fabric with right sides together, and stitch crotch seam using ½” seam allowance.
- Match front side seam with back side seam on each leg, with right sides together. Pin/baste seam. Stitch side seam and press open.
- At waist, turn under ½” and press. Turn under 2″ to create a casing. Topstitch along top and bottom of inside edge of the turn.
- Cut waistband elastic equal to your waist measurement less 3″.
- Carefully remove stitches at CF between the 2 topstitching lines on the casing (see red dots) to create an opening. Draw elastic through casing without twisting elastic.
- To join elastic, butt ends of elastic over a piece of fabric cut twice the width of the elastic. Wrap elastic with fabric scrap. Zigzag-stitch the ends of elastic to fabric scrap. This method eliminates bulk in elastic and works to prevent frayed ends from protruding.
- Thread cable cording through casing on top of elastic. Knot cord ends.
- Hem leg bottoms with a ½” double rolled hem.
SQUARE TUFTED FLOOR PILLOW
 Featured: Square Tufted Box Pillows by Restoration Hardware

Young or old, few ever outgrow the love
of laying on the floor while visiting or watching television. What you
need are some big comfy floor pillows that you can use for those times
when the gang is over at your house and there is no room on the couch.
If the pillows are big enough (24 to 36 inches) they can also be seat
cushions around a big coffee table for the overflow from the dining
room. If you can’t quite envision these in your house, how about making a
stacking set of these giant pillows to give to a student or a young
couple in a new apartment. They never have enough seating. Cover the
cushions with an upholstery fabric and pipe the edges for a real
professional look.
Dimensions:Small Square Cushion: 18″ sq.
Medium Square Cushion: 24″ sq.
Large Square Cushion: 30″ sq.
You will need:
- Approx. 17 yds. of cable cord, ½” thickness
- Approx. 4 ½ yds. of brushed cotton, 54″ wide colour A
- Approx. 3 ½ yds. of brushed cotton, 54″ wide colour B
- 2 yds. of hook & loop fastener, ½” wide
- Coordinating thread
- 1 covered button kit, 1″ diameter (6 buttons), optional
- Heavy-duty thread (optional)
- 2 yds. of polyester batting, 60″ wide
- Polyethylene Foam, 4″ thickness/30″ wide x 72″ long
- Upholstery spray adhesive

MAKING A BOX CUSHION:
CUTTINGTo prepare the welt, cut 2 pieces of fabric each measuring, the length of the cushion (X) plus 8″ by the required depth less 1″, adding ½” to all edges for seams.
Cut 1 piece of fabric measuring, the width of the cushion (X) times 3 less 8″ by the required depth, adding ½” to all edges for seams. Make sure to cut the depth from down the length of the fabric.
Cut the top and bottom cushion pieces to the required size, (X by X), adding ½” to all sides for the seam allowances. If patterned fabric is used, make sure to centre any design on the fabric.
Cut bias strips of contrasting fabric 1 ½” wide to make the piping. Make enough length to go around the perimeter of each cushion plus 5″, twice.
Cut foam to size. (X by X)
ASSEMBLY
Spray each foam pad with spray adhesive and wrap in batting on all sides.
Cover 2 button blanks with contrasting fabric for each cushion.
Join enough bias strips for the required length and wide enough to cover the cable cord plus the seam allowance. Lay the cord in the centre, on the wrong side of the bias strip.
 Fold
the bias strip over the cord matching the raw edges. Stitch the 2 sides
of the bias strip together along the length. Use a zipper foot or
cording foot on the sewing machine to ensure that the stitches are close
to the cord.
Fold
the bias strip over the cord matching the raw edges. Stitch the 2 sides
of the bias strip together along the length. Use a zipper foot or
cording foot on the sewing machine to ensure that the stitches are close
to the cord.On the 2 smaller welt side pieces, turn under ¼” and then 5/8″ along one long edge, making sure that any design or nap on the fabric is the right way up on all the pieces. Press. Open the fold and center the hook side of the fastener tape on one piece and the loop side of the other, leaving 4-1/2″ free on each end. Stitch fastener tape in place. Re-fold edge and sew length of turned edge.
Lap hook and loop together to create a width of 5″ when combining the 2 welt side pieces. Sew across the ends to secure.
Join the welt pieces together to form a ring, making sure that any design or nap on the fabric is the right way up on all the pieces.
Pin the ends of the strips, right sides together, and stitch, ½” in from the raw edges, using a flat seam. Press the seams open.
 Place
the contrasting piping around the outer edge of the bottom cushion
piece, right sides together and matching the raw edges. Align the seams
on the welt to the corners of the cushion piece so that the piping
gently curves around at the corners (clip cording seam allowance if
necessary). Starting and finishing at the back of the cushion and
joining the ends of the piping cord to neaten. Baste in place, 1/2″ in
from the raw edges. Sew in place using a zipper foot.
Place
the contrasting piping around the outer edge of the bottom cushion
piece, right sides together and matching the raw edges. Align the seams
on the welt to the corners of the cushion piece so that the piping
gently curves around at the corners (clip cording seam allowance if
necessary). Starting and finishing at the back of the cushion and
joining the ends of the piping cord to neaten. Baste in place, 1/2″ in
from the raw edges. Sew in place using a zipper foot.Stitch the welt to the bottom cushion piece.
Attach the piping cord to the perimeter of the top cushion piece. Starting and finishing at the back of the cushion and joining the ends of the piping cord to neaten. Pin the top section to the top edge of the welt, ½” in from the raw edges and matching the corners. Stitch in place using a zipper foot on the sewing machine so that the stitches are close to the piping cord. Turn right side out through the opening.
Insert the covered foam pad into the cushion and close the lapover on the opening.
If using, attach a covered button to one end of heavy-duty thread and anchor through center of cushion. Draw thread throuh foam pad and out other side of cushion. Attach a second covered button and return thread through center. Tighten up slightly to tuft pillow and pass thread through first button. Knot thread.
WRAP YOURSELF IN ART
 Featured: Urban Wrap by Disappearing Creek Ranch

Step into a world where sculpture and the
human form combine; where the lines of fashion and art blur and merge
as one. This beautifully sculpted “urban wrap” vest from the Disappearing Creek Ranch company,
comes with asymmetrical fronts that hug the body in all the right
places and its uneven edges ‘confuse’ the eye, altering perception, and
camouflaging figure faults we may think we have, all the while adding
style and sophistication. Choose the double-faced fashion fabric that’s
most comfortable and flattering for your body type, and know that with
the generous lap over, fit can easily be adjusted.
You will need:- 1 yd. of felted wool, 54″ wide
- Coordinating thread
- Stick pin
- Roll of kraft paper
- Tracing wheel
Chest – measure just under the arms around the fullest part of the bust.
Backwaist length – measure from nape of neck to waistline.
Back width – measure from armhole to armhole across the shoulder blades.
PATTERN

Fold the kraft paper in half. The foldline will be the centreback.
Mark a point on the foldline and label it 1.
2 from 1 = backwaist length + 5″
3 from 1 = ½ backwaist length – 1 ½”
Square lines from 1, 2, and 3 across the paper.
4 from 3 = ½ the chest measurement + 2 ½”
Square a line up and down from 4.
Points 5 and 6 are located at the intersections of lines 1 and 2.
7 from 1 = ¾ backwaist length + 1½”
Square a line from 7 across the paper.
8 is located at the intersecting lines.
9 from 8 = 4″
Square line down from 9 to locate 10 and 11.
12 from 1 = ½ back width + 4″
Square a line down from 12 to locate 13 and 14 at the intersecting lines.
15 from 12 = distance from 12 to 14.
Join 14 and 15 with a straight line and locate 16, 2 inches from 14.
Draw a shallow curve from 12 passing through 16 and onto line 3.
17 from 5 = 4″
Draw a straight tangent line from 6 passing through 17.
Square a line from the tangent line radiating from point 13. Smooth point 13
with a blended curve.
Trace out lines 7-8-6-1 for the right-hand side of the collar.
Trace out lines 3-16-12-6-17-13-2 (blue lines) for the right-hand side of the vest.
The left-hand side of the vest is outlined in red.
Cut out lines 1-12 16-3.
Unfold the paper and rule off the tracing with a straightedge.
Cut out the vest and collar separately.
Grainlines run parallel to centerback.
Seam allowance is included in the patterndraft.
CUTTING
Due to the fabric surface being seen from both sides, a double-faced felted wool is suggested. *
Vest body – cut 1X self
Collar – cut 1X self
ASSEMBLY
- Staystitch the upper back and armscye of the vest about a ½” from the edge. Turn edge under to inside and baste down. Steam the rolled seam to relax it. Topstitch along rolled edge. Remove basting.
- Take the vest body (right side up) and the collar (wrong side up) and lay them side-by-side, along the neckline. Overlap the neck seams (1/2″) so the actual seam lines sit one on top of the other across the top of the garment. The seam allowance from the collar should be hanging over into the body (the collar piece is on top) and the vest seam allowance should be towards the collar. If you stitch down the seam line through both layers, you will have a seam allowance pointing toward the collar on one side of the garment, and a seam allowance pointing toward the body on the other side. Turn under the raw edge of one seam allowance and topstitch in place. Repeat on the second seam allowance. This is a lapped seam technique.
- Staystitch the hemline about a ½” from the edge. Turn edge under to inside and baste down. Steam the rolled edge to relax and shape the curved edge. Topstitch along rolled edge. Remove basting.
- On the front edges from the neckline downward to hem, roll a double-roll edging along the fronts and slipstitch to hold in place.
- On outer edge of collar, turn under 1″ and topstitch in place. Trim close to stitching.
* Based on your selection of your fashion fabric, you may need to choose a more appropriate seam finish. Fabrics like felted wool do not fray. Ideally, a fine satin overlock would be appropriate if the fabric frays.
KNOTTED FRINGE SHAWL
 Knotted
fringe is actually quite easy to make and can be a lovely addition to
any number of fashion design ideas such as on a vest, a skirt hem, or
even, curtains. The first thing you must decide is whether your design
project requires the addition of fringe or whether the fringe can be
knotted from existing strands. You can apply the fringe trim similar to
the macramé knotted fringe on this luxurious alpaca and silk shawl from the Viva Terra collection.
Knotted
fringe is actually quite easy to make and can be a lovely addition to
any number of fashion design ideas such as on a vest, a skirt hem, or
even, curtains. The first thing you must decide is whether your design
project requires the addition of fringe or whether the fringe can be
knotted from existing strands. You can apply the fringe trim similar to
the macramé knotted fringe on this luxurious alpaca and silk shawl from the Viva Terra collection.
The second option, that of loosing weft (horizontal) threads leaving the remaining warp (veritcal)
threads hanging. Measure out how long you want the fringe to be and
mark that measurement with a line of stay-stitching. Then draw out the
threads up to that stitching line. Decide how many threads you want to
bundle together to tie in a knot. Then tie the knots and you will have a
lovely fringed trim.
You will need:
- 5/8 yd of double-sided fashion fabric, 60″ wide such as woolens, cashmere, alpaca, etc.
- Yarn for fringing such as embroidery cotton, crochet pearl cotton, silk ribbon, chainette, etc.
- Crochet hook
- Darning needle
- Coordinating thread
- Heavy cardboard
CUTTING
 Cut a rectangle 60″ X 21″ from the fashion fabric.
Cut a piece of cardboard about 8″ wide and half as long as desired length for finished strands (add extra length to account for take-up of knotting for thicker yarns).
Wind yarn loosely around cardboard, cut across one end when card is
filled. Repeat several times and then start fringing; you can wind more
strands as you need them.
ASSEMBLY
 Finish the edges of the rectangle with a narrow hem around its perimeter.
Hand-stitch a blanket stitch to the two narrow ends of the rectangle using yarn and darning needle. Use this stitching as the anchor to apply the fringe.
Follow these instructions from the Craft Yarn Council of America for knotted fringe to create a diamond pattern of knotting.
For single knot fringe, hold the number of strands specified for 1 knot of fringe together and fold in half.
With crochet hook draw folded end through space or stitch. Pull loose ends through folded section and draw knit up tightly. (fig. 1 & 2)
For double knot fringe, after completing fringe as above, turn so right side of work is facing you. Work knots in a diamond pattern as shown in diagrams to left. (fig. 3 & 4)
HOODED WRAP COAT
Featured: Hooded wrapcoat by Mara Hoffman
The appeal of the flat-felled seam is
that it makes the joint stronger by running two lines of stitches
through each piece of fabric, while simultaneously encapsulating the raw
edges and preventing them from unraveling. This is the special seam
that designers use to create your denim jeans. What’s more, it’s pretty
simple once you get the concept. You can make it even easier by running
an iron over the seam after you make each fold. Set it to a low heat so
that you don’t scorch your fabric and try making a hooded wrap coat like
this one from Mara Hoffman. Use a cozy double-sided winter coating and skip the lining.
You will need:- 3 1/4 yds. of fashion fabric, 54″ wide
- 2 yds. of stay tape. 5/8″ wide
- coordinating thread
Add a 3-1/2″ hem allowance to the body pattern pieces and appropriate seam allowances for desired size of flat-felled seams (I used 3/4″ for 3/8″ flat-felled). All other seaming can be 1/2″ seam allowance.
CUTTING
ASSEMBLY
- Layer the pocket placket (right side) to the patch pocket (wrong side) pin/baste and stitch seam. Press seam allowance upward and grade. Turn under 1/2″ seam allowance and press.
- Aligned pressed edge to machine stitching and topstitch the placket in place.
- Topstitch the top edge of the pocket.
- Press under seam allowance on patch pockets and edge stitch on fronts.
- Join fronts and back at shoulders with RST*.
- Secure a stay tape on shoulder seams. Double topstitch shoulder seams.
- Join sleeves to armholes with RST. Grade seam and secure with a stay tape. Double topstitch armscye seams.
- Fold body and sleeves with WST*. Pin/baste side seams and underarm seam. Stitch seams with a flat-felled seam.
- Make loop carrier. Cut into 3 equal lengths.
- Stitch belt loops to side seams 5″ below armholes.
- Fold the remaining loop at the CB neck and baste in place.
- Layer hood pieces together with WST. Pin/baste center seam. Stitch center seam with flat-felled seam.
- Pin/baste hood to neckline with WST. Pin/baste neck seam catching back neck loop. Trim. Sew neck seam with a flat-felled seam.
- Fold up hem 3″ and topstitch.
- Fold cuffs in half RST and sew up short ends. Press open.
- Pin/baste cuffs (RSU) to sleeves (WSU). Sew sleeve cuff opening. Grade seam and press seam allowance towards cuff.
- Turn under 1/2″ on cuff and align turn with machine-stitching. Topstitch the cuff seam. Topstitch cuff edges.
- Pin/baste front placket to front edges and hood with WST. Sew placket to coat using 1/2″ seam allowance. Grade seam and press towards placket.
- Turn up short ends of placket and turn under 1/2″ of placket. Press. Align pressed edge to machine-stitch and topstitch. Topstitch placket edge.
- Press under 1/2″ on short ends of sash. Fold sash in half (RST) lengthwise and stitch the long seam. Grade. Turn sash right side out and press flat. Topstitch around perimeter.
THE FLAT-FELLED SEAM
To begin, lay one piece of fabric on top
of the other. The bottom piece of fabric should extend beyond the upper
piece by the width of the seam (the seam-to-be, that is). Sew a line of
stitching in from the edge of the top piece by the width of the seam.
Flip the bottom piece out from underneath
so that both are lying flat on the table and the extra flap sticks up
in the air. Fold the longer flap down over the short one and then fold
both of them down flat, as shown. Sew a line of stitches to hold down
the flap. When you sew this second row of stitches, be sure to gently
pull the two pieces of fabric taut and press the overlap flat as you
feed it through the sewing machine. This will result in a cleaner and
stronger seam.
DIRNDL SKIRT
Featured: Dirndl Skirt by Valentino
The Dirndl skirt (a full skirt with a
gathered waistband) has come a long way since its origins in traditional
German costume. Lots of prominent designers have included dirndl
skirts in their collections recently. The Dirndl featured above is from
the Valentino collection.
You can incorporate this adorable look
into your wardrobe. The Dirndl skirt looks great on everyone! In
contrast with the full skirt, the tight waistband highlights curves and
minimizes your waistline. The full skirt also makes legs appear
thinner.
Overall, the look is very figure flattering and feminine.
You will need:- 2 – 3 yds. of fashion fabric, 60″ wide
- 1 – 1 ½ yds. of fusible interfacing, 22″ wide
- 1 skirt zipper, 7″ long
- 2 hook & eye set, size 0
- Coordinating thread
- Heavy-duty thread
- Kraft paper
On kraft paper, draw a line equal to your waist measurement. Add a 1 inch extension.Draw a parallel line 4 inches from first line. Connect the 2 lines by joining the ends together. Draw the grainline through the center of the pattern. Add ½” seam allowance to the perimeter. This is the waistband.
Draw a right angle on kraft paper. (1)
From the right angle, pivot an arc using a compass equal to your waist measurement. (choose radius from the chart). (2)
From the right angle, swing an arc equal to the chosen radius measurement plus 22 inches or desired finished length. (3)Draw grainlines parallel to the vertical and horizontal axis in the center of the pattern piece. Add ½” seam allowance to the waistline and ¾” seam allowances to the side seams. (4)
CUTTING
Cut waistband 1X self
Cut skirt 2X self
Cut waistband interfacing 1X fusible
ASSEMBLY
- Mark the center on each skirt piece.
- Staystitch the waist seam on each skirt piece. Do this from the side seam to the center.
- Do a seam finish on the side seams to neaten raw edges. (I used pinking shears).
- Layer the skirt pieces with right sides together and pin/baste the left side seam. Stitch the seam beginning 7 ½” from the top, using a ¾” seam allowance. Press seam open.
- Insert skirt zipper using a lapped zipper application.
- With right sides together, pin/baste the right side seam. Stitch seam using ¾” seam allowance. Press seam open.
- Turn under the seam allowance on one long edge of the waistband and press.
- At one short end, clip seam allowance 1 ½” from end for the extension.
- Fold the waistband in half with right sides together, and stitch the short ends. Grade seam and trim corners. Turn right side out.
- Divide the waistband in quarters excluding the extension. Beginning from the back of the skirt, pin the unpressed edge of the waistband to the skirt matching quarters to the CF, CB and side seams.
- Gather up excess fabric by drawing up on heavy-duty thread and shirr the skirt waist evenly and in proportion. Sew seam slightly beneath the staystitching at the waist.
- Turn the raw seam up into the waistband and encase it. Align the pressed edge of the waistband to the machine stitching. Slip-stitch the waistband to the skirt and the opening on the extension tab.
- Stitch a pair of hook and eyes on the inside of the waistband and the extension tab.
- Hem the bottom of the skirt with a ¼” double-rolled hem.
HERE COMES THE BRIDE
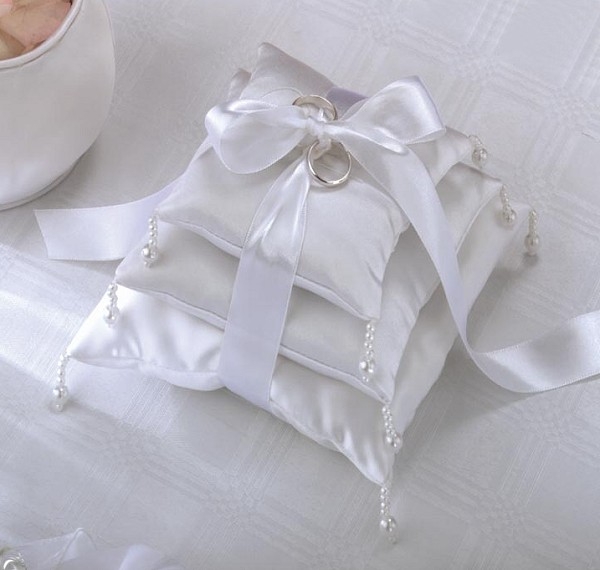 Wedding
ring pillows are traditionally decorative pillows that have the wedding
rings placed delicately on them for their trip down the aisle. The
young ring bearer usually walks the wedding ring pillow down the aisle.
In the interest of not losing the rings, or having any sort of accident
considering the young age of the ring bearer, having the rings tied to
the pillow is a very good idea.
Wedding
ring pillows are traditionally decorative pillows that have the wedding
rings placed delicately on them for their trip down the aisle. The
young ring bearer usually walks the wedding ring pillow down the aisle.
In the interest of not losing the rings, or having any sort of accident
considering the young age of the ring bearer, having the rings tied to
the pillow is a very good idea.
You will need:
- ¼ yd. of peau de soie, 45″ wide
- 1 small package of fiber-fill
- 1 yd. of satin ribbon, 1″ wide
- 60 Small pearls, 5 mm diameter
- 12 Large pearls, 10 mm diameter
- Clear monofilament thread
- Coordinating thread
PATTERN

CUTTING
Cut 2 of each pillow size in fabric.
ASSEMBLY
On clear monofilament thread, thread 4 small beads, 1 large bead, and 1 small bead. Then return monofilament thread back through the large bead and small beads. Leave long thread ends. This is one bead fringe. Repeat and make 11 more.
- For each pillow, turn under ½” along one edge and press.
- Layer fabric in pairs, with right sides together and match up pressed edges. Open pressed edge and pin layers together in all 4 corners. (I used silk pins)
- Stitch around the perimeter of each pillow, beginning on the pressed edge and curve stitching around the corners. Leave a 2 ½” opening to allow for turning. Trim corners.
- Turn pillows right side out.
Thread bead fringe onto a large hand needle. Attach beading to each corner of the pillows and knot monofilament thread from inside to secure.
- Fill the cavity of each pillow with fiber-fill. Pad corners first then fill body (fluff up the fiber-fill if necessary). Do not overstuff pillows but be generous. Slipstitch opening closed.
- Thread monofilament thread on large needle. Take a few tacking stitches in center of largest pillow and pass needle through center of medium-sized pillow and then the small pillow. Return needle through centers of small and medium pillows and loop a knot between the medium and large pillows. Hide loose thread end by burying into pillow.
- Tie the ribbon around the stack of pillows and finish with a square knot. Attach wedding rings to ribbon ends and tie in a bow.
RUCHED EMPIRE DRESS
Sometimes dresses are so gorgeous they can be intimidating to imagine making it yourself but just take a calm look. Their beauty is in the fabric and in the most simple way all you need to do is add a little basic sewing skill.
Featured: Empire waist dress with a ruched bodice and off-the-shoulder ruffled neckline and long sleeves with elasticized cuffs created by Notte by MarchesaIn many cases, your use of fabric as inspiration and the theme for the piece begins there. There are so many things you can do with luxurious fabric and a bit of elastic … who knows, you may become a famous dress designer one day!You will need:
- 2 yds. of fashion fabric, 60″ wide
- 3 yds. of shirring elastic. 3/8″ wide
- 2 ¼ yds. of single fold bias tape, 1/2″ wide
- Coordinating thread
Cut block layout according to your measurements as illustrated. Cut 1 front, cut 1 back, and 2 sleeves cut on the fold. For the bust measurement, measure just under the arms around the fullest part of the chest. For the finished length, measure from the armpit to the desired length (above the knee in this case).
ASSEMBLY
- With right sides together, layer the fabric squares and match the edges along the length. Pin or baste and stitch to create a tube, using ½” seam allowances. Press seams open.
- Repeat for each sleeve piece. You now have 1 large tube of fabric for the body and 2 smaller tubes for the sleeves.
- On the sleeves, turn under the bottom edge by ¼” and press. Make a ½” casing by turning under ½” hem and stitching along the pressed edge, leaving a 3″ opening for the insertion of the elastic.
- Cut 2 lengths of elastic equal to the distance around your closed fist. Thread the elastic through the casing and sew ends securely together. Slipstitch opening closed.
- Turn the top edge of the sleeves under by ¼” and press. Turn again by 1 ½” and press.
- Stitch the turning along the bottom edge, leaving a 3″ opening. Parallel to this stitching, sew a second row of stitching ½” apart. This will create a casing for the elastic.
- Cut 2 lengths of elastic equal to the bicep measurement. Thread the elastic through the casings and secure the ends together. Machine-stitch the opening on the casing closed.
- On the body, turn under the bottom edge twice by ½” and press. Topstitch hemline.
- On the body, turn under the top edge by 1 ¼” and press. This will be the ruffle.
- Place the bias tape along the ruffle overlapping the raw edge by ¼”. Pin/baste the bias tape around the top edge and fold back the short ends and butt together at one of the side seams. Stitch the edges of the bias tape.
- From the bias tape, measure a parallel distance of 7-8″. Place a second row of bias tape on the body and stitch tape as in the prior step.
- Cut 2 lengths of elastic equal to the bust measurement. Thread elastic in each casing and gather up excess to create the ruching. Sew elastic ends together. Slipstitch ends of bias tape closed.
- Match up each underarm seam of the sleeves with the sideseams at the ruffle edge. Tack together.
SWEET CAMIE
Featured: Ray camie by Hengst
Romantic and feminine, this piece is a perfect layering piece and makes a statement on its own as well. Made from a heavenly blend of hemp and silk this camisole by Hengst has a beautiful drape and a flirty fit while incorporating delicate spaghetti straps and a softly gathered neck edge.You will need:
- 5/8 yd. of fashion fabric, 45″ wide
- 2 yds. of thin rouleau or thin ribbon
- Coordinating thread
Bust measurement: measure just under arms around fullest part of chest.
Back waist length measurement: measure from nape of neck to waistline
PATTERN
CUTTING
Fold fabric in half with right sides together and align selvedges. Pin/baste selvedges.
Chalk out rectangle as illustrated based on your measurements. Cut on chalked outline to yield 2 pieces.
ASSEMBLY
On each piece, turn in each armsyce ¼” twice to the wrong side of the fabric to create a narrow double-rolled hem. Press. Topstitch.
- Do a seam finish on the side seams to neaten the raw edges. (I used pinking shears).
- On one piece, fold in half lengthwise to locate its center. Mark with chalk. From the top edge, measure down 5″. Mark with chalk. Draw a dart ½” on either side of the center mark. Staystitch the “dart” shape.
- Carefully cut the center of the dart. Roll back the cut edge and create a ¼” double rolled edge. Slipstitch the rolled edge. This will be the centerfront slit of the camisole.
- On front and back pieces, turn the top edge under 1/4″. Press. Turn ½” to make a casing. Topstitch.
- With right sides together, layer front on top of back and pin/baste side seams. Stitch using a ½” seam allowance. Press seam open.
- Turn bottom edge under ¼” and fold again ½” to create a hemline. Pin /baste hem. Topstitch.
- Thread rouleau or ribbon through the back casing and from the armhole, through the front casing to the center slit. Tie ends in a bow.
FRINGED CONVERTIBLE SCARF
Featured: Burberry
Two of a kind – a fringed scarf with two handsome options. A sleek satin side and a warm wooly side.
You will need:
- 2 yds. of wool fabric, 54″ wide
- 2 yds. of printed satin fabric, 45″ wide
- 1 yd. [0.9 m] of Stitch Witchery® bonding web, ½” wide
- Coordinating thread
Straighten the fabric edge you want to fringe.
Cut a rectangle shape 72″ X 16″ from the wool fabric.
On the 2 short ends of the rectangle, pull a thread yarn across the fabric at the “depth” line. (1″ wide or as you desire). Use this line as a guide for running small machine stitches to secure the fringe.
To create the fringe, clip every 2-3″ perpendicular to the edge, up to but not through, the stitching or the perpendicular threads (these will be part of the fringe). Complete the fringe by pulling away all the threads below the stitching (I used a straight pin) as shown.
FOR THE SATIN
Cut a rectangle shape 73″ X 16″.
On the 2 short ends, turn ½” under and press.
ASSEMBLY
Layer the fabrics, with right sides together, matching the folded ends of the satin to the “depth” line of the wool fringe. Sew the two long edges of the rectangle. Press seams open.
Turn right side out. Press along the long seams.
Sandwich a 15″ strip of the bonding web between the fabric layers at each short end. Press to fuse the opening close following manufacturer’s direction.
(TIP: Use a presscloth whenever fusing fabric.)
BOW-TIE BIKINI
Featured: Bow-tie Bikini by Laura Urbinati
If you’re intent is on looking your best at the pool this summer, you might take matters into your own hands and make a swimsuit that will turn heads no matter where you happen to be swimming or lounging. This bikini design* from Milan-based Laura Urbinati is fresh, young at heart and very chic. Decide whether you want to use two-way or four-way stretch fabric, which will impact the durability of your swimsuit. Four-way stretch (Lycra® Spandex) will be more elastic for running, jumping and playing in the water, while two-way stretch (cotton/spandex tricot) has a tendency to run if the wearer participates in lots of activity so it is better for sun-bathing.You will need: - about 60 cm [2/3 yd.] of stretch fabric
- about 30 cm [1/3 yd.] of “nude” tricot lining
- 2.5 m [2 ¾ yds.] of thin swimwear elastic (0 .5 cm [1/4"] width)
- 1 bra hook closure set
- Coordinating nylon thread


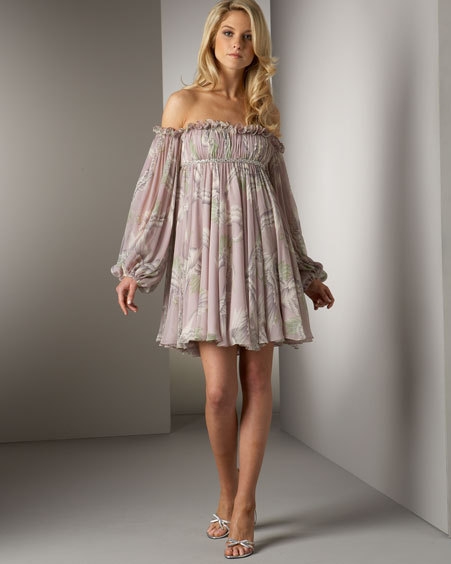


PATTERN

CUTTING
Cut bra cup 2X self
Cut bra cup lining 2X
Cut side back strap 2X self
Cut bikini back 1X self
Cut bikini front 1X self
Cut bikini internal flap (lining) 1X
Cut bow ties 6X self
Cut shoulder straps 2X self
ASSEMBLY
To make the bra and bikini:- Cut swimwear fabric (self) along the solid lines (note: cutting is done so that 1 cm. turns are included along the edges that are then folded to contain the swimwear elastic within the finishing). Cut the bikini internal flap and the bra cups in a “nude” tricot lining.
- Stitch the dart seam that is marked on bra cup pattern to create the shape of the cups, sewing together the cups on the center front (CF) and line the bra. Sandwich the back straps on left and right at the side seams between the self fabric and the lining.
- Then topstitch the entire perimeter and finish with the elastic turned and zig-zag elastic finish on the backstraps.
- Create the shoulder straps by cutting two strips of fabric as pattern to be folded upon themselves to obtain the finished width of 1 cm; then sewn for their length and attached to bra (see pattern, red dots).
- Cut 6 bow tie shapes. Layer in pairs and sew with RST, then turned right side out, tie the bows in 3 knots to be applied on bikini at the sides and the bra in the middle (CF).
- Insert a closure hook closing at both ends of the back straps.
- Line the bikini front by joining the crotch seam to the back and reverse-layer with the internal flap (at crotch seam) and baste along the sides to the self fabric.
- Join the sideseams and outline the waist and leg openings with elastic. Finally, turn the edges and zig-zag elastic finish.
No comments:
Post a Comment