 Featured: Turtle Tote by LIFEwithBIRD
An exercise in stylish functionality by Aussie line LIFEwithBIRD.
A roomy, oversized canvas carryall, it can seamlessly go from work to
after-hours party to weekend getaway, all without missing a beat. Here
is a similar carpetbag version easy to draft and make up for your
daytripping.
You will need:- 1 ¾ yds. [1.5m] canvas or upholstery fabric, 54” [137 cm] wide
- 1 heavy-duty zipper, 18” [46 cm] long
- 1 ½ yds. [1.4 m] heavy webbing, 2” [50 mm] wide
- All-purpose thread
- Cardboard
- Kraft paper
DIMENISONS: approx. 20” X 10” X 15” (51 cm X 25.5 cm X 38 cm)
PATTERN DRAFT

Add ½” [12mm] seam allowances to all pattern pieces.
CUTTING Cut 2 of each piece in fabric.
Cut 2 straps from webbing – 26” long
Cut a rectangle 20” X 10” in cardboard
ASSEMBLY
1. Prepare the base.
With right sides together, stitch around the perimeter of the base
layers, leaving one short end opening. Turn base right side out and
press. Insert cardboard into base piece and slipstitch opening closed.
Set aside.
2. Prepare patch
pockets. Turn under 2” [50 mm] of top edge of pocket pieces and press.
Hem turned edge. Turn under pocket side seam allowances and press flat.
Set aside.
NOTE: A
dome snap, Velcro® tab or zipper may be added to the patch pocket
opening if desired. Do so at this time following manufacturer’s
directions.
3. With right sides together (RST), align and match raw edges of bag at A and B. Stitch a 1” [25 mm] seam at A and B. Press seam allowance open.
4.  Center zipper FACE down along opening in seam. Stitch zipper tape to seam allowances.
Center zipper FACE down along opening in seam. Stitch zipper tape to seam allowances.
Turn bag FACE UP and topstitch on either side of seam and zipper.
5. With RST, align and match seams between A-C and B-D. Sew seam and press. Turn bag right side out and topstitch along both sides of the seam on the FACE side.
6. On FACE side, center a patch pocket over the seam between the ● and edge-stitch along the pocket sides.
7. Attach ends of webbing strap at X at A and at B (on either side of zipper opening).
 Open zipper and turn out bag through opening. With RST, join A to A and sew across seam, ensuring the straps are caught in the seam. (Be careful not to twist the straps.)
Repeat on opposite side for B to B.
8. Join C-D together (RST) and press seam open. On FACE side, topstitch on either side of the seam.
9. Align and match C to C and D to D. Sew seams, ensuring you catch the bottom of the patch pocket in the stitching.
10. Turn bag right side out through zipper opening. Place self-lined cardboard base into bottom of bag for support.


Cut 1 front, cut 1 back, cut 4 bra cups and cut 4 loop carriers (1-1/2” [4 cm] wide strips).
ASSEMBLY
PATTERN

Cut a rectangle 72” X 45” [183 cm X 114 cm].
ASSEMBLY
Cut the fabric into two equal lengths.
Reduce the width of both pieces to 35″ [89cm].
From the excess cut-away material, cut two rectangles, each measuring 10″ wide x 40″ long [25.5cm x 102cm]. Set these aside to be used for the sleeves.
 From the foldline at the center top edge of the fabric:
 Choose
the other panel of fabric to be the back of the caftan. Spread it out
on the tabletop, face side up, and fold in half lengthwise. Mark and cut
the back neck opening as follows:
Choose
the other panel of fabric to be the back of the caftan. Spread it out
on the tabletop, face side up, and fold in half lengthwise. Mark and cut
the back neck opening as follows:
 Align
the edge of the flat braid to the foldline of the seam allowance. The
trim should be on top of the seam allowance with wrong sides together. Edge-stitch the braid to the centerfront edge.
Align
the edge of the flat braid to the foldline of the seam allowance. The
trim should be on top of the seam allowance with wrong sides together. Edge-stitch the braid to the centerfront edge.
 To complete the caftan:
Lustrous satin fashion fabric shapes an elegant wrap designed with a pull-through slit opening for easy adjustability, like this one by Maggy London.
You will need:
 Make stole pattern approx. 16″ X 80″. Round the ends with a circular template (I used a large pie plate). Position slit opening 4″ from one end.
CUTTING
Cut 2X self
ASSEMBLY
Step 1: Mark slit position and length on WRONG (interfaced) side of one of the stole portions. Thread-trace a 4-inch slit, extending the thread tracing beyond end markings. The thread-traced markings should resemble a ladder.
 Step 2:
Cut a self fabric patch for the slit on straight grain, 2″ (5cm) wide
and 5″ (13cm). Make a center line horizontally across the length of the
patch. With RIGHT sides together, baste the center of the patch along
ladder rungs with ends extending 1/2″ (1.3cm) beyond ladder sides.
Step 2:
Cut a self fabric patch for the slit on straight grain, 2″ (5cm) wide
and 5″ (13cm). Make a center line horizontally across the length of the
patch. With RIGHT sides together, baste the center of the patch along
ladder rungs with ends extending 1/2″ (1.3cm) beyond ladder sides.
Step 3: On WRONG side, mark lines 1/8″ (3mm) above and below buttonhole marking, using tailor’s chalk.
Step 4: Using a small machine-stitch, start sewing along one long side of the buttonhole, following pencil lines, being careful to end stitching exactly at thread-traced ends. Do not stitch across ends, back-stitch or pivot at corners. Bring thread ends to WRONG side and tie in a knot.
 Step 5:
Snip between the two stitching lines and clip diagonally to corners, as
shown. Be careful not to clip through machine stitching. (TIP: Add a dot of seam sealant such as Fray Check® to corners, and allow to dry.)
Step 5:
Snip between the two stitching lines and clip diagonally to corners, as
shown. Be careful not to clip through machine stitching. (TIP: Add a dot of seam sealant such as Fray Check® to corners, and allow to dry.)
Step 6: Pull patch through opening to WRONG side of front. This opening should form a perfect rectangle. Roll edges of opening between your fingers until each seam is at the edge of the opening. Press so that none of the patch shows on the OUTSIDE.
Step 7: To form “buttonhole” lips, fold each long side of the patch over the opening, so that the folds meet exactly at the center.
Step 8: On OUTSIDE, baste “buttonhole” lips together along fold lines and press in place. Basting should remain in place until stole is completed.
 Step 9:
To secure “buttonhole” lips and keep them from shifting, with front
RIGHT side up, fold it back out of the way until you can sew the end of
the patch and the triangle (formed by clipping corners in step 5)
together. Using small machine stitches, stitch across the base of the
triangle, catching patch. Trim end to 1/4″ (6mm). Repeat on other end.
Step 9:
To secure “buttonhole” lips and keep them from shifting, with front
RIGHT side up, fold it back out of the way until you can sew the end of
the patch and the triangle (formed by clipping corners in step 5)
together. Using small machine stitches, stitch across the base of the
triangle, catching patch. Trim end to 1/4″ (6mm). Repeat on other end.
Step 10: Stitch horizontal seam allowance of buttonhole and patch together, just inside the original stitching. Trim patch to 1/4″ (6mm). Repeat on other seam. Set aside.
Step 11: On second stole portion, repeat step 1.
Step 12: Cut a self fabric patch for the slit on bias grain, 5″ (13cm) wide and 5″ (13cm). Make a center line diagonally across the patch. With RIGHT sides together, baste the center of the patch along ladder rungs with ends extending beyond ladder sides.
 Step 13: On WRONG side, mark lines 1/8″ (3mm) above and below buttonhole marking, using tailor’s chalk.
Step 14: Using a small machine-stitch, start sewing along one long side of the buttonhole, following chalk lines, being careful to end stitching exactly at thread-traced ends. Pivot at corners and complete the “rectangular” shape of the back opening.
Step 15: Snip between the two stitching lines and clip diagonally to corners, as shown in step 5. Be careful not to clip through machine stitching.
Step 16: Pull patch through opening to WRONG side of front. This opening should form a perfect rectangle. Roll edges of opening between your fingers until each seam is at the edge of the opening. Press so that none of the patch shows on the OUTSIDE.
Step 17: After the stole perimeter is completed, align the opening with the bound “buttonhole” slit and slipstitch rectangle opening to back of “buttonhole” lips.
Making The Stole
Step18: With RIGHT sides together, layer the 2 stole pieces and align the slit openings. Pin/baste the outer edges. Stitch around the perimeter, leaving 5″ opening along one long edge. Grade and trim seam allowances.
Step 19: Turn stole right side out. Slip stitch opening closed.
Step 20: Match and align bound “buttonhole” slit. Complete step 17.
Gown Width – Measure the fullest part of your body – eg. bustline or hipline.

Cut 4 strips of fabric 3 inches wide tapering to 2 inches wide.
Cut 1 rectangle of fabric 8 inches wide by circumference of tube once pleated.
Cut 1 rectangle of fabric equal to the finished length plus 2 inches by the gown width plus 3 inches.
 Knotted
fringe is actually quite easy to make and can be a lovely addition to
any number of fashion design ideas such as on a vest, a skirt hem, or
even, curtains. The first thing you must decide is whether your design
project requires the addition of fringe or whether the fringe can be
knotted from existing strands. You can apply the fringe trim similar to
the macramé knotted fringe on this luxurious alpaca and silk shawl from the Viva Terra collection.
Knotted
fringe is actually quite easy to make and can be a lovely addition to
any number of fashion design ideas such as on a vest, a skirt hem, or
even, curtains. The first thing you must decide is whether your design
project requires the addition of fringe or whether the fringe can be
knotted from existing strands. You can apply the fringe trim similar to
the macramé knotted fringe on this luxurious alpaca and silk shawl from the Viva Terra collection.
 Cut a rectangle 60″ X 21″ from the fashion fabric.
 Finish the edges of the rectangle with a narrow hem around its perimeter.
Hand-stitch a blanket stitch to the two narrow ends of the rectangle using yarn and darning needle. Use this stitching as the anchor to apply the fringe.
Follow these instructions from the Craft Yarn Council of America for knotted fringe to create a diamond pattern of knotting.
For single knot fringe, hold the number of strands specified for 1 knot of fringe together and fold in half.
With crochet hook draw folded end through space or stitch. Pull loose ends through folded section and draw knit up tightly. (fig. 1 & 2)
For double knot fringe, after completing fringe as above, turn so right side of work is facing you. Work knots in a diamond pattern as shown in diagrams to left. (fig. 3 & 4)
 Wedding
ring pillows are traditionally decorative pillows that have the wedding
rings placed delicately on them for their trip down the aisle. The
young ring bearer usually walks the wedding ring pillow down the aisle.
In the interest of not losing the rings, or having any sort of accident
considering the young age of the ring bearer, having the rings tied to
the pillow is a very good idea.
Wedding
ring pillows are traditionally decorative pillows that have the wedding
rings placed delicately on them for their trip down the aisle. The
young ring bearer usually walks the wedding ring pillow down the aisle.
In the interest of not losing the rings, or having any sort of accident
considering the young age of the ring bearer, having the rings tied to
the pillow is a very good idea.

 Sometimes
dresses are so gorgeous they can be intimidating to imagine making it
yourself but just take a calm look. Their beauty is in the fabric and in
the most simple way all you need to do is add a little basic sewing
skill.
Sometimes
dresses are so gorgeous they can be intimidating to imagine making it
yourself but just take a calm look. Their beauty is in the fabric and in
the most simple way all you need to do is add a little basic sewing
skill.

Cut block layout according to your measurements as illustrated. Cut 1 front, cut 1 back, and 2 sleeves cut on the fold. For the bust measurement, measure just under the arms around the fullest part of the chest. For the finished length, measure from the armpit to the desired length (above the knee in this case).
ASSEMBLY

Bust measurement: measure just under arms around fullest part of chest.
Back waist length measurement: measure from nape of neck to waistline
PATTERN

CUTTING
Fold fabric in half with right sides together and align selvedges. Pin/baste selvedges.
Chalk out rectangle as illustrated based on your measurements. Cut on chalked outline to yield 2 pieces.
ASSEMBLY

You will need:
 Straighten the fabric edge you want to fringe.
Cut a rectangle shape 72″ X 16″ from the wool fabric.
On the 2 short ends of the rectangle, pull a thread yarn across the fabric at the “depth” line. (1″ wide or as you desire). Use this line as a guide for running small machine stitches to secure the fringe.
To create the fringe, clip every 2-3″ perpendicular to the edge, up to but not through, the stitching or the perpendicular threads (these will be part of the fringe). Complete the fringe by pulling away all the threads below the stitching (I used a straight pin) as shown.
FOR THE SATIN
Cut a rectangle shape 73″ X 16″.
On the 2 short ends, turn ½” under and press.
ASSEMBLY
 Layer
the fabrics, with right sides together, matching the folded ends of the
satin to the “depth” line of the wool fringe. Sew the two long edges of
the rectangle. Press seams open.
Layer
the fabrics, with right sides together, matching the folded ends of the
satin to the “depth” line of the wool fringe. Sew the two long edges of
the rectangle. Press seams open.
Turn right side out. Press along the long seams.
Sandwich a 15″ strip of the bonding web between the fabric layers at each short end. Press to fuse the opening close following manufacturer’s direction.
(TIP: Use a presscloth whenever fusing fabric.)
 A
handkerchief pointed-hem skirt is flattering to all, but especially for
short-legged people because the points break up that horizontal
hemline. No pattern is needed to make this skirt style. It is a simple
block layout.
A
handkerchief pointed-hem skirt is flattering to all, but especially for
short-legged people because the points break up that horizontal
hemline. No pattern is needed to make this skirt style. It is a simple
block layout.
 The
size of the circular opening should be just big enough to pull over
your hips, and can then be tightened with elastic. The circumference of a
circle is about 3 times its diameter, so for a person with 44″ hips, a
7″ radius is needed to create the opening. Use the chart provided to
make the circle you need. Fold a square piece of paper in half, then
half again. From folded point, measure out a radius to create a circle
equal to your hip measurement and draw an arc. Cut on this line and open
paper flat. Measure the circumference of your template.*
The
size of the circular opening should be just big enough to pull over
your hips, and can then be tightened with elastic. The circumference of a
circle is about 3 times its diameter, so for a person with 44″ hips, a
7″ radius is needed to create the opening. Use the chart provided to
make the circle you need. Fold a square piece of paper in half, then
half again. From folded point, measure out a radius to create a circle
equal to your hip measurement and draw an arc. Cut on this line and open
paper flat. Measure the circumference of your template.*
 These
long and loose bottoms score high on the comfort index. The fabrics are
fluid and the prints are fun, which means they are less for curling up
on the sofa than for spending a weekend afternoon in style. Think silk,
linen, rayon, or cotton…something lightweight and drapy. Balance them
with a body-fitting top or stay faithful to the bedtime look with a big
and beautiful sweater.
These
long and loose bottoms score high on the comfort index. The fabrics are
fluid and the prints are fun, which means they are less for curling up
on the sofa than for spending a weekend afternoon in style. Think silk,
linen, rayon, or cotton…something lightweight and drapy. Balance them
with a body-fitting top or stay faithful to the bedtime look with a big
and beautiful sweater.

 Shirred
sundresses with spaghetti straps are a fun wardrobe item. Whether
you’re hanging out by the pool or just chilling on a summer day, this
dress keeps you looking sweet and fresh all day long. The border print
detail on the fashion model (ASOS Dresses)
adds to the shirred bust panel with thin ribbon tie shoulder straps.
This is a quick little dress that is easy to whip up in a day without a
pattern and looks flattering on most body shapes.
Shirred
sundresses with spaghetti straps are a fun wardrobe item. Whether
you’re hanging out by the pool or just chilling on a summer day, this
dress keeps you looking sweet and fresh all day long. The border print
detail on the fashion model (ASOS Dresses)
adds to the shirred bust panel with thin ribbon tie shoulder straps.
This is a quick little dress that is easy to whip up in a day without a
pattern and looks flattering on most body shapes.


 John Lennon sang on the White Album of the Beatles; “Your inside is out, when your outside is in”
to express the paradox of the oneness free from illusion of a
multidimensional world. The German mathematician and astronomer-
theoretician A. F. Möbius
discovered at the beginning of the nineteenth century, that something
with two sides can have one surface: the möbius ring. The inside is the
outside when one joins the two short ends together with a twist into a
ring – think of the cyclic of time; visualize by joining the frontside
to the backside. Isn’t it amazing?
John Lennon sang on the White Album of the Beatles; “Your inside is out, when your outside is in”
to express the paradox of the oneness free from illusion of a
multidimensional world. The German mathematician and astronomer-
theoretician A. F. Möbius
discovered at the beginning of the nineteenth century, that something
with two sides can have one surface: the möbius ring. The inside is the
outside when one joins the two short ends together with a twist into a
ring – think of the cyclic of time; visualize by joining the frontside
to the backside. Isn’t it amazing?


 No pattern is required for this easy fit yoga pant as there is no
waste. Chalk out cutting lines directly onto the fabric. Working off of a
rectangle, I cut a triangular gusset
and inverted it, re-attaching to the leg. How wide the leg fabric is
depends on how full you want the final pants to be (narrower for a
tapered style, wider for a relax fit). Be careful not to cut the rise
too large as it will stretch and droop some resulting in a larger drop
than you might think.
No pattern is required for this easy fit yoga pant as there is no
waste. Chalk out cutting lines directly onto the fabric. Working off of a
rectangle, I cut a triangular gusset
and inverted it, re-attaching to the leg. How wide the leg fabric is
depends on how full you want the final pants to be (narrower for a
tapered style, wider for a relax fit). Be careful not to cut the rise
too large as it will stretch and droop some resulting in a larger drop
than you might think.
Use full width of 45″ fabric and select a fabric that can be cut in either direction. (eg. up or down its length). I prefer a lightweight fabric as it gathers easily with an elastic waist.
Straighten cut ends to a right angle [90 degree].
Fold the fabric, with right sides together (RST), in half lengthwise so that selvedges align. Chalk out 2 lengths for each pant leg.

The minimum outseam length is the measurement from your waistline, over the buttock and down the leg to your heel. Take this measurement while touching your toes. Add 2″ for a waist casing, 1″ for hem allowance and 1″ for seam allowance [total = 4"]. Square across fabric width. (see cutting diagram)
At bottom of rectangle, measure half the distance from foldline to selvedge to create the leg cuff . This measurement may be tapered if you desire a smaller opening at the ankle.
For the rise, measure down 13″ from the waist along the selvedge edge. Join this point with the leg cuff point with a straight line.
The remaining piece of fabric from the leg cut with be inverted and become the leg gusset. [2 pieces for each leg].
 Open each leg and sew a gusset piece to each inseam RST using a ½” seam allowance. Press seam open.
Fold each leg portion RST and align gusset seams. Sew using ½” seam allowance. Press seam open.
Turn one leg inside out. Insert right-side-out leg into inside-out leg with RST. Sew up crotch seam using ½” seam allowance. Turn legs right side out.
Turn under ½ ” seam allowance along waist edge. Press. Turn under 1-1/2″ once more to create casing. Sew along fold edges. Casing may be for elastic or a drawcord. Leave an opening to insert drawcord or elastic.
Turn up hem allowance ½” and press. Turn ½” again and sew double-turned hem.
Front and back of pants are the same, so if I use an elastic waist I sew a small button to inside CF. This “belly button” indicates the front of my pants.

Turn a plain T-shirt into a high fashion wrap top, lickety-split.
Wrapping is a big component of this summer’s fashion look. If you have a plain cotton T-shirt, you can have a hot fashion item in no time.
STEP 1 Cut up center front to within 5cm (2 in.) of armhole.
STEP 2 Fold in half along center back and center front. Cut a diagonal line as shown in diagram. Cut removed section in half along center back fold line to create two ties.

STEP 3 With right sides together, stitch short edges of one tie diagonally across bottom of one point at bottom front of T-shirt . Repeat with second tie.

STEP 4 Zigzag-stitch all raw edges; turn under 1.5 cm (5/8 in.); topstitch.
To wear, cross ties at the front, wrap around to the back and secure in a snug knot.
[4] Comments
 Smocked Wrap

Fold the cut edge to align with the selvedge edge from bottom to top. This with create the true bias line. Mark with chalk.
Repeat step 1 and 2 on opposite end of cloth, from top to bottom. The two triangles will be the front and back of the wrap.
With the remaining fabric, mark 9 bias strips (14.5 inches wide) parallel to one another, following the true bias (see diagram). This is the ruffle. Cut fabric along all chalk lines.
To assemble the ruffle, join each strip to one another at the short ends. Fold the long bias trim strip in half lengthwise, with wrong sides facing, and run a gathering stitch along the raw edges.
To assemble ruffled trim with body, begin by rounding the pointed ends of each triangle.(a saucer makes a perfect template). Then baste gathered ruffle to right side of the fabric, aligning all raw edges, along the perimeter of one of the triangles. Stitch gathered trim into place.
To complete the wrap, place the second triangle with right sides facing to the trimmed body piece (the trim will be sandwiched between each body piece) aligning all raw edges. Pin and baste together. Stitch around the perimeter, following the previous row of stitching, allowing a 4″ opening along one straight edge. Turn right side out and slipstitch opening closed.
To create the smocked effect, handstitch several running stitches in a circular shape throughout the body portion in a random pattern. (see diagram)
Draw up on each running stitch to gather up fabric and tie off. Hide loose ends of thread by sinking it into wrong side of fabric.
HOODED COWL
 Featured: Missoni Hooded Scarves
For Fall ’09, Missoni
is staying true to the label’s knitwear traditions and producing plenty
of fabulous pieces including an abundance of hooded scarves. Design one
up for yourself and make use of that fabulous knit remnant you have
been saving for something special or go big as featured here.
You will need:
- ¾ yd. [0.7 m] of stable knit fashion fabric, 60” [152 cm] wide
- Matching thread
DIMENSIONS: approx. 30” long x 12” wide [76 cm x 30 cm]
PATTERN & CUTTING
This is a patternless design (a simple
block draft). You can plot it directly onto your fabric but you will
need to straighten the cut ends of your fabric before you are going to
cut. The corners should be 90°. The rectangle should be about 60 inches long and 25 inches wide [152 cm x 63.5 cm]. Once that is done, you are ready to cut out the shape.
Fold the fabric into quarters both vertically and horizontally and align the raw edges (fig.1). At the “open” corner, measure 12” [30.5 cm] from the corner and mark location with a pin (■).
Draw an arc using a circular template (I used a large pie plate) with tailor’s chalk at the corner.
Cut through all 4 layers and remove the excess fabric.
ASSEMBLY
Open the fabric flat and refold it in the long direction with the right sides facing together.
Stitch the curved ends together between the ■ using a ¼” [6mm] seam allowance. (fig.2)
Open the fabric as a “tube” and refold it
in the narrow direction with the right sides facing together. Align the
sewn seam and match up the open raw edges. Clip the seam allowance at
the ■, if necessary.
Stitch around the open edge of the loop using a ¼” [6 mm] seam allowance and leave a 6” [15 cm] opening to turn out. (fig.3) Turn the garment right side out and slip-stitch the opening closed.
NAUTICAL HALTER
 Featured: Selma dress
In many cases, discover your fabric as
inspiration and the theme for the piece begins there. There are so many
design ideas you can do with patterned fashion fabric and a bit of
elastic. Take for instance, the Selma dress with an elasticized bodice and striking rope trim makes for a nautical style and fun back by Christopher Deane. Come across your own themed fabric and try this dress draft for summer.
You will need:- approx. 2 ½ yds. [2.3m] of fashion fabric, 45″ [114 cm] wide (depends on desired length)
- shirring elastic thread.
- 4 yds. [3.6m] of cording, 1/2″ [12mm] diameter
- Coordinating thread
X = bust measurement (measure just under the arms around the fullest part of the chest).
Finished length = measure vertically from the armpit to the desired hemline .
PATTERN
This is a patternless design (simple
block draft). Plot and cut block layout directly onto the fabric
according to your measurements as illustrated (seam allowance is included).
CUTTINGCut 1 front, cut 1 back, cut 4 bra cups and cut 4 loop carriers (1-1/2” [4 cm] wide strips).
ASSEMBLY
1. Make 2 self-lined bra
cups. Begin by layering 2 pieces, with right sides together. Stitch
across narrow top edge using ½” seam allowance. From machine stitching,
measure down ½” and sew down both sides of bra piece, using ½” seam
allowance. Press seams open; then turn bra cup right side out. Press bra
cups flat and topstitch across the top of each bra cup below the openings. Baste the raw edges together. Set aside.
2.  With
FACE side up, shirr fabric panels using elastic thread in the bobbin.
Begin 1” from top edge of panel and stitch across width of each panel.
Do parallel rows of shirring about ½” apart (I used the presser foot width as a guide) and continue until you have a shirred length of fabric equal to 1/3 X.
With
FACE side up, shirr fabric panels using elastic thread in the bobbin.
Begin 1” from top edge of panel and stitch across width of each panel.
Do parallel rows of shirring about ½” apart (I used the presser foot width as a guide) and continue until you have a shirred length of fabric equal to 1/3 X.
For example: if the bust equals 36 inches , you would shirr 12-inch length from the top edge of the panel.
3. With right sides
together, layer the fabric panels and align the shirred portions while
matching the edges along the length. Pin or baste and stitch to create a
tube, using ½” seam allowances. Press seams open.
Design Note: The
fit of this style is not a snug one. The dress is designed to hang from
the shoulder straps. You may get a closer fit by increasing the seam
allowance at the side seams.
4. Hem the bottom edge of the tube with a narrow double rolled hem by turning under the bottom edge twice by ½” and press. Topstitch hemline.
5. On one panel front,
find the center of the panel above the shirring and mark. Pin/baste one
bra cup on either side of this mark, with right side facing. Sew across
bottom edges of bra cups.
6. Make carriers 1/2″ X
3″ [12mm X 75mm]; you will need 4 of them. At the outer edges of the bra
cups, fold a carrier in half to form a loop and secure to either side
of the garment. Divide the back portion between the two loop carriers
into thirds. Place a loop carrier at each location and secure.
7.  Serge or pink the raw edge of the top edge. Turn top edge to inside and press. Topstitch in place.
Serge or pink the raw edge of the top edge. Turn top edge to inside and press. Topstitch in place.
8. Cut 2 lengths of
cording. Thread cord in each bra casing and gather up excess fabric to
create the gathers. Knot cording together to create halter straps and
thread through loop carriers.
SUN SERAPE
 Featured: Best Behavior
Stay “kewl” this summer with this
gossamer sun serape. It is a cinch to whip up in an afternoon. Take your
styling cues from Danish design house, Best Behavior and layer it over your tiny tees and baggy pants.
You will need:- approx. 2 yds. [1.8m] of transparent fashion fabric, 45” [114 cm] wide such as chiffon
- 1 pkg. of bias binding, 1” [25 mm] wide (matching colour)
- coordinating thread
PATTERN
This is a patternless design (a simple
block draft). You can plot it directly onto your fabric but you will
need to straighten the cut ends of your fabric before you are going to
cut. The corners should be 90°. Once that is done, trim away the
selvedges.
CUTTINGCut a rectangle 72” X 45” [183 cm X 114 cm].
ASSEMBLY
- Find the center of the cloth by folding it in half, both lengthwise and widthwise. Mark the location with a pin. Radiating from the center, lightly chalk an arc 5″ [12.5 cm] away from one fold to the other. Carefully cut on chalked line through all layers to create the neck opening. Reserve cut away portion.
- Fold the width of the bias tape in half and align the raw edges of the tape along the FACE side of the neck opening. Stitch around the neck opening using a ¼” [6mm] seam allowance. Grade the seam allowance. Turn bias binding to inside of opening and press seam flat. Topstitch around neck opening.
- Open the fabric flat, FACE side down and machine a narrow double rolled hem along all sides.
- To make the pocket, re-fold the cut away portion from the neck into quarters, with right sides together. Reduce the radius of the arc by 1″ [25mm].
- Open the fabric flat and fold in half , with RST. Stitch around the curved edge, using a ½” [12mm] seam allowance, leaving a small opening to turn-out. Trim the seam allowance close to the stitching. Turn pocket right side out and slipstitch opening closed. Press pocket flat.
- Align pocket to left side of centerfront and edge-stitch pocket to front of garment.
- Fold garment in half and align corners. Measure up from matching corners on each side approximately 14”[35.5cm] . Tack front and back together at this point (●).
CAFTAN
 Featured: Oscar de la Renta Caftan
Oscar de la Renta
shows us how to relax with this 2009 caftan style. The sheer striped
silk print is so feminine and the flat braid trim makes this style ultra
luxe. Can you just imagine lounging around in this? (You’ll definitely
want to sew one up as no pattern is required.) This is a classic piece
that belongs in any collection of beautiful, fine clothing.
You will need:- Fashion fabric, 45″ [114cm] wide
- Flat braid trim, 2″ [5cm] wide
- Coordinating thread
- 12 half-ball buttons, line 20 [12.5 mm dia.]
Measure from the nape of your neck down
to the desired length: purchase twice this amount of 45″ [114cm] wide
fashion fabric and four and a half times this amount of 2″ [50mm] wide
flat braid trim .
CUTTINGCut the fabric into two equal lengths.
Reduce the width of both pieces to 35″ [89cm].
From the excess cut-away material, cut two rectangles, each measuring 10″ wide x 40″ long [25.5cm x 102cm]. Set these aside to be used for the sleeves.
NECKLINE
Choose one length of fabric to be the
front of the caftan. Spread it out on the tabletop, face side up, and
fold in half lengthwise. Mark and cut the front neck opening as follows:
From the foldline at the center top edge of the fabric:
Measure down 4″ [10cm] and mark with a pin.
Along the top edge, place a pin 4″ [10 cm] from the foldline.
Arc a curve using a compass from the top of the foldline between the 2 pins.
Cut out the neck opening. Refer to diagram A.
Cut along the foldine of the front piece in two halves (centerfront seam).
Choose
the other panel of fabric to be the back of the caftan. Spread it out
on the tabletop, face side up, and fold in half lengthwise. Mark and cut
the back neck opening as follows:
From the foldline at the center top edge of the fabric:
Measure down 1 ½” [4 cm] and mark with a pin.
Along the top edge, place a pin 4″ [10cm] from the foldline.
From this pin, measure down 1 ½” [4cm].
Shape the back neck and cut out the neck opening. Refer to diagram B.
ASSEMBLY
On the two front portions of the caftan,
turn ½” [12.5mm] seam allowance along the centerfront edges and press
flat. Open the folded edge.
Align
the edge of the flat braid to the foldline of the seam allowance. The
trim should be on top of the seam allowance with wrong sides together. Edge-stitch the braid to the centerfront edge.
Repeat (as mirrored image) to the opposite front piece of the caftan.
Layer both front pieces with right sides together and matching the braid trim. Align the trim at the center front.
Measure down from the neck edge 8″ [20cm] and mark with a pin. This will create a keyhole neckline.
Measure up from the hem edge 18″ [46cm] and mark with a pin. This will create a center slit.
With wrong sides together, stitch the centerfront seam of the front panels between the two pins. (Note: Do not catch the trim in the stitched seam.)
With the front piece FACE UP, gently
press the centerfront seam open by placing the braid trim flat. On the
open edge of the trim, edgestitch the braid to the caftan fronts.
With wrong sides together, pin/baste back piece to front piece at shoulders. Sew shoulder seams. Press seams open.
Take the two sleeve rectangles and pin
braid trim to one long edge in the same manner that was used for the
centerfront edge , aligning trim with seam allowance. (There will be some excess at the top and bottom). Edge-stitch braid to fabric to create the wrists.
With right sides together, fold each rectangle in half width-wise and mark midpoint location with a pin.
With right sides together, pin/baste each
sleeve rectangle to the body, matching the pin to the shoulder seam.
Sew sleeves to body.
Measure the neck opening of the caftan (do not include seam allowance). Cut a length of braid trim equal to this measurement plus 1 inch [25mm].
Turn short ends of trim under ½” [12.5mm]
and press flat. Fold trim in half lengthwise. Bind the raw neckline
with the trim. Pin/baste in place. Topstitch along edge of braid from CF to CF.
To complete the caftan:
Place the front of the caftan together
with the back, right sides together. Pin/baste the side seams and
underarm seams together. Trim any excess of the trim, if necessary.
Stitch the sides. Press seams open.
Hem the bottom by binding hemline with braid trim in the same manner used for the neckline.
Sew a thread loop and button at the neckline at the centerfront.
Sew a button at the base of the keyhole opening and another at the top of the center slit.
Evenly space the rest of the buttons along the centerfront seam and sew in place.
SATIN STOLE
 Featured: Maggy London Satin Stole
Lustrous satin fashion fabric shapes an elegant wrap designed with a pull-through slit opening for easy adjustability, like this one by Maggy London.
You will need:
- 2 yds. (1.8 m) of satin fashion fabric, 45″ wide
- Coordinating thread
- Small patch of fusible interfacing
- Fray Check ® fabric sealant
Make stole pattern approx. 16″ X 80″. Round the ends with a circular template (I used a large pie plate). Position slit opening 4″ from one end.CUTTING
Cut 2X self
ASSEMBLY
Making a Bound “Buttonhole” Slit
TIP: To insure perfect results, make a trial buttonhole slit on the same number of fabric layers as your garment for practice.Step 1: Mark slit position and length on WRONG (interfaced) side of one of the stole portions. Thread-trace a 4-inch slit, extending the thread tracing beyond end markings. The thread-traced markings should resemble a ladder.
 Step 2:
Cut a self fabric patch for the slit on straight grain, 2″ (5cm) wide
and 5″ (13cm). Make a center line horizontally across the length of the
patch. With RIGHT sides together, baste the center of the patch along
ladder rungs with ends extending 1/2″ (1.3cm) beyond ladder sides.
Step 2:
Cut a self fabric patch for the slit on straight grain, 2″ (5cm) wide
and 5″ (13cm). Make a center line horizontally across the length of the
patch. With RIGHT sides together, baste the center of the patch along
ladder rungs with ends extending 1/2″ (1.3cm) beyond ladder sides.Step 3: On WRONG side, mark lines 1/8″ (3mm) above and below buttonhole marking, using tailor’s chalk.
Step 4: Using a small machine-stitch, start sewing along one long side of the buttonhole, following pencil lines, being careful to end stitching exactly at thread-traced ends. Do not stitch across ends, back-stitch or pivot at corners. Bring thread ends to WRONG side and tie in a knot.
 Step 5:
Snip between the two stitching lines and clip diagonally to corners, as
shown. Be careful not to clip through machine stitching. (TIP: Add a dot of seam sealant such as Fray Check® to corners, and allow to dry.)
Step 5:
Snip between the two stitching lines and clip diagonally to corners, as
shown. Be careful not to clip through machine stitching. (TIP: Add a dot of seam sealant such as Fray Check® to corners, and allow to dry.)Step 6: Pull patch through opening to WRONG side of front. This opening should form a perfect rectangle. Roll edges of opening between your fingers until each seam is at the edge of the opening. Press so that none of the patch shows on the OUTSIDE.
Step 7: To form “buttonhole” lips, fold each long side of the patch over the opening, so that the folds meet exactly at the center.
Step 8: On OUTSIDE, baste “buttonhole” lips together along fold lines and press in place. Basting should remain in place until stole is completed.
 Step 9:
To secure “buttonhole” lips and keep them from shifting, with front
RIGHT side up, fold it back out of the way until you can sew the end of
the patch and the triangle (formed by clipping corners in step 5)
together. Using small machine stitches, stitch across the base of the
triangle, catching patch. Trim end to 1/4″ (6mm). Repeat on other end.
Step 9:
To secure “buttonhole” lips and keep them from shifting, with front
RIGHT side up, fold it back out of the way until you can sew the end of
the patch and the triangle (formed by clipping corners in step 5)
together. Using small machine stitches, stitch across the base of the
triangle, catching patch. Trim end to 1/4″ (6mm). Repeat on other end.Step 10: Stitch horizontal seam allowance of buttonhole and patch together, just inside the original stitching. Trim patch to 1/4″ (6mm). Repeat on other seam. Set aside.
Step 11: On second stole portion, repeat step 1.
Step 12: Cut a self fabric patch for the slit on bias grain, 5″ (13cm) wide and 5″ (13cm). Make a center line diagonally across the patch. With RIGHT sides together, baste the center of the patch along ladder rungs with ends extending beyond ladder sides.
 Step 13: On WRONG side, mark lines 1/8″ (3mm) above and below buttonhole marking, using tailor’s chalk.
Step 14: Using a small machine-stitch, start sewing along one long side of the buttonhole, following chalk lines, being careful to end stitching exactly at thread-traced ends. Pivot at corners and complete the “rectangular” shape of the back opening.
Step 15: Snip between the two stitching lines and clip diagonally to corners, as shown in step 5. Be careful not to clip through machine stitching.
Step 16: Pull patch through opening to WRONG side of front. This opening should form a perfect rectangle. Roll edges of opening between your fingers until each seam is at the edge of the opening. Press so that none of the patch shows on the OUTSIDE.
Step 17: After the stole perimeter is completed, align the opening with the bound “buttonhole” slit and slipstitch rectangle opening to back of “buttonhole” lips.
Making The Stole
Step18: With RIGHT sides together, layer the 2 stole pieces and align the slit openings. Pin/baste the outer edges. Stitch around the perimeter, leaving 5″ opening along one long edge. Grade and trim seam allowances.
Step 19: Turn stole right side out. Slip stitch opening closed.
Step 20: Match and align bound “buttonhole” slit. Complete step 17.
SLINKY COLUMN GOWN
 Featured: Column evening gown by Oscar de la Renta

Effortlessness and the flow of luxurious
fabrics were cited as the most important elements of this autumn/winter
2008-9 shows. The theme continuing on the shoulders and defining the
silhouette at the hips, while the simple eveningwear dresses were long,
figure-hugging and draped sensually over the body.
Simple textures and technically brilliant structures, like the gown by Oscar de la Renta, make this a simple and yes, “patternless” couture project.
COLUMN GOWN
You will need:- approx. 2 yds. of fashion fabric, 45″ to 54″ wide
- approx. ½ yd. of fusible interfacing, 22″ wide
- Coordinating thread
- 1 closed dress zipper, 18″ long
- ¼ yd. of elastic, ½” wide
- 1 – Hook & eye set
MEASUREMENTS
Finished Length – Measure from under arm to floor.Gown Width – Measure the fullest part of your body – eg. bustline or hipline.
PATTERN

CUTTING
Cut 4 strips of fabric 2 inches wide.Cut 4 strips of fabric 3 inches wide tapering to 2 inches wide.
Cut 1 rectangle of fabric 8 inches wide by circumference of tube once pleated.
Cut 1 rectangle of fabric equal to the finished length plus 2 inches by the gown width plus 3 inches.
ASSEMBLY
- Set the fabric strips in pairs. For each pair, interface 1 strip following the manufacturer’s direction for fusing.
- With right sides together (RST), pin/baste the long edges of each pair together. Stitch.
- Turn right side out and press flat. Edge-stitch along the finished seams. Set aside.
- Fold the large rectangle in half lengthwise with RST. From the top, leave 18 ½” open for the zipper. From the bottom, leave 19″ open for a slit. Pin/baste the remain edges together and stitch using ½” seam allowance. Press the entire seam open.
- Align the zipper along the top opening and insert using the center slot method.
- For the open slit, fold under ¼” of the seam allowance and topstitch or slipstitch the slit opening.
Turn the “column” right side out and try gown on. Take the excess fabric above the bustline and pleat 2 box pleats, one on either side of the centerfront (red dot). Pin/baste pleats down. (see diagram)
- Remove gown and measure the finished circumference of the gown, beginning and ending at the zipper. Add 1″ for seam allowance. Record this measurement.
- Match the 2 tapered straps to the 2 pleats on the front of the gown (red dots) and align the raw edges. Pin/baste in position. Next, pin/baste the narrow straps 2″ away from the tapered straps. Align the raw edges and pin/baste in position.
- Try on gown. Drape straps over the shoulder and pin/baste other end of each strap to back of gown. Adjust the lengths of the straps and cut off excess. At top of shoulder, fell or tack the tapered strap to the narrow strap with handstitching so they are side-by-side.
- For the facing, use the smaller rectangle and adjust the width to equally the finished circumference dimension of the top of the gown plus 1″ for seam allowance.
- On the bottom of the rectangle, turn under ¼”, then turn under 5/8″. Press turning.
- Fold the short ends of the rectangle to its center. Mark the 2 foldlines with chalk. Open the rectangle flat, wrong side up.
- Pin the ends of the elastic to where the foldline marks are located. Stitch across the ends of the elastic.
- Stitch the 5/8 turning along the bottom to encase the elastic. (Stretch elastic as you sew).
- With RST, match up the raw edges of the facing piece (the side without the elastic casing) and the top of the gown, sandwiching the strap ends between the layers and allowing ½” seam allowance extended beyond the zipper for the facing piece. Pin/baste the top edge of the gown and machine-stitch. Grade seam and press seam allowance towards facing.
- Under-stitch facing inside of the finished seam.
- Turn under seam allowance on facing piece at centerback and slipstitch to back of zipper tape.
- Hand-sew hook and eye set above zipper opening to facing.
- At hemline, make a ½” double rolled hem.

KNOTTED FRINGE SHAWL
 Knotted
fringe is actually quite easy to make and can be a lovely addition to
any number of fashion design ideas such as on a vest, a skirt hem, or
even, curtains. The first thing you must decide is whether your design
project requires the addition of fringe or whether the fringe can be
knotted from existing strands. You can apply the fringe trim similar to
the macramé knotted fringe on this luxurious alpaca and silk shawl from the Viva Terra collection.
Knotted
fringe is actually quite easy to make and can be a lovely addition to
any number of fashion design ideas such as on a vest, a skirt hem, or
even, curtains. The first thing you must decide is whether your design
project requires the addition of fringe or whether the fringe can be
knotted from existing strands. You can apply the fringe trim similar to
the macramé knotted fringe on this luxurious alpaca and silk shawl from the Viva Terra collection.
The second option, that of loosing weft (horizontal) threads leaving the remaining warp (veritcal)
threads hanging. Measure out how long you want the fringe to be and
mark that measurement with a line of stay-stitching. Then draw out the
threads up to that stitching line. Decide how many threads you want to
bundle together to tie in a knot. Then tie the knots and you will have a
lovely fringed trim.
You will need:
- 5/8 yd of double-sided fashion fabric, 60″ wide such as woolens, cashmere, alpaca, etc.
- Yarn for fringing such as embroidery cotton, crochet pearl cotton, silk ribbon, chainette, etc.
- Crochet hook
- Darning needle
- Coordinating thread
- Heavy cardboard
CUTTING
 Cut a rectangle 60″ X 21″ from the fashion fabric.
Cut a piece of cardboard about 8″ wide and half as long as desired length for finished strands (add extra length to account for take-up of knotting for thicker yarns).
Wind yarn loosely around cardboard, cut across one end when card is
filled. Repeat several times and then start fringing; you can wind more
strands as you need them.
ASSEMBLY
 Finish the edges of the rectangle with a narrow hem around its perimeter.
Hand-stitch a blanket stitch to the two narrow ends of the rectangle using yarn and darning needle. Use this stitching as the anchor to apply the fringe.
Follow these instructions from the Craft Yarn Council of America for knotted fringe to create a diamond pattern of knotting.
For single knot fringe, hold the number of strands specified for 1 knot of fringe together and fold in half.
With crochet hook draw folded end through space or stitch. Pull loose ends through folded section and draw knit up tightly. (fig. 1 & 2)
For double knot fringe, after completing fringe as above, turn so right side of work is facing you. Work knots in a diamond pattern as shown in diagrams to left. (fig. 3 & 4)
material source: Craft Yarn Council of America
HERE COMES THE BRIDE
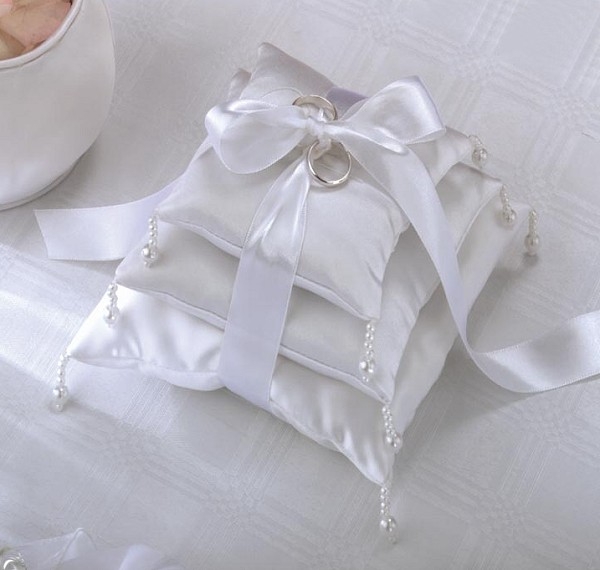 Wedding
ring pillows are traditionally decorative pillows that have the wedding
rings placed delicately on them for their trip down the aisle. The
young ring bearer usually walks the wedding ring pillow down the aisle.
In the interest of not losing the rings, or having any sort of accident
considering the young age of the ring bearer, having the rings tied to
the pillow is a very good idea.
Wedding
ring pillows are traditionally decorative pillows that have the wedding
rings placed delicately on them for their trip down the aisle. The
young ring bearer usually walks the wedding ring pillow down the aisle.
In the interest of not losing the rings, or having any sort of accident
considering the young age of the ring bearer, having the rings tied to
the pillow is a very good idea.
You will need:
- ¼ yd. of peau de soie, 45″ wide
- 1 small package of fiber-fill
- 1 yd. of satin ribbon, 1″ wide
- 60 Small pearls, 5 mm diameter
- 12 Large pearls, 10 mm diameter
- Clear monofilament thread
- Coordinating thread
PATTERN

CUTTING
Cut 2 of each pillow size in fabric.
ASSEMBLY
On clear monofilament thread, thread 4 small beads, 1 large bead, and 1 small bead. Then return monofilament thread back through the large bead and small beads. Leave long thread ends. This is one bead fringe. Repeat and make 11 more.
- For each pillow, turn under ½” along one edge and press.
- Layer fabric in pairs, with right sides together and match up pressed edges. Open pressed edge and pin layers together in all 4 corners. (I used silk pins)
- Stitch around the perimeter of each pillow, beginning on the pressed edge and curve stitching around the corners. Leave a 2 ½” opening to allow for turning. Trim corners.
- Turn pillows right side out.
Thread bead fringe onto a large hand needle. Attach beading to each corner of the pillows and knot monofilament thread from inside to secure.
- Fill the cavity of each pillow with fiber-fill. Pad corners first then fill body (fluff up the fiber-fill if necessary). Do not overstuff pillows but be generous. Slipstitch opening closed.
- Thread monofilament thread on large needle. Take a few tacking stitches in center of largest pillow and pass needle through center of medium-sized pillow and then the small pillow. Return needle through centers of small and medium pillows and loop a knot between the medium and large pillows. Hide loose thread end by burying into pillow.
- Tie the ribbon around the stack of pillows and finish with a square knot. Attach wedding rings to ribbon ends and tie in a bow.


RUCHED EMPIRE DRESS
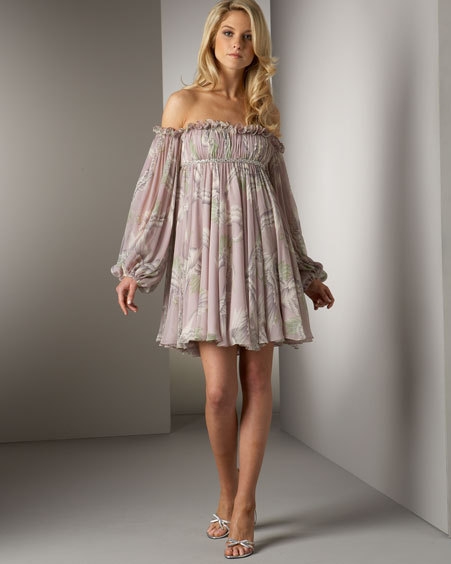 Sometimes
dresses are so gorgeous they can be intimidating to imagine making it
yourself but just take a calm look. Their beauty is in the fabric and in
the most simple way all you need to do is add a little basic sewing
skill.
Sometimes
dresses are so gorgeous they can be intimidating to imagine making it
yourself but just take a calm look. Their beauty is in the fabric and in
the most simple way all you need to do is add a little basic sewing
skill.
Featured: Empire
waist dress with a ruched bodice and off-the-shoulder ruffled neckline
and long sleeves with elasticized cuffs created by Notte by Marchesa
In many cases, your use of fabric as
inspiration and the theme for the piece begins there. There are so many
things you can do with luxurious fabric and a bit of elastic … who
knows, you may become a famous dress designer one day!
You will need:- 2 yds. of fashion fabric, 60″ wide
- 3 yds. of shirring elastic. 3/8″ wide
- 2 ¼ yds. of single fold bias tape, 1/2″ wide
- Coordinating thread

Cut block layout according to your measurements as illustrated. Cut 1 front, cut 1 back, and 2 sleeves cut on the fold. For the bust measurement, measure just under the arms around the fullest part of the chest. For the finished length, measure from the armpit to the desired length (above the knee in this case).
ASSEMBLY
- With right sides together, layer the fabric squares and match the edges along the length. Pin or baste and stitch to create a tube, using ½” seam allowances. Press seams open.
- Repeat for each sleeve piece. You now have 1 large tube of fabric for the body and 2 smaller tubes for the sleeves.
- On the sleeves, turn under the bottom edge by ¼” and press. Make a ½” casing by turning under ½” hem and stitching along the pressed edge, leaving a 3″ opening for the insertion of the elastic.
- Cut 2 lengths of elastic equal to the distance around your closed fist. Thread the elastic through the casing and sew ends securely together. Slipstitch opening closed.
- Turn the top edge of the sleeves under by ¼” and press. Turn again by 1 ½” and press.
- Stitch the turning along the bottom edge, leaving a 3″ opening. Parallel to this stitching, sew a second row of stitching ½” apart. This will create a casing for the elastic.
- Cut 2 lengths of elastic equal to the bicep measurement. Thread the elastic through the casings and secure the ends together. Machine-stitch the opening on the casing closed.
- On the body, turn under the bottom edge twice by ½” and press. Topstitch hemline.
- On the body, turn under the top edge by 1 ¼” and press. This will be the ruffle.
- Place the bias tape along the ruffle overlapping the raw edge by ¼”. Pin/baste the bias tape around the top edge and fold back the short ends and butt together at one of the side seams. Stitch the edges of the bias tape.
- From the bias tape, measure a parallel distance of 7-8″. Place a second row of bias tape on the body and stitch tape as in the prior step.
- Cut 2 lengths of elastic equal to the bust measurement. Thread elastic in each casing and gather up excess to create the ruching. Sew elastic ends together. Slipstitch ends of bias tape closed.
- Match up each underarm seam of the sleeves with the sideseams at the ruffle edge. Tack together.
SWEET CAMIE

Featured: Ray camie by Hengst
Romantic and feminine, this piece is a
perfect layering piece and makes a statement on its own as well. Made
from a heavenly blend of hemp and silk this camisole by Hengst has a beautiful drape and a flirty fit while incorporating delicate spaghetti straps and a softly gathered neck edge.
You will need:- 5/8 yd. of fashion fabric, 45″ wide
- 2 yds. of thin rouleau or thin ribbon
- Coordinating thread
Bust measurement: measure just under arms around fullest part of chest.
Back waist length measurement: measure from nape of neck to waistline
PATTERN

CUTTING
Fold fabric in half with right sides together and align selvedges. Pin/baste selvedges.
Chalk out rectangle as illustrated based on your measurements. Cut on chalked outline to yield 2 pieces.
ASSEMBLY
On each piece, turn in each armsyce ¼” twice to the wrong side of the fabric to create a narrow double-rolled hem. Press. Topstitch.
- Do a seam finish on the side seams to neaten the raw edges. (I used pinking shears).
- On one piece, fold in half lengthwise to locate its center. Mark with chalk. From the top edge, measure down 5″. Mark with chalk. Draw a dart ½” on either side of the center mark. Staystitch the “dart” shape.
- Carefully cut the center of the dart. Roll back the cut edge and create a ¼” double rolled edge. Slipstitch the rolled edge. This will be the centerfront slit of the camisole.
- On front and back pieces, turn the top edge under 1/4″. Press. Turn ½” to make a casing. Topstitch.
- With right sides together, layer front on top of back and pin/baste side seams. Stitch using a ½” seam allowance. Press seam open.
- Turn bottom edge under ¼” and fold again ½” to create a hemline. Pin /baste hem. Topstitch.
- Thread rouleau or ribbon through the back casing and from the armhole, through the front casing to the center slit. Tie ends in a bow.

FRINGED CONVERTIBLE SCARF
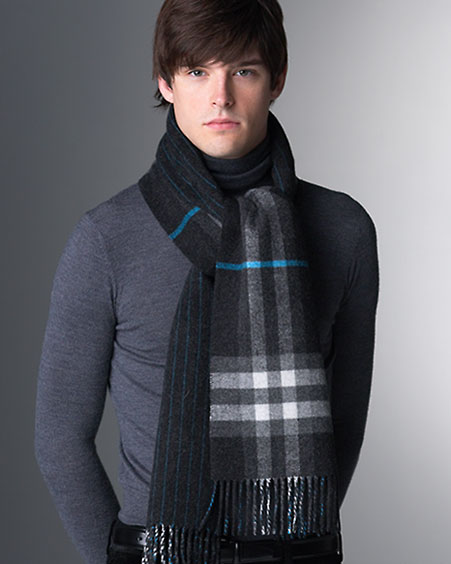
Featured: Burberry
Two of a kind – a fringed scarf with two handsome options. A sleek satin side and a warm wooly side.You will need:
- 2 yds. of wool fabric, 54″ wide
- 2 yds. of printed satin fabric, 45″ wide
- 1 yd. [0.9 m] of Stitch Witchery® bonding web, ½” wide
- Coordinating thread
Straighten the fabric edge you want to fringe.Cut a rectangle shape 72″ X 16″ from the wool fabric.
On the 2 short ends of the rectangle, pull a thread yarn across the fabric at the “depth” line. (1″ wide or as you desire). Use this line as a guide for running small machine stitches to secure the fringe.
To create the fringe, clip every 2-3″ perpendicular to the edge, up to but not through, the stitching or the perpendicular threads (these will be part of the fringe). Complete the fringe by pulling away all the threads below the stitching (I used a straight pin) as shown.
FOR THE SATIN
Cut a rectangle shape 73″ X 16″.
On the 2 short ends, turn ½” under and press.
ASSEMBLY
 Layer
the fabrics, with right sides together, matching the folded ends of the
satin to the “depth” line of the wool fringe. Sew the two long edges of
the rectangle. Press seams open.
Layer
the fabrics, with right sides together, matching the folded ends of the
satin to the “depth” line of the wool fringe. Sew the two long edges of
the rectangle. Press seams open.Turn right side out. Press along the long seams.
Sandwich a 15″ strip of the bonding web between the fabric layers at each short end. Press to fuse the opening close following manufacturer’s direction.
(TIP: Use a presscloth whenever fusing fabric.)
HANDKERCHIEF SKIRT
 A
handkerchief pointed-hem skirt is flattering to all, but especially for
short-legged people because the points break up that horizontal
hemline. No pattern is needed to make this skirt style. It is a simple
block layout.
A
handkerchief pointed-hem skirt is flattering to all, but especially for
short-legged people because the points break up that horizontal
hemline. No pattern is needed to make this skirt style. It is a simple
block layout.
One easy way to get that effect is to hem
two squares of fashion fabric, each having four points (called a
“handkerchief” hem) and layer them for an eight-pointed look.
Experiment with swatches of opaque and transparent fabrics as you
design and discover what happens when you overlap two layers of the same
colour or harmonizing colours. The top layer could be trimmed shorter
than the under layer for a tiered look and the hemline could be
decorated with flat braid trim or fringe, if desired. Be creative!
You will need:- 2 ½ yds. of fashion fabric, 45″ wide
- 1 yd. of waist band elastic, 1″ wide
- Coordinating thread
- 10 yds. of flat ribbon braid (optional)
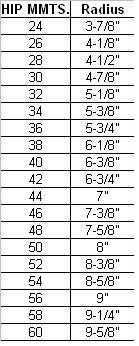 The
size of the circular opening should be just big enough to pull over
your hips, and can then be tightened with elastic. The circumference of a
circle is about 3 times its diameter, so for a person with 44″ hips, a
7″ radius is needed to create the opening. Use the chart provided to
make the circle you need. Fold a square piece of paper in half, then
half again. From folded point, measure out a radius to create a circle
equal to your hip measurement and draw an arc. Cut on this line and open
paper flat. Measure the circumference of your template.*
The
size of the circular opening should be just big enough to pull over
your hips, and can then be tightened with elastic. The circumference of a
circle is about 3 times its diameter, so for a person with 44″ hips, a
7″ radius is needed to create the opening. Use the chart provided to
make the circle you need. Fold a square piece of paper in half, then
half again. From folded point, measure out a radius to create a circle
equal to your hip measurement and draw an arc. Cut on this line and open
paper flat. Measure the circumference of your template.*
ASSEMBLY
Cut 2 squares of fabric doubled the finished length.
Hem each square with a narrow double-rolled hem.
Apply trim (optional) parallel to hem, several inches from the edge. Miter at corners.
Layer both squares, with bottom layer FACE DOWN and top layer FACE UP, as illustrated for an eight-pointed look.
 Place template in center of square and trace out.
Stitch on chalk mark. Cut out center of circle allowing for a ¼” seam allowance.
Turn bottom layer out through the opening so that bottom layer lies flat on top. Press seam flat.
Topstitch around the edge of the circle.
Cut elastic equal to your waist measurement less 3 inches.
Butt the ends of the elastic together and zigzag stitch together.
Sandwich elastic between the 2 layers without twisting the elastic.
Stitch through all layers around the opening to encase the elastic. Make casing slightly wider than the width of elastic.
* TIP: Increase or decrease the circle by 1/8″ to change the overall total circumference measurement by 1/2″.
THE PAJAMA PANT
 These
long and loose bottoms score high on the comfort index. The fabrics are
fluid and the prints are fun, which means they are less for curling up
on the sofa than for spending a weekend afternoon in style. Think silk,
linen, rayon, or cotton…something lightweight and drapy. Balance them
with a body-fitting top or stay faithful to the bedtime look with a big
and beautiful sweater.
These
long and loose bottoms score high on the comfort index. The fabrics are
fluid and the prints are fun, which means they are less for curling up
on the sofa than for spending a weekend afternoon in style. Think silk,
linen, rayon, or cotton…something lightweight and drapy. Balance them
with a body-fitting top or stay faithful to the bedtime look with a big
and beautiful sweater.
Featured: Blue-green silk pajama pants from Dries Van Noten
The cut and fabrication of these loungers
is novice level and fits many shapes and sizes. It’s an easy
“no-pattern” afternoon project.
You need:
- 1 ½ yds. of fashion fabric, 44-45″ wide
- Coordinating thread
- 1 pkg. of 1″ wide waistband elastic or 60″ drawcord
- Tailor’s chalk
- Tape measure
PATTERN
No real pattern is required but if you wish to make several pants you can make a paper template.
Recommended to control the fullness at
the gathered waist is elastic or a drawsting. The waist can accommodate
30″ to 52″ approximately.
For the cut, measure your finished pant length. (waist to heel). Add 1″ for cuff hem allowance and 1 ½ ” for waist casing to this measurement. Record it.
Straighten the cut edges of your fashion fabric and square across the width.
Measure along the selvedge the pant length measurement and square a line across the width with tailor’s chalk
Divide the section equally in half parallel to the selvedge with a chalk line. These are the left and right leg sections.

On each leg section, measure in approx.
2-4″ from the lines. This may vary based on how fitted a bottom cuff you
want (must be able to get your foot through however). Then, measure
along the length and find the midpoint. Chalk a notch. (X and O on diagram). Join Xs and Os to bottom points at hem with a straight edge using chalk.
Take this “midpoint” measurement and plot
it along the waistline. Add 13″ for the rise. Square up on remaining
fabric parallel to selvedge and mark with chalk. This is the gusset section.
Divide the gusset section in half by squaring across the fabric width.
Measure across top and bottom the distance equal to half the leg distance from waistline to X.
Plot it and mark with chalk. Repeat but measure the dividing line from
the opposite end. Join the notches with a straight edge. (see diagram).
Cut on the chalk lines. You will have a left leg side, a right leg side, and 2 pairs of gussets.
ASSEMBLY
Finish raw edges with desired seam finish. (I used pinking shears).
With right sides together, pin and baste a gusset to each center portion of the legs. (Match Xs and Os). Stitch seam and press open.
With right sides together, fold each leg section in half lengthwise and pin and paste inseam from crotch to hem. Stitch inseam and press seam open.
Turn one leg section right side out and place it down the other leg section. Match up CF and CB at waist and align inseams. Pin and baste gussets together and stitch crotch seam. Press open. Turn pants right side out.
Turn under 1/2″ at waistline and press.
Turn under 1″ all round and machine stitch down to create a casing. Open
a slit in the front crotch seam at the waist to insert an elastic or
drawcord. (make elastic equal to your waist measurement less 2″ if using).
Hem bottoms of legs using a 1″ hem allowance.
SHIRRED BORDER PRINT SUNDRESS
 Shirred
sundresses with spaghetti straps are a fun wardrobe item. Whether
you’re hanging out by the pool or just chilling on a summer day, this
dress keeps you looking sweet and fresh all day long. The border print
detail on the fashion model (ASOS Dresses)
adds to the shirred bust panel with thin ribbon tie shoulder straps.
This is a quick little dress that is easy to whip up in a day without a
pattern and looks flattering on most body shapes.
Shirred
sundresses with spaghetti straps are a fun wardrobe item. Whether
you’re hanging out by the pool or just chilling on a summer day, this
dress keeps you looking sweet and fresh all day long. The border print
detail on the fashion model (ASOS Dresses)
adds to the shirred bust panel with thin ribbon tie shoulder straps.
This is a quick little dress that is easy to whip up in a day without a
pattern and looks flattering on most body shapes.
You need:
- Shirring elastic thread
- Coordinating thread
- 2 yds of cotton fabric (border print is optional), 44-45″ wide
1. For the fabric cut, measure the bust and double the measurement and this will be the width of fabric you will need.
Measure from very top of crease of underarm down to where you want the finished length to hit. (I usually prefer the knee or little higher). Add 1 inch to measurement. This will be the length of fabric you will need.

For example, for a size 10/12 and a dress length of 22 inches, the bust is 32 inches.
So fabric needed is approximately 64 x 23 inches for the dress.
From the excess fabric, cut a strip of fabric 1 ½” x 60″ for the ribbon ties.
2. To make it easy, I would find a border print
that would work widthwise (44-45 in) as opposed to the usual
lengthwise. Cut the length of fabric to this measurement. You are going
to do this parallel to the selvedge to make effective use of the border
(railroaded pattern).

On the other hand, for directional cutting
on the straight of grain, cut 2 pieces of fabric (bust mmt. x
finished length + 1″). This dress will have 2 side seams instead of 1
centerback seam.
3. Finish the raw seam edges of the length as desired. (I used pinking shears). Hem the top of the dress using a ¼” double rolled hem finish.
4. Begin shirring
about 3/8″ under the hem stitch line. Continue shirring about 20 to 22
more rows down. Space the shirring about ½” or width of your presser
foot parallel to your last row of shirring. Make sure to hand-wind the
elastic thread onto a bobbin and use regular thread on the top, loosen
your tension slightly and do some backstitching to tack the shirring so
it doesn’t come unsewn.
5. With right sides together, match the raw edges of the back seam and sew it closed. Press seam flat. (I usually do some topstitching to both sides of the seam so it reinforces the seam).
6. Press the fabric strip in half
lengthwise with wrong sides together. Open the fold and align each long
edge to the foldline and press. Refold the strip and edge-stitch along
perimeter of the strip to create the ties. Cut equally into 2 or 4
pieces as desired for ribbon shoulder straps.
7. Try the dress on and mark the placement of the ribbon ties. Sew in place. (When you sew the ribbon ties, I like to sew them on the hemline of the top of the dress and I tack them so they are secure).
8. Hem the bottom of the dress using a ½” hem finish.
EYE PILLOWS FOR RELAXATION

Eye Pillows provide soothing relief in two ways:
- Chill an eye pillow in a ziplock bag in refrigerator or use at room temperature to provide soothing relief for your eyes.
- Heat for up to 30 seconds in the microwave to use as a “mini” heat pad for other parts of your body. (Do not use heated product on your eyes.)
Eye Pillows are perfect for:
- Migraines and other headaches
- Sinusitis
- Rest for tired eyes
- Hand or foot warmers
Eye Pillows are made with 100% cotton covers (size 4″ by 9″) filled with natural grains such as millet or rice, or seeds like flaxseed or linseed, or an herb mix, such as lavender which is a favorite for calming nerves.
Combine Eye Pillows with soothing music and scented candles to maximize your relaxation experience.

To make an eye pillow, select 100% cotton percale or sateen for the inner bag. Cut a rectangle 5″ by 19″ [13 cm by 49 cm].
For the outer cover, select 100% cotton sateen or flannel. Preshrink fabric. Cut a rectangle 5″ by 22″ [13 cm by 56 cm].
To assemble outer cover, turn and stitch a
¼” double-roll hem on each short end of rectangle. Fold one end of
rectangle with right side together (RST) 2″ [5cm] to create a flap. Fold
opposite end of rectangle with RST to align ½” [1.25 cm] short of flap
fold. (see X location on diagram). Stitch through all layers along long edges. Turn right side out.
To assemble inner bag, fold rectangle in
half with RST and stitch along long edges. Turn right side out. Fill bag
with a ½ lb. [200 g] of grain/seed/herb mix. Turn under ½’ [1.25 cm] at
open end to inside and stitch opening closed. Insert inner bag into
cover.
April 19, 2008
MOBIUS SHAWL
 John Lennon sang on the White Album of the Beatles; “Your inside is out, when your outside is in”
to express the paradox of the oneness free from illusion of a
multidimensional world. The German mathematician and astronomer-
theoretician A. F. Möbius
discovered at the beginning of the nineteenth century, that something
with two sides can have one surface: the möbius ring. The inside is the
outside when one joins the two short ends together with a twist into a
ring – think of the cyclic of time; visualize by joining the frontside
to the backside. Isn’t it amazing?
John Lennon sang on the White Album of the Beatles; “Your inside is out, when your outside is in”
to express the paradox of the oneness free from illusion of a
multidimensional world. The German mathematician and astronomer-
theoretician A. F. Möbius
discovered at the beginning of the nineteenth century, that something
with two sides can have one surface: the möbius ring. The inside is the
outside when one joins the two short ends together with a twist into a
ring – think of the cyclic of time; visualize by joining the frontside
to the backside. Isn’t it amazing?
The möbius ring is a popular pattern used
by knitters to create scarves and wraps into wonderful fashion
accessories out of yarn. I thought the same idea could be achieved by
using double faced fabrics such as Yukon fleece. Both sides of the
fabric are identical and raw edges do not fray.
The shoulder shawl, similar like the one above designed by Judy Scott of Mountain Color Yarns http://www.mountaincolors.com, can be easily made from a rectangle of two-ply polar fleece. No pattern is needed.
- Start with a rectangle (ABCD) approx. 20″ long x 60″ wide.
- Give the rectangle a half twist.
- Align the short ends so that they overlap and A matches D and B matches C.
- Stitch through the overlapped layers and trim closely to the stitching.

ECO-FRIENDLY TOTES

You buy organic, ride public transit and recycle. It’s time to achieve the truly ultimate green lifestyle. Create your own reusable canvas shopping tote bag to replace your plastic and paper bags.
Eco-friendly and reusable, you can design a
wide-range of fashionable organic totebags — numerous styles, sizes, and
colours. These sustainable alternatives to your traditional shopping
bags are often made using hemp, bamboo or, most popular of all, organic cotton.
What you will need:
Self fabric – 1/2 yd. of 54″ width natural fibers
Contrast fabric – 3/4 yd. of 54″ width natural fibers
Matching thread
Card or Bristol board – 6″ x 18″
If you want to launder the tote, serge or zigzag the edges of the fabric, preshrink it in the washer and dryer, then cut the bag pieces to size. (note: allow extra yardage if preshrinking)
You should have a new sewing machine needle for this project and match the size to the weight of fabric being used.
All seam allowances are ½” unless stated otherwise. RST = right sides together.
INSTRUCTIONS
Step 1: No pattern is needed. From self fabric [A], cut two 25″ x 14″ panels.
From contrast fabric [B], cut one 25″ x 15″ rectangle for bottom section, two 19″ x 7″ rectangles for the base, and a strip 54″ x 5″ for the handles.
Step 2: Fold fabric B in half lengthwise. Cut out a 2.5″ square at the lower corners of each folded end.

Step 3: For bag straps,
fold strip in half lengthwise with WST and press. Open strip and fold
raw edges to centerfold. Refold strip on pressed fold. Edge-stitch along open edge, then edge-stitch along fold. Press. Cut in half for handles.
Step 4: Press under top edge of each panel section (fabric A)
1-1/4″ turn. Divide top edge into thirds and mark with a pin. Open
folded edge of front panel and place face up. Align strap ends to each
pin location and stitch ends in place along edge. Repeat on back panel.
Step 5: Stitch each panel section to bottom section along its width, with RST. Press seams to one side.
Step 6: Fold body of bag in
half with RST, aligning side seam at seam of contrasting fabric and at
top edge foldline. Stitch fabric pieces together on the sides and press
open.
Step 7: Matching the side and bottom seams of the fabric at point X, stitch across corners.
Step 8: Turn under ¼” along bag top and turn under foldline to create a 1″ facing at the top opening. Drop straps inside bag. Stitch facing at top edge catching the handles on the front and the back.
Step 9: Then, flip strap handles up, out of bag. Stitch 1/4″ topstitching at top edge catching handles once more to reinforce.
Step 10: On each base piece, press under seam allowance on one short end. With RST, match both pieces and stitch around edges leaving folded edge open. Grade corners. Turn right side out and slip in cardboard. Stitch open edge closed. Drop lined base into bottom of bag to reinforce.
EASY FIT YOGA PANTS

Use full width of 45″ fabric and select a fabric that can be cut in either direction. (eg. up or down its length). I prefer a lightweight fabric as it gathers easily with an elastic waist.
Straighten cut ends to a right angle [90 degree].
Fold the fabric, with right sides together (RST), in half lengthwise so that selvedges align. Chalk out 2 lengths for each pant leg.

The minimum outseam length is the measurement from your waistline, over the buttock and down the leg to your heel. Take this measurement while touching your toes. Add 2″ for a waist casing, 1″ for hem allowance and 1″ for seam allowance [total = 4"]. Square across fabric width. (see cutting diagram)

At bottom of rectangle, measure half the distance from foldline to selvedge to create the leg cuff . This measurement may be tapered if you desire a smaller opening at the ankle.
For the rise, measure down 13″ from the waist along the selvedge edge. Join this point with the leg cuff point with a straight line.
The remaining piece of fabric from the leg cut with be inverted and become the leg gusset. [2 pieces for each leg].
 Open each leg and sew a gusset piece to each inseam RST using a ½” seam allowance. Press seam open.
Fold each leg portion RST and align gusset seams. Sew using ½” seam allowance. Press seam open.
Turn one leg inside out. Insert right-side-out leg into inside-out leg with RST. Sew up crotch seam using ½” seam allowance. Turn legs right side out.
Turn under ½ ” seam allowance along waist edge. Press. Turn under 1-1/2″ once more to create casing. Sew along fold edges. Casing may be for elastic or a drawcord. Leave an opening to insert drawcord or elastic.
Turn up hem allowance ½” and press. Turn ½” again and sew double-turned hem.
Front and back of pants are the same, so if I use an elastic waist I sew a small button to inside CF. This “belly button” indicates the front of my pants.
T-SHIRT WITH A TWIST
Turn a plain T-shirt into a high fashion wrap top, lickety-split.
Wrapping is a big component of this summer’s fashion look. If you have a plain cotton T-shirt, you can have a hot fashion item in no time.
STEP 1 Cut up center front to within 5cm (2 in.) of armhole.
STEP 2 Fold in half along center back and center front. Cut a diagonal line as shown in diagram. Cut removed section in half along center back fold line to create two ties.
STEP 3 With right sides together, stitch short edges of one tie diagonally across bottom of one point at bottom front of T-shirt . Repeat with second tie.
STEP 4 Zigzag-stitch all raw edges; turn under 1.5 cm (5/8 in.); topstitch.
To wear, cross ties at the front, wrap around to the back and secure in a snug knot.
December 30, 2007
SMOCKED WRAP
Posted by Don under apparel design | Tags: accessories, fashion, patternless design, sewing |[4] Comments
 Smocked Wrap
You will need:
- approx. 5 yds. of 45-inch wide satin or iridescent fabric
- matching thread
To begin, straighten cut ends of fabric so that it is a right angle (90°) to the selvedge of the cloth. This can be achieved by drawing a crosswise thread or fraying the cut edge. Cut the crosswise edge straight.

Fold the cut edge to align with the selvedge edge from bottom to top. This with create the true bias line. Mark with chalk.
Repeat step 1 and 2 on opposite end of cloth, from top to bottom. The two triangles will be the front and back of the wrap.
With the remaining fabric, mark 9 bias strips (14.5 inches wide) parallel to one another, following the true bias (see diagram). This is the ruffle. Cut fabric along all chalk lines.
To assemble the ruffle, join each strip to one another at the short ends. Fold the long bias trim strip in half lengthwise, with wrong sides facing, and run a gathering stitch along the raw edges.
To assemble ruffled trim with body, begin by rounding the pointed ends of each triangle.(a saucer makes a perfect template). Then baste gathered ruffle to right side of the fabric, aligning all raw edges, along the perimeter of one of the triangles. Stitch gathered trim into place.
To complete the wrap, place the second triangle with right sides facing to the trimmed body piece (the trim will be sandwiched between each body piece) aligning all raw edges. Pin and baste together. Stitch around the perimeter, following the previous row of stitching, allowing a 4″ opening along one straight edge. Turn right side out and slipstitch opening closed.

To create the smocked effect, handstitch several running stitches in a circular shape throughout the body portion in a random pattern. (see diagram)
Draw up on each running stitch to gather up fabric and tie off. Hide loose ends of thread by sinking it into wrong side of fabric.
No comments:
Post a Comment